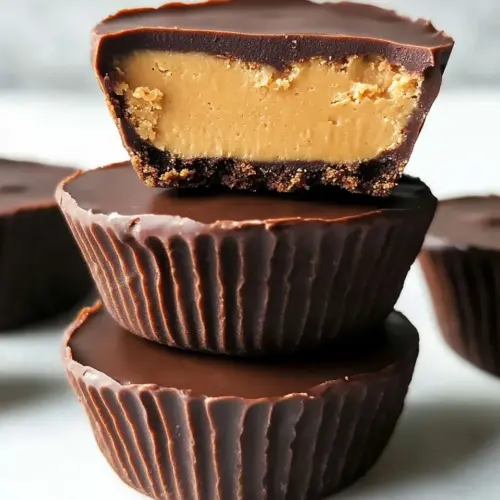
Protein Peanut Butter Cups
Satisfy your sweet cravings with homemade Protein Peanut Butter Cups. Creamy peanut butter blended with rich dark chocolate creates a delicious and nutritious treat. Perfect for meal prepping or enjoying after a workout, these cups are a delightful way to indulge without the guilt. Make a batch today!
Equipment
- Wooden Spoon
- Mixing Bowl
- Frying Pan
- Large Pot
Ingredients
- ½ cup Peanut Butter
- ¼ cup Collagen Peptides
- 2 tablespoons Maple Syrup
- ½ teaspoon Fine Sea Salt
- 1 cup Dark Chocolate Chips see notes
- 2 teaspoons Coconut Oil
Instructions
- Line a standard muffin pan with 9 parchment paper liners. This helps to easily remove the cups once they are set. You want to ensure you have a good foundation for your Protein Peanut Butter Cups.
- To melt the chocolate, add an inch of water to a small saucepan and bring it to a boil on the stovetop. This method is gentle, preventing the chocolate from burning. While waiting, gather your chocolate chips and coconut oil.
- In a heat-safe bowl that fits snugly over the top of the saucepan, combine the chocolate chips and coconut oil. The steam will warm the bowl, gently melting the chocolate. Stir occasionally until the mixture is smooth and creamy.
- Add 2 teaspoons of the melted chocolate to each muffin liner. This first layer forms the base. Tilt the pan gently on all sides, ensuring the chocolate coats the lower edges of each cup. This step is optional but recommended for a nice chocolatey edge.
- Once done, place the pan on a flat shelf in your freezer. This allows the bottom layer to firm up while you prepare the filling.
- In a medium bowl, combine the peanut butter, collagen, maple syrup, and fine sea salt. Stir well until the mixture looks uniform and creamy. This is where all the delicious flavors meld together.
- Remove the pan from the freezer and scoop about a tablespoon of the peanut butter mixture into the center of each muffin cup. Gently flatten the tops with your fingers. Be careful not to spread it all the way to the edges; leave space for more chocolate on top.
- Pour 2 teaspoons of the remaining melted chocolate on top of each cup, spreading it around evenly with the back of a spoon. Top with flaky sea salt if desired. It adds a lovely crunch and an extra burst of flavor.
- Return the pan to the freezer and allow them to firm up for about 10 minutes. After that, they should be set and ready to enjoy!
- Transfer your Protein Peanut Butter Cups to an airtight container to preserve their flavor. They can be stored in the fridge for up to a month. Serve chilled for the best texture, as they can melt in your hands if they warm up too much.
Notes
Tip 1: Nutrition information is for 1 peanut butter cup, assuming you use all of the melted chocolate (you might not!) and get 9 cups from this batch. This information is automatically calculated so it’s just an estimate, not a guarantee.
Tip 2: Want to make a holiday shape? Turn this recipe into Peanut Butter Hearts or Peanut Butter Eggs, instead.
Tip 3: For a lower calorie treat, you can reduce the dark chocolate chips to only ¼ cup. In this case, you’ll only be able to coat the top of each peanut butter cup.
Tip 4: This recipe is dairy-free when you use allergy-friendly chocolate chips, such as Enjoy Life brand.