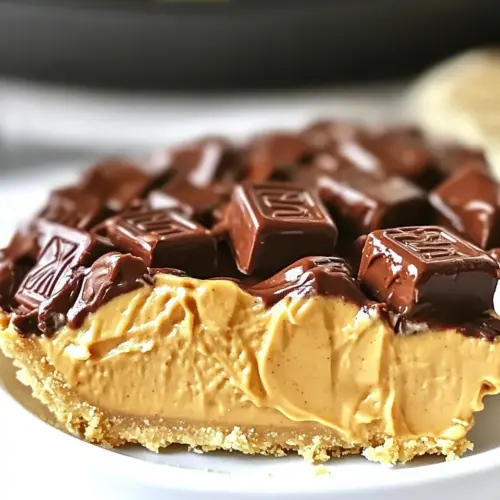
No Bake Peanut Butter Twix Pie
The ultimate creamy and crunchy dessert, the No Bake Peanut Butter Twix Pie combines rich peanut butter filling with a crispy cookie crust. Indulge in this easy, decadent treat that's perfect for any occasion, and delight your family and friends tonight!
Equipment
- Wooden Spoon
- Mixing Bowl
Ingredients
- 2 cups shortbread cookie crumbs like Lorna Doone, about 30 cookies
- 6 tablespoons butter melted
- 8 ounces cream cheese room temperature
- 1 cup peanut butter I use Skippy Naturals, you can also use regular.
- ½ cup granulated sugar
- 1 teaspoon vanilla extract
- 2 ounces semi-sweet chocolate
- 1 ½ containers Cool Whip (fat-free, regular, or sugar-free)
Instructions
- Start by preparing your crust. In a mixing bowl, combine the shortbread cookie crumbs and melted butter. Use a fork to mix the two together until the crumbs are well-coated and resemble wet sand. The mixture should hold together when pressed. Once ready, press the crumb mixture firmly into a 9-inch pie plate, ensuring an even layer across the bottom and up the sides. Chill the crust in the refrigerator for at least 30 minutes to set.
- While the crust is chilling, prepare the filling. In a large mixing bowl, beat the cream cheese with a hand mixer until it's smooth and creamy. Make sure to scrape down the sides of the bowl as you go to ensure even mixing. Once the cream cheese is smooth, add in the peanut butter, granulated sugar, and vanilla extract. Mix until everything is fully combined and there are no lumps remaining. The mixture should be creamy and thick, with a delicious peanut butter aroma.
- Next, gently fold in one container of Cool Whip into the peanut butter mixture. Use a spatula to carefully incorporate the Cool Whip without deflating it too much. The filling will be light and fluffy, but still thick enough to hold its shape. Once combined, spread the filling evenly into the chilled pie crust. Use a spatula to smooth the top for a great presentation.
- Now it’s time to prepare the chocolate topping. In a microwave-safe bowl, melt the semi-sweet chocolate in 30-second increments. Stir the chocolate between each increment to ensure it melts evenly without burning. After about one minute, the chocolate should be completely melted and smooth. Be careful not to overheat it; you want it just melted.
- Once the chocolate is melted, stir in one cup of Cool Whip until well combined. This will create a creamy, luscious chocolate topping. Spread this chocolate mixture over the top of the pie, covering the filling entirely. The contrast of the chocolate against the creamy filling is visually appealing and adds to the flavor.
- Finally, place the pie back in the refrigerator to chill for at least 4 hours, or preferably overnight. This allows all the flavors to meld together and ensures a firm structure when slicing. When ready to serve, remove the pie from the fridge and slice it into wedges. You can serve it plain or add extra dollops of Cool Whip on top for a little extra indulgence.
Notes
- Tip 1: Store any leftovers in the refrigerator for up to 3 days. Just make sure to cover it to keep it fresh.
- Tip 2: Chill the pie for at least 4 hours or overnight to ensure it sets properly.
- Tip 3: Consider adding a sprinkle of crushed peanuts or chocolate shavings on top for garnish before serving.
- Tip 4: Try using different nut butters for a twist on the flavor!
- Tip 5: This pie pairs wonderfully with a cup of coffee or a scoop of vanilla ice cream.