Baked Pita Chips
Craving a deliciously crunchy snack? Try these Baked Pita Chips! Crispy, flavorful, and easy to make, they’re the perfect addition to any gathering or a delightful treat for yourself. Make them tonight for a snack that’s healthier than store-bought options!
Equipment
- Food Processor
- Oven
- Blender
- Baking Sheet
Ingredients
- 4 pita bread rounds pita bread
- 1/4 cup extra virgin olive oil
- Salt
- Garlic powder (optional)
- Za'atar seasoning OR dried parsley flakes and sesame seeds
Instructions
- First, preheat your oven to 400 degrees F. This is the perfect temperature for achieving that golden brown color we all love in chips.
- Next, take a baking sheet and brush it with a generous amount of olive oil, ensuring it’s coated evenly. This will prevent the chips from sticking and contribute to their crispiness.
- Now, grab your first pita round and brush the top with more olive oil. Make sure to cover it completely, as this will enhance the flavor and texture.
- Sprinkle salt over the pita to your taste. If you're feeling adventurous, add a light dusting of garlic powder for an added depth of flavor.
- If using, liberally sprinkle za'atar seasoning across the top. Remember, some blends contain salt, so adjust your seasoning accordingly.
- If you don’t have za'atar, don’t worry! You can substitute it with dried parsley flakes and sesame seeds for a different flavor profile that still tastes amazing.
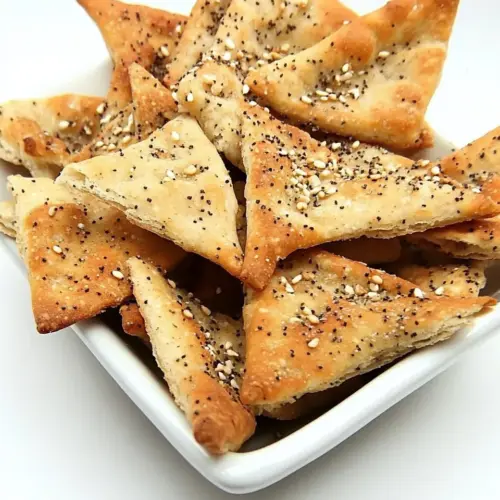
- Cut the pita in half, then into quarters, and finally into eighths, creating eight equal-sized triangles. This is where the fun begins!
- Place the pita triangles on the oiled baking sheet, seasoning-side facing up. Be sure to keep them in a single layer for even cooking.
- Once all your pita is on the sheet, pop it into the oven. Bake for about 8 to 10 minutes, but keep an eye on them. Chips can turn from golden to burnt quickly!
- When they’re perfectly crisp and golden brown, remove them from the oven and let them cool. They’ll get even crunchier as they do.
- Lastly, serve your Baked Pita Chips on their own or with your favorite dip like hummus or baba ghanoush. Store any leftovers in a sealed container to keep them fresh!
Notes
- Tip 1: You will also need: A baking sheet
- Tip 2: Store your pita chips in a sealed container to maintain their crispiness. They can last for a week if kept airtight.
- Tip 3: You can freeze any unbaked, seasoned pita triangles. Just place them in a single layer on a baking sheet, freeze until solid, then transfer to a zip-top bag for future baking.
- Tip 4: These chips are fantastic with dips like hummus, tzatziki, or babaghanoush, making your snack time more delightful.
- Tip 5: Experiment with different herbs or spices to suit your taste—try paprika, cumin, or even chili powder for a twist!
- Tip 6: Portion your pita chips into small bowls or snack bags to keep yourself from overindulging!