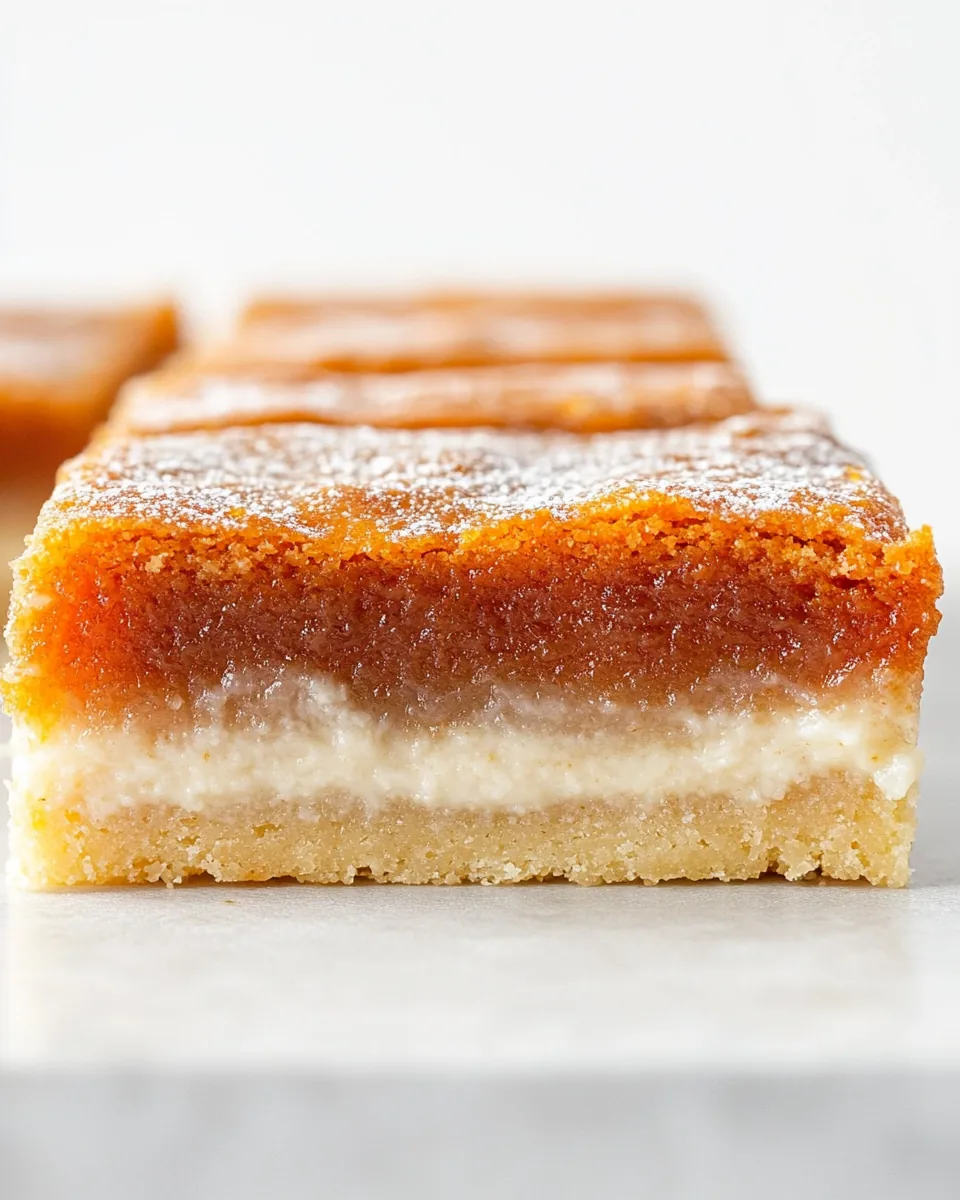
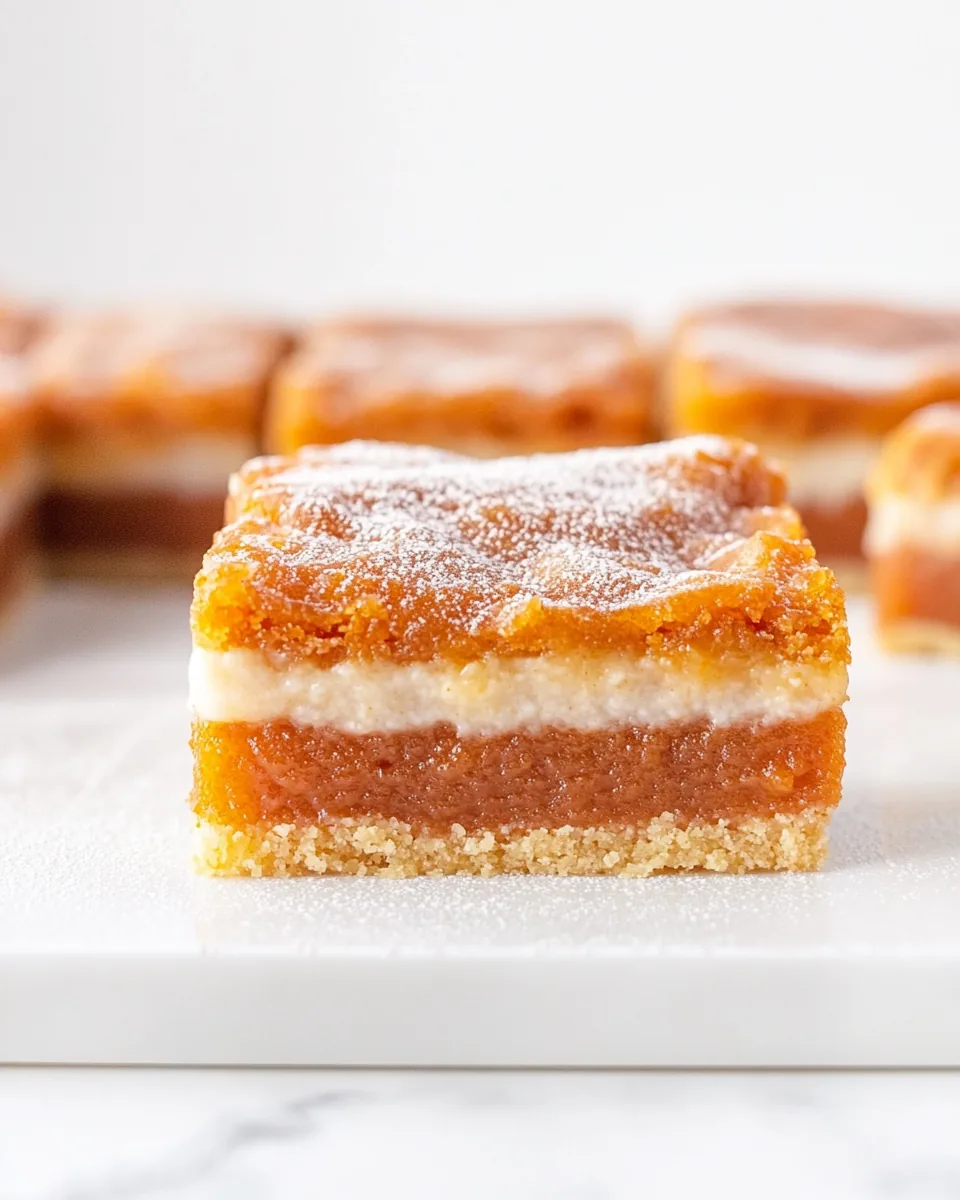
Pumpkin Bars
There’s something about the changing leaves and the crisp air that brings out my love for baking, and nothing captures that spirit quite like Pumpkin Bars. As soon as I smell the warm spices of cinnamon and nutmeg, I’m instantly transported to cozy family gatherings and the charm of autumn. These bars are more than just a dessert; they’re a celebration of the season. Whether enjoyed at a festive Thanksgiving dinner or as an afternoon treat with a steaming cup of coffee, they evoke a sense of comfort and nostalgia. Imagine cutting into a warm, soft bar, the rich pumpkin filling oozing out slightly, while a sweet glaze drizzles over the top—it’s pure bliss! Making Pumpkin Bars has become a cherished annual tradition in my home, where family members eagerly anticipate their arrival each fall. With each bite, you experience the warmth and love baked right in, making them a perfect way to share joy with friends and family.
Recipe Snapshot
55 mins
25 mins
30 mins
Medium
220 kcal
2 g
Gluten-Free, Low FODMAP
10 g
Frying Pan, Whisk, Oven, Mixing Bowl, Baking Sheet
What We Adore About This Pumpkin Bars
Perfect for Fall Gatherings
There’s no denying that Pumpkin Bars are the ultimate fall treat. The rich flavor of pumpkin paired with warm spices creates a delightful harmony that embodies the essence of the season. They’re perfect for gatherings, whether it’s a cozy family dinner or a larger Thanksgiving celebration. Everyone loves them!
Easy to Make
What I adore about this recipe is its simplicity. Even if you’re a novice in the kitchen, you can whip up these bars with ease. The steps are straightforward, allowing you to focus on enjoying the process rather than stressing over complicated techniques. Plus, the cleanup is minimal, which is always a win!
Irresistible Texture
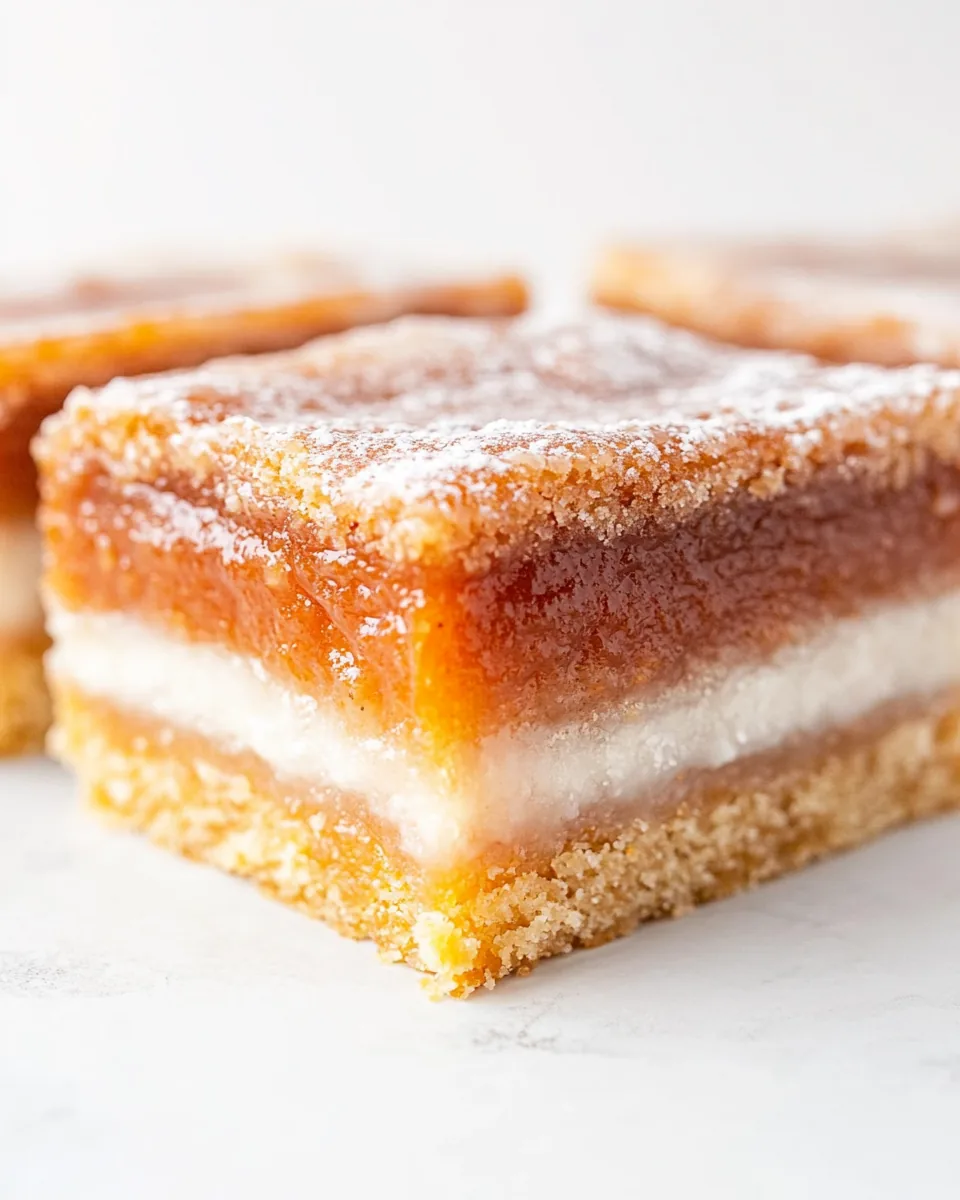
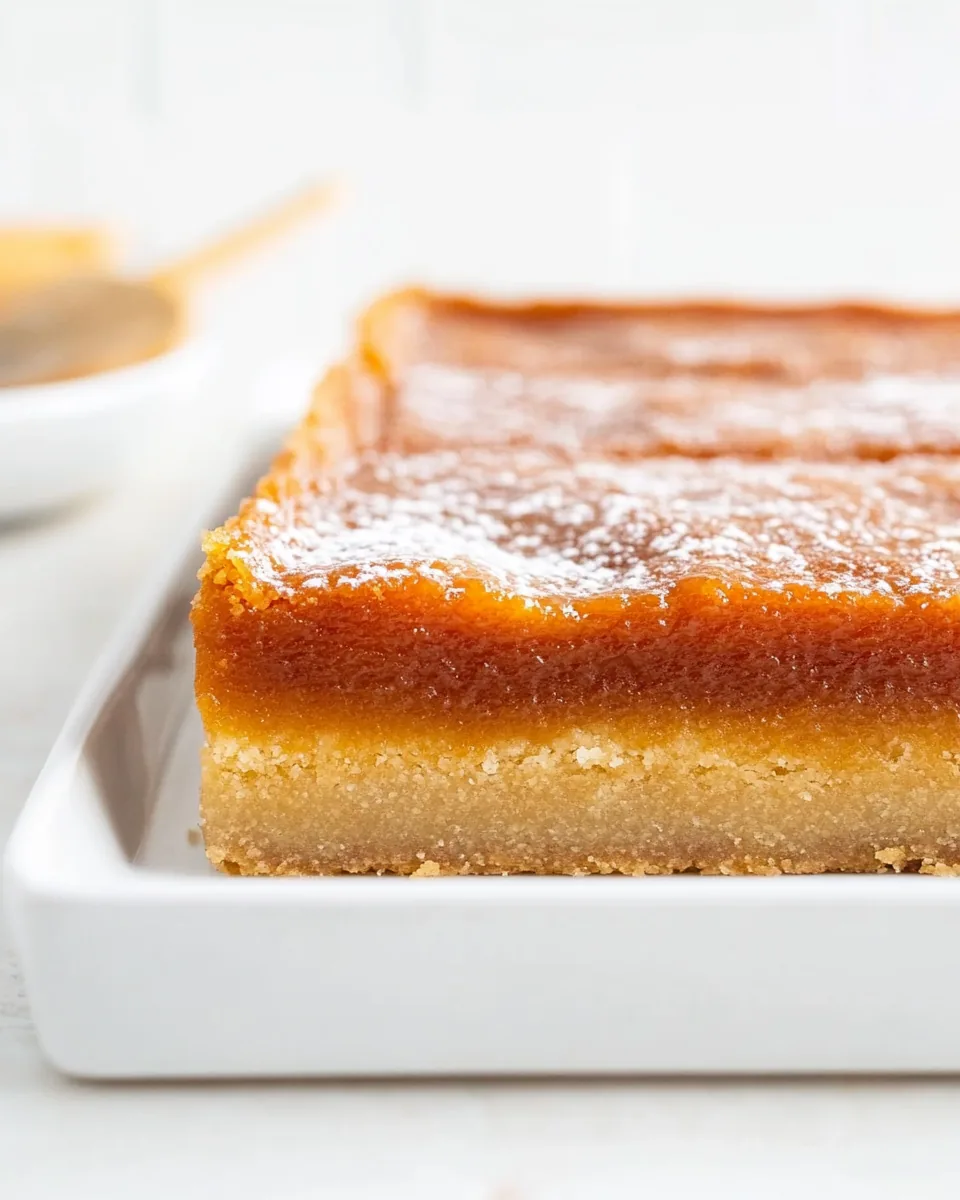
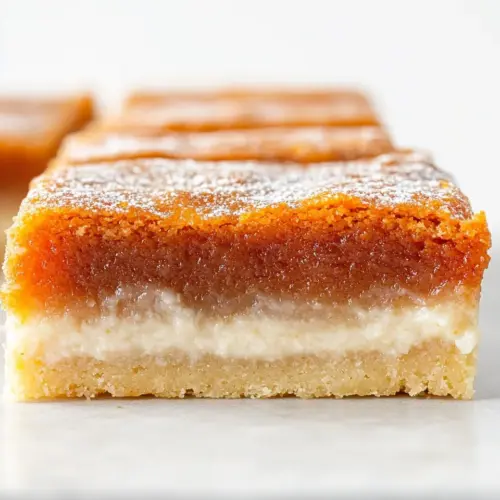
The texture of these bars is another reason to fall in love with them. They’re soft and moist but still hold together beautifully, making them easy to cut and serve. Each bite is a delightful explosion of flavor, and the slight chewiness complements the creamy pumpkin filling perfectly.
Versatile Enjoyment
Pumpkin Bars are incredibly versatile! You can enjoy them as a sweet snack, dessert, or even a breakfast treat with a hot cup of coffee. They are also a fantastic addition to potlucks or bake sales, where they are sure to impress with their beautiful glaze and festive appearance.
Perfect for Sharing
These bars are perfect for sharing, making them an ideal dish for any social occasion. Friends and family alike will gather around, eager to taste the deliciousness you’ve created. The joy of sharing food is amplified with the gift of homemade Pumpkin Bars, leaving everyone with a smile.
Customizable Toppings
One of the best parts about Pumpkin Bars is the potential for customization. You can easily swap out the glaze for a cream cheese frosting or add nuts for some crunch. This flexibility allows you to tailor the recipe to your liking, ensuring that every batch is a little different and perfectly suited to your tastes.
Ingredients to Make Pumpkin Bars
When it comes to Pumpkin Bars, the ingredients are key to achieving that comforting flavor and texture. Each component plays a crucial role, from the warm spices that define the season to the creamy pumpkin that brings it all together. Here’s a closer look at what you’ll need.
- 2 cups granulated white sugar
- 1 cup (2 sticks) salted butter, at room temperature
- ½ teaspoon salt
- 4 large eggs
- 1 teaspoon vanilla extract
- 3 cups all-purpose flour
- One 30-ounce can pumpkin pie mix
- 1 cup powdered sugar
- ½ teaspoon vanilla extract
- 2 to 3 tablespoons milk
Making This Pumpkin Bars
Making Pumpkin Bars is a delightful experience that fills your kitchen with the warm aromas of fall. Let’s dive into the process and create something truly special!
- Preheat your oven to 350℉. Prepare a 15x10x1-inch baking pan by spraying it with nonstick spray. This ensures that your bars come out clean and don’t stick to the pan.
- In a large bowl, cream together 2 cups of granulated white sugar, 1 cup of salted butter, and ½ teaspoon of salt using an electric mixer. Mix until the mixture is light and fluffy—this can take about 3 to 5 minutes.
- Next, add in the 4 large eggs, one at a time, beating well after each addition. This step is crucial for incorporating air into the batter, which helps to create that perfect texture.
- Once the eggs are well mixed in, add 1 teaspoon of vanilla extract. Mix until everything is combined. You should have a smooth and creamy mixture at this point.
- Gradually add in 3 cups of all-purpose flour, mixing just until combined. Be careful not to overmix, as this can lead to denser bars.
- Spread approximately 3 cups of this dough into the prepared baking pan, creating an even layer. This will serve as the base for your delicious Pumpkin Bars.
- Open the can of pumpkin pie mix and spread it evenly over the dough in the pan. This adds that rich pumpkin flavor that we all love during the fall.
- Using a spoon, drop teaspoonfuls of the remaining dough over the pumpkin filling, creating a topping layer. Don’t worry if it’s not perfect; the bars will look beautiful once baked!
- Place the pan in the preheated oven and bake for 30 to 35 minutes, or until the top is golden brown and a toothpick inserted in the center comes out clean. The aroma will be incredible!
- Once baked, allow the bars to cool in the pan on a wire rack. This helps to set the structure and makes them easier to cut.
- Meanwhile, in a medium bowl, whisk together the glaze ingredients: 1 cup of powdered sugar, ½ teaspoon of vanilla extract, and 2 to 3 tablespoons of milk. Adjust the milk until you achieve your desired consistency.
- Once the bars are cool, drizzle the glaze over the top, ensuring it settles into all the nooks and crannies. Let the glaze set for a few moments before cutting into squares and serving!
Things Worth Knowing
- Tip 1: Always preheat your oven! This ensures that your bars bake evenly and rise beautifully.
- Tip 2: Let the bars cool completely before cutting. This helps prevent them from crumbling apart.
- Tip 3: When mixing the batter, be gentle when folding in the flour to keep the texture light and fluffy.
- Tip 4: Feel free to add nuts or chocolate chips to the dough for an extra flavor twist!
Change It Up
When it comes to Pumpkin Bars, there are plenty of ways to make them your own! Here are some ideas to inspire you:
- Storage: Store leftovers in an airtight container at room temperature for up to 3 days, or in the fridge for longer freshness.
- Freezing: These bars freeze beautifully! Wrap them tightly in plastic wrap, then place in a freezer bag or container for up to 3 months.
- Pairing: Serve with whipped cream on top for a delicious twist, or alongside your favorite fall beverage like apple cider.
- Spice It Up: Try adding extra spices like nutmeg or ginger for a more robust flavor.
- Glaze Alternatives: Experiment with different glazes, such as cream cheese frosting for a sweeter option.
Side Dish Ideas for Pumpkin Bars
Serving Pumpkin Bars can be a delightful experience, especially when paired with the right accompaniments. Here are some ideas to elevate your serving game:
- Whipped Cream: A dollop of whipped cream on top adds a creamy texture and complements the spiced flavor beautifully.
- Coffee: Pairing these bars with a warm cup of coffee or chai tea can be a comforting afternoon treat.
- Ice Cream: For an indulgent dessert, serve with a scoop of vanilla or caramel ice cream.
- Seasonal Fruits: Fresh apples or pears can provide a refreshing contrast to the rich flavors of the bars.
- Cheese Platter: Offering a cheese platter with mild cheeses can balance the sweetness of the bars, making it a great pairing for gatherings.
- Nut Mix: A light nut mix can add a crunchy texture, making for a delightful contrast with the soft bars.
FAQ
Conclusion
These Pumpkin Bars truly capture the essence of fall with their warm flavors and comforting texture. They’re perfect for sharing with family and friends during the holiday season, or enjoying as a special treat any time of year. I encourage you to give this recipe a try; you won’t regret it! Enjoy the process of baking, and savor each delicious bite.
Pumpkin Bars
Equipment
- Frying Pan
- Whisk
- Oven
- Mixing Bowl
- Baking Sheet
Ingredients
- 2 cups granulated white sugar
- 1 cup salted butter at room temperature
- ½ teaspoon salt
- 4 large eggs
- 1 teaspoon vanilla extract
- 3 cups all-purpose flour
- 30 ounce pumpkin pie mix
- 1 cup powdered sugar
- ½ teaspoon vanilla extract
- 2 to 3 tablespoons milk
Instructions
- Preheat your oven to 350℉. Prepare a 15x10x1-inch baking pan by spraying it with nonstick spray.
- In a large bowl, cream together 2 cups of granulated white sugar, 1 cup of salted butter, and ½ teaspoon of salt using an electric mixer. Mix until the mixture is light and fluffy.
- Next, add in the 4 large eggs, one at a time, beating well after each addition. This step is crucial for incorporating air into the batter.
- Once the eggs are well mixed in, add 1 teaspoon of vanilla extract and mix until everything is combined.
- Gradually add in 3 cups of all-purpose flour, mixing just until combined.
- Spread approximately 3 cups of this dough into the prepared baking pan.
- Open the can of pumpkin pie mix and spread it evenly over the dough in the pan.
- Using a spoon, drop teaspoonfuls of the remaining dough over the pumpkin filling, creating a topping layer.
- Place the pan in the preheated oven and bake for 30 to 35 minutes, or until the top is golden brown.
- Once baked, allow the bars to cool in the pan on a wire rack.
- In a medium bowl, whisk together the glaze ingredients: 1 cup of powdered sugar, ½ teaspoon of vanilla extract, and 2 to 3 tablespoons of milk.
- Once the bars are cool, drizzle the glaze over the top, ensuring it settles into all the nooks and crannies.
Notes
- Tip 1: Store leftovers in an airtight container at room temperature for up to 3 days.
- Tip 2: These bars freeze beautifully! Wrap them tightly in plastic wrap.
- Tip 3: Serve with whipped cream on top for a delicious twist.
- Tip 4: Add extra spices like nutmeg for a more robust flavor.
- Tip 5: Experiment with glazes, like cream cheese frosting.