Garlic Cheese English Muffin Mummies
There’s something magical about the delightfully spooky Garlic Cheese English Muffin Mummies that brings out the child in all of us. I remember the first time I made these for Halloween; the kids were absolutely thrilled to see these little monsters emerge from the oven. With their gooey cheese and fun olive eyes, they’re not just a meal; they’re an experience. It’s the perfect way to combine creativity with cooking, and trust me, they vanished faster than I could set them on the table!
Recipe Snapshot
15 mins
10 mins
5 mins
Medium
200 kcal
8 g
Keto, Gluten-Free
9 g
Chef’s Knife, Mixing Bowl, Oven, Baking Sheet
What Makes This Garlic Cheese English Muffin Mummies Special
They’re Fun to Make Together
One of the best parts about making Garlic Cheese English Muffin Mummies is that it’s a hands-on experience perfect for family time. Kids love getting involved, whether it’s layering the cheese or placing the olive eyes. Watching them create their own little monsters is a joy that stretches beyond just cooking.
Perfect for Halloween Themed Parties
These mummies make an excellent addition to any Halloween-themed gathering. They not only taste delicious but also serve as a fantastic talking point among guests. The playful design of the Garlic Cheese English Muffin Mummies will definitely impress your friends and make the party memorable.
Quick and Easy to Prepare
When you’re busy with party preparations, the last thing you want is a complicated recipe. Luckily, these mummies are incredibly simple to whip up. With just a few ingredients and minimal prep, you can have a delicious appetizer ready in no time. It’s practicality meets fun!
Versatile Flavor Combinations
While the classic recipe is fantastic as is, feel free to get creative! You can add other toppings like chopped herbs or different types of cheese, allowing you to customize the flavor to your liking. The Garlic Cheese English Muffin Mummies will always be a hit, no matter how you tweak them!
Great for Leftovers
These mummies taste just as good the next day! If you happen to have any leftovers after your Halloween festivities, they make for a tasty snack. Simply pop them in the microwave or toaster oven to warm them up, and you’ll be enjoying these little delights all over again.
Everything You Need for Garlic Cheese English Muffin Mummies
When creating the scrumptious Garlic Cheese English Muffin Mummies, the ingredients play a critical role in achieving that delicious combination of flavors. Each component contributes a unique texture and taste, making the dish delightful. Let’s take a closer look at the key players!
- 3 English muffins (halved) – The base of our mummies, providing a sturdy and chewy texture that complements the toppings.
- 2 tablespoons extra-virgin olive oil – This adds richness and helps the garlic blend beautifully with the muffins.
- 1 medium garlic clove (finely minced) – Infuses the dish with a robust flavor that pairs perfectly with the cheese.
- Pinch kosher salt – Enhances the flavors of the other ingredients and helps everything come together.
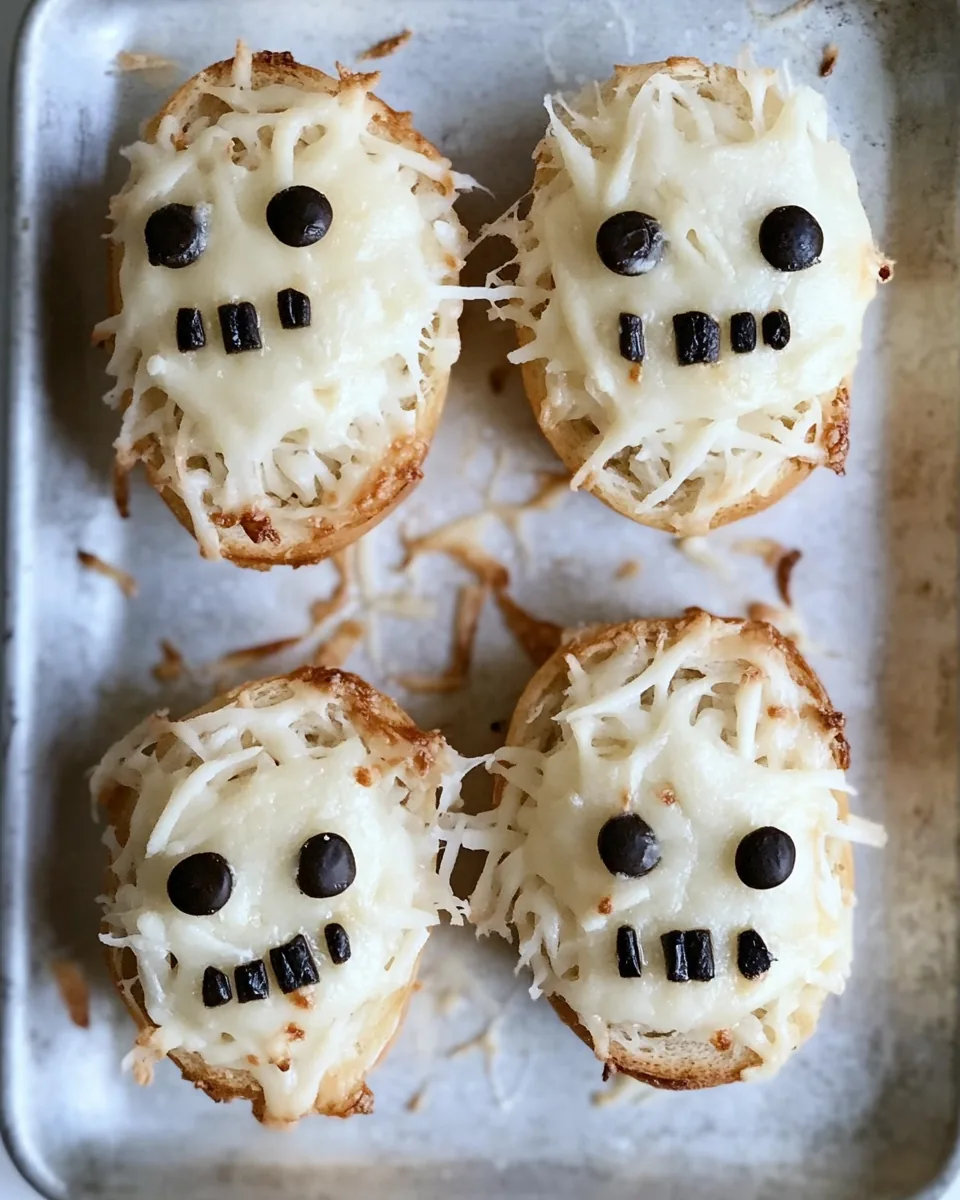
- 6 string cheese sticks (unwrapped and pulled into strips) – The star ingredient that gives our mummies their cheesy goodness and fun appearance.
- 3-4 large black pitted olives (sliced) – These serve as the spooky eyes, adding a fun and whimsical touch to the dish.
The Process for Making Garlic Cheese English Muffin Mummies
Now that we have our ingredients ready, let’s get into the fun part: making the Garlic Cheese English Muffin Mummies. This process is straightforward and enjoyable, allowing you to unleash your creativity. Follow these steps to create your own mummy masterpieces!
- Preheat your oven to 350 degrees Fahrenheit. It’s important to get the oven nice and hot so that the cheese melts perfectly.
- Next, lay the English muffins cut-side up on a baking sheet. Make sure they’re spaced out evenly to allow for proper cooking.
- In a small bowl, mix together the olive oil, garlic, and a pinch of kosher salt. This mixture is what will give your mummies that delectable garlic flavor.
- Brush the olive oil mixture generously onto the surface of the English muffins. Don’t be shy; the more flavor, the better!
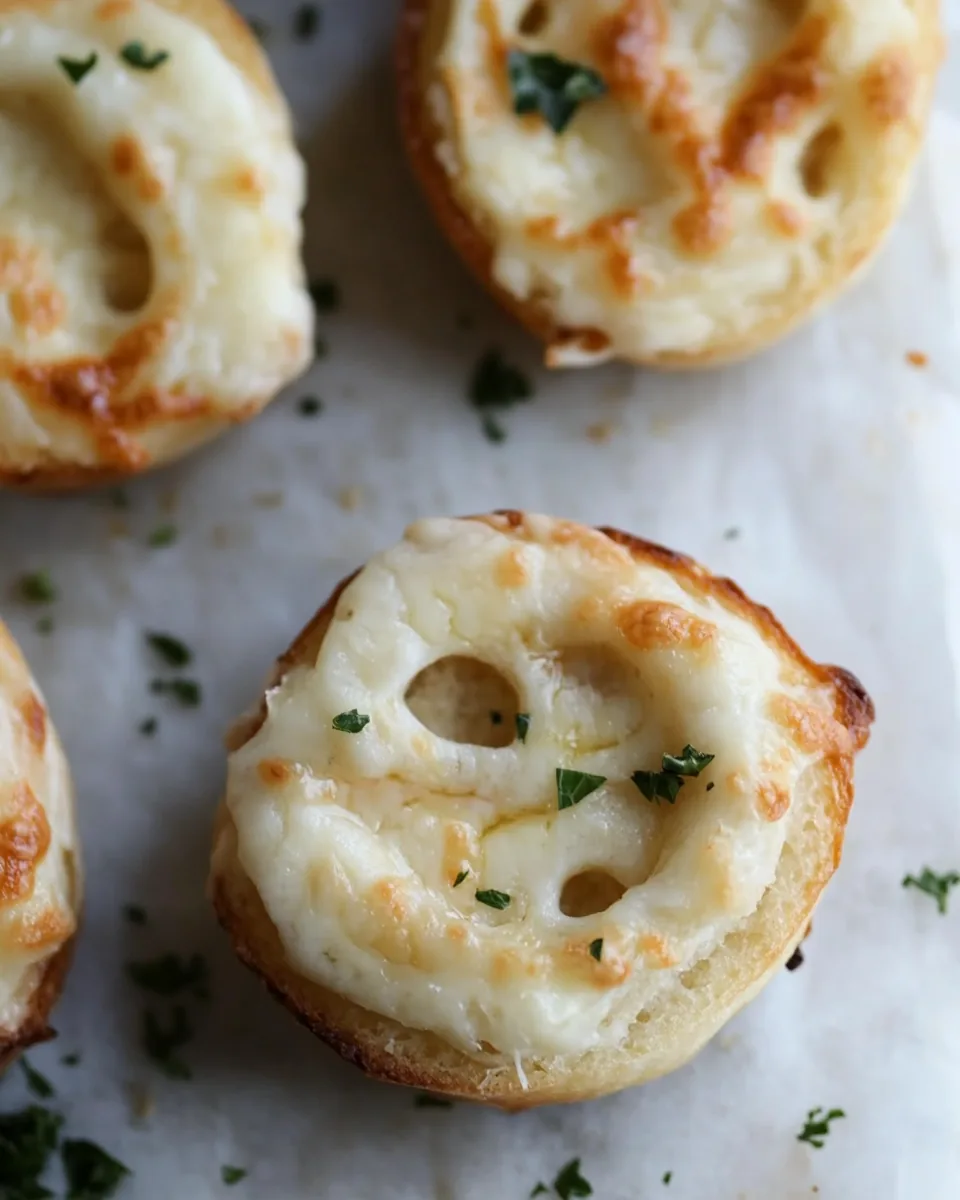
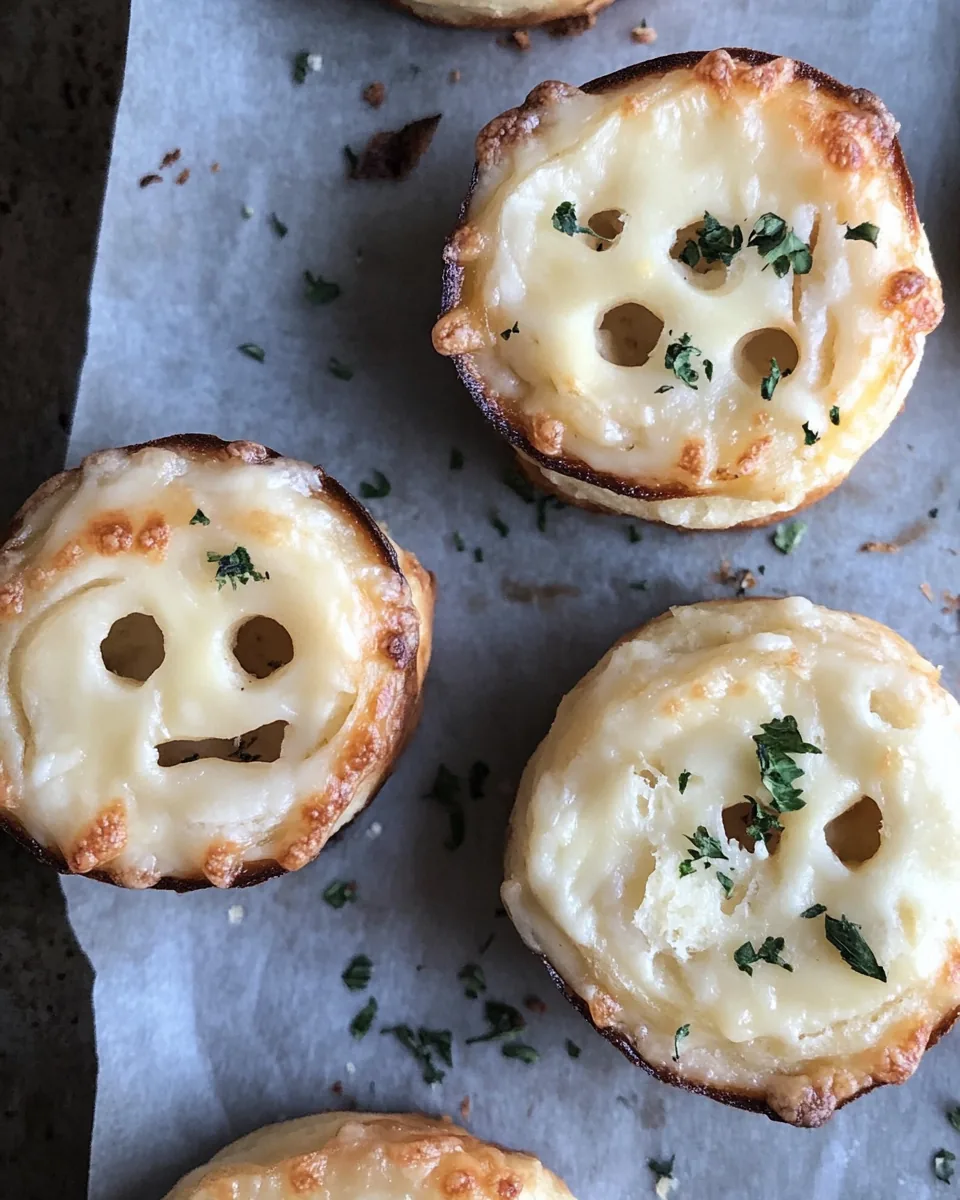
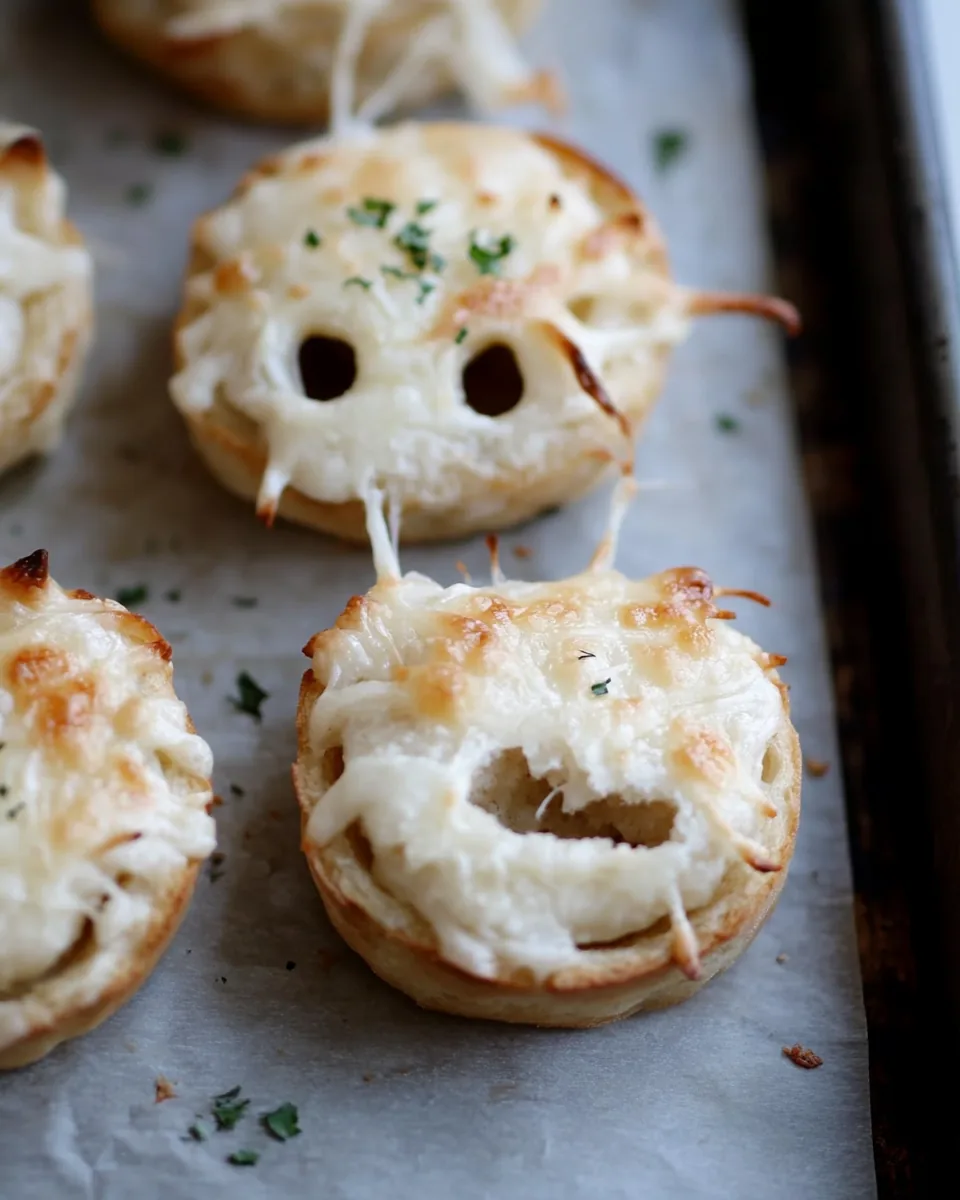
- Now, it’s time to lay the cheese in strips along the top of each muffin. Make sure to leave a gap where the olives will go for the eyes.
- Carefully add the olive slices where you left the gaps, giving your mummies a spooky appearance.
- Place the baking sheet in the preheated oven and bake for about 5 minutes. You’ll know they’re done when the cheese has melted and the edges of the English muffins start to turn golden brown.
- Once baked, remove them from the oven and let them cool for a minute. Serve them warm and enjoy the delighted reactions!
Things Worth Knowing
- Watch the cheese: Keep an eye on the oven to ensure the cheese doesn’t overcook. You want it gooey, not burnt.
- Customize your olives: If black olives aren’t your favorite, you can use green ones for a different look and taste.
- Experiment with herbs: Feel free to sprinkle some dried herbs like oregano or basil on top for extra flavor.
- Try different cheeses: Mixing different types of cheese can add more depth to the flavor of your mummies.
Recipe Variations about Garlic Cheese English Muffin Mummies
There are so many fun ways to customize your Garlic Cheese English Muffin Mummies. Here are some ideas to get creative with your recipe!
- Storage: To store leftovers, keep them in an airtight container in the fridge for up to three days. They can also be reheated in the oven or microwave.
- Freezing: You can freeze the mummies once they’ve cooled. Just wrap them well and store for up to a month. Reheat them directly from frozen.
- Cheesy Variations: Use a mix of different cheeses, like mozzarella or pepper jack, for varied flavors.
- Add veggies: Consider adding sliced bell peppers or jalapeños for an extra kick.
- Make it a meal: Pair these with a side salad or soup to make it a more complete dinner.
What to Pair With Garlic Cheese English Muffin Mummies
The Garlic Cheese English Muffin Mummies are incredibly versatile and can be enjoyed in various settings. Here are some ideas to consider:
- Perfect for Halloween: Serve them as a fun snack at Halloween parties; they’re sure to be a hit!
- Game Day Delight: These mummies also make for excellent appetizers during the big game.
- Lunch Box Treat: Pack them in kids’ lunch boxes for a spooky twist that will excite lunchtime.
- Pair with soup: A warm bowl of tomato soup complements the cheesy flavors nicely.
- Salad Side: Serve with a fresh garden salad for a light and satisfying meal.
FAQ
Conclusion
The Garlic Cheese English Muffin Mummies are a delightful twist on a classic favorite. With their playful design and cheesy goodness, they’re sure to be a hit at any gathering. I encourage you to try making them for your next event; you won’t regret it. They’re not just food; they’re fun, and that’s what makes them special!

Garlic Cheese English Muffin Mummies
Equipment
- Chef's Knife
- Mixing Bowl
- Oven
- Baking Sheet
Ingredients
- 3 pieces English muffins (halved)
- 2 tablespoons extra-virgin olive oil
- 1 medium garlic clove (finely minced)
- 1 pinch kosher salt
- 6 sticks string cheese (unwrapped and pulled into strips)
- 3-4 pieces black pitted olives (sliced)
Instructions
- Preheat oven to 350 degrees Fahrenheit.
- Lay English muffins cut-side up on a baking sheet.
- In a small bowl, mix together the olive oil, garlic, and salt.
- Brush the olive oil mixture onto the English muffins.
- Lay the cheese in strips along the top of the English muffin, leaving a gap where the eyes will go.
- Add the olive "eyes.".
- Bake for about 5 minutes, until the cheese has melted and the edges of the English muffins are beginning to get golden brown. Serve.
Notes
- Storage: To store leftovers, keep them in an airtight container in the fridge for up to three days. They can also be reheated in the oven or microwave.
- Freezing: You can freeze the mummies once they’ve cooled. Just wrap them well and store for up to a month. Reheat them directly from frozen.
- Cheesy Variations: Use a mix of different cheeses, like mozzarella or pepper jack, for varied flavors.
- Add veggies: Consider adding sliced bell peppers or jalapeños for an extra kick.
- Make it a meal: Pair these with a side salad or soup to make it a more complete dinner.