Blistered Pea Hummus
There’s nothing quite like a great dip to bring friends and family together, and Blistered Pea Hummus is a delightful addition to any gathering. I first stumbled upon this vibrant dish during a sunny spring picnic, where the flavors danced in the air, inviting everyone to indulge. The moment I took my first bite, it was as if the freshness of the peas and the warm spices created a delicious harmony, making my taste buds sing. This hummus is not just a dish; it’s an experience that transforms any ordinary occasion into something special. Whether you’re hosting a barbecue or simply need a nourishing snack, this Blistered Pea Hummus is sure to impress.
Recipe Snapshot
35 mins
30 mins
5 mins
Medium
180 kcal
6 g
Keto, Paleo, Whole30
7 g
Mortar and pestle, Juicer, Small saucepan, Blender
Why You’ll Love This Blistered Pea Hummus
Freshness at Its Core
What truly sets the Blistered Pea Hummus apart is its use of fresh English peas. Unlike traditional hummus that may rely heavily on chickpeas, this vibrant version shines through with the sweetness of peas, which brings a refreshing twist to the table. You’ll love the bright green color and the burst of flavor that each pea brings.
Textural Delight
The method of blistering the peas adds a unique layer of texture and flavor. The quick cooking process enhances their natural sweetness while giving them a slight char. This technique not only intensifies the taste but also creates a satisfying mouthfeel that contrasts beautifully with the creaminess of the tahini and garlic in the hummus.
Versatile & Customizable
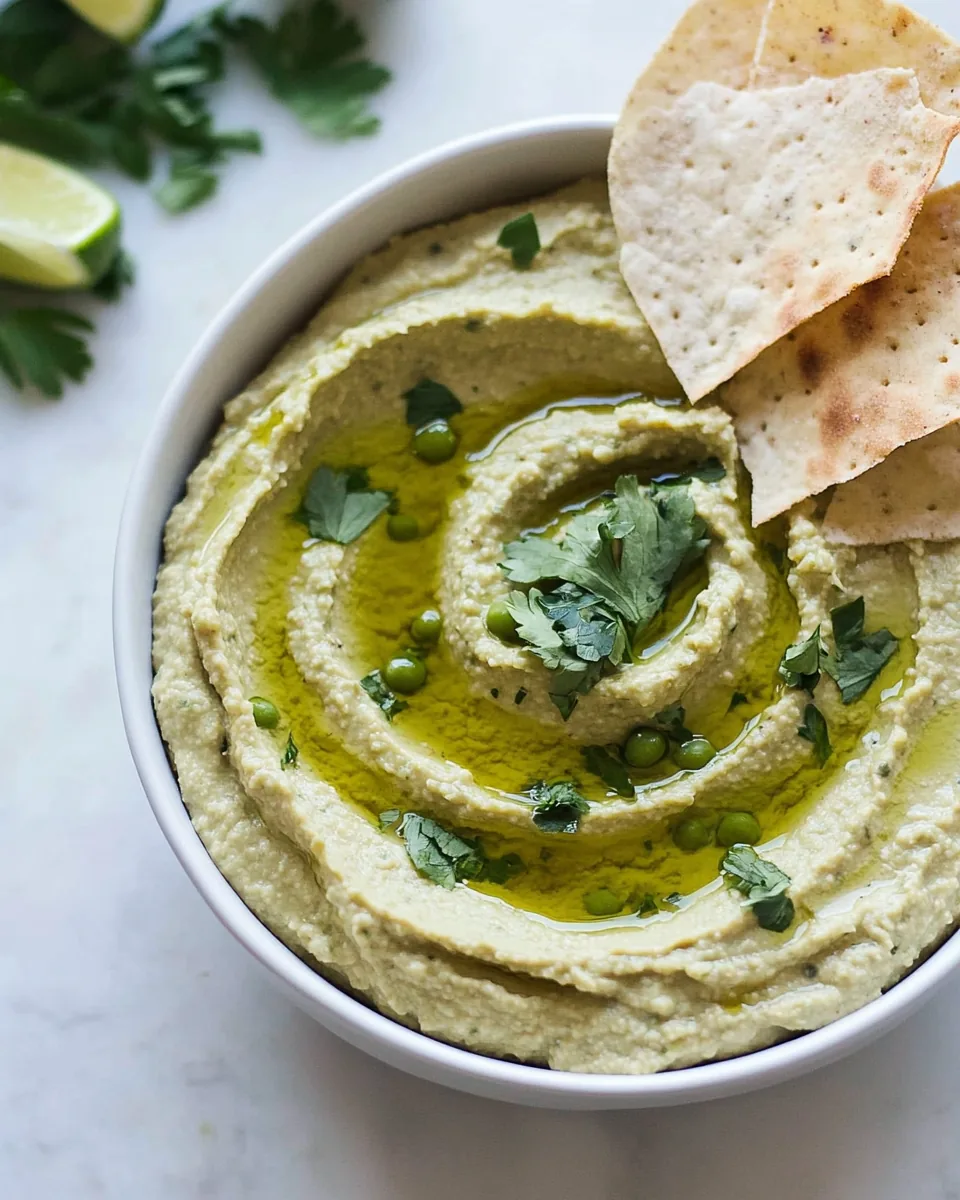
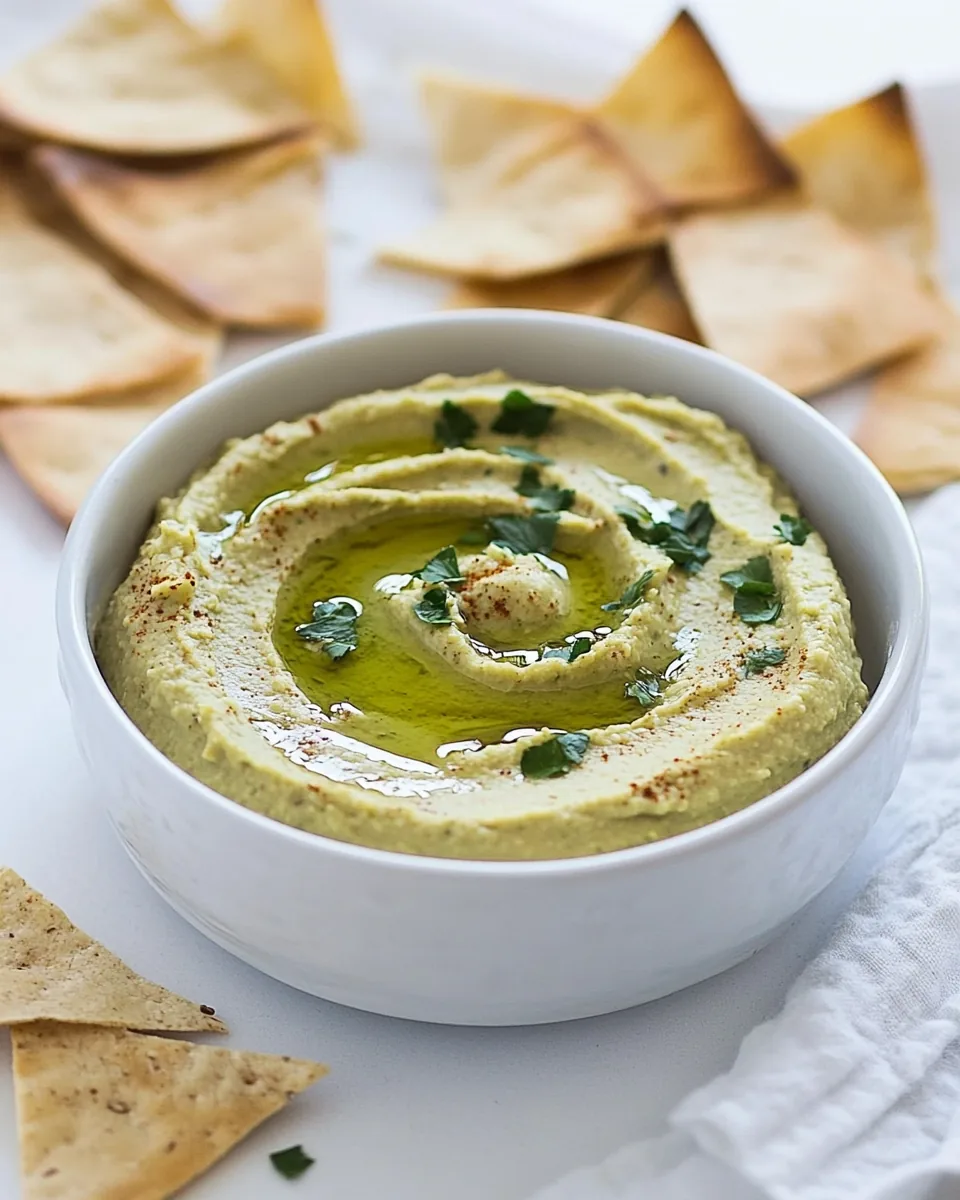
One of the best things about this recipe is its versatility. Enjoy it with crisp vegetables, pita chips, or spread it on sandwiches and wraps. Plus, you can easily adjust the flavors to suit your preferences, whether you want it spicier or creamier. The Blistered Pea Hummus can adapt to different palates, making it a hit at any gathering.
Quick and Easy
You don’t need to be a culinary expert to whip up this delicious dip. With a handful of ingredients and minimal prep time, you’ll have a gourmet treat ready in no time. The process of making Blistered Pea Hummus is straightforward, allowing even novice cooks to impress their guests with a homemade dip!
Perfect for Every Season
Though it’s a fantastic spring dish, the Blistered Pea Hummus is perfect for any season. The bright flavors are uplifting in the colder months, while its freshness shines during warm weather. It’s a true year-round delight that can brighten up any meal.
A Showstopper
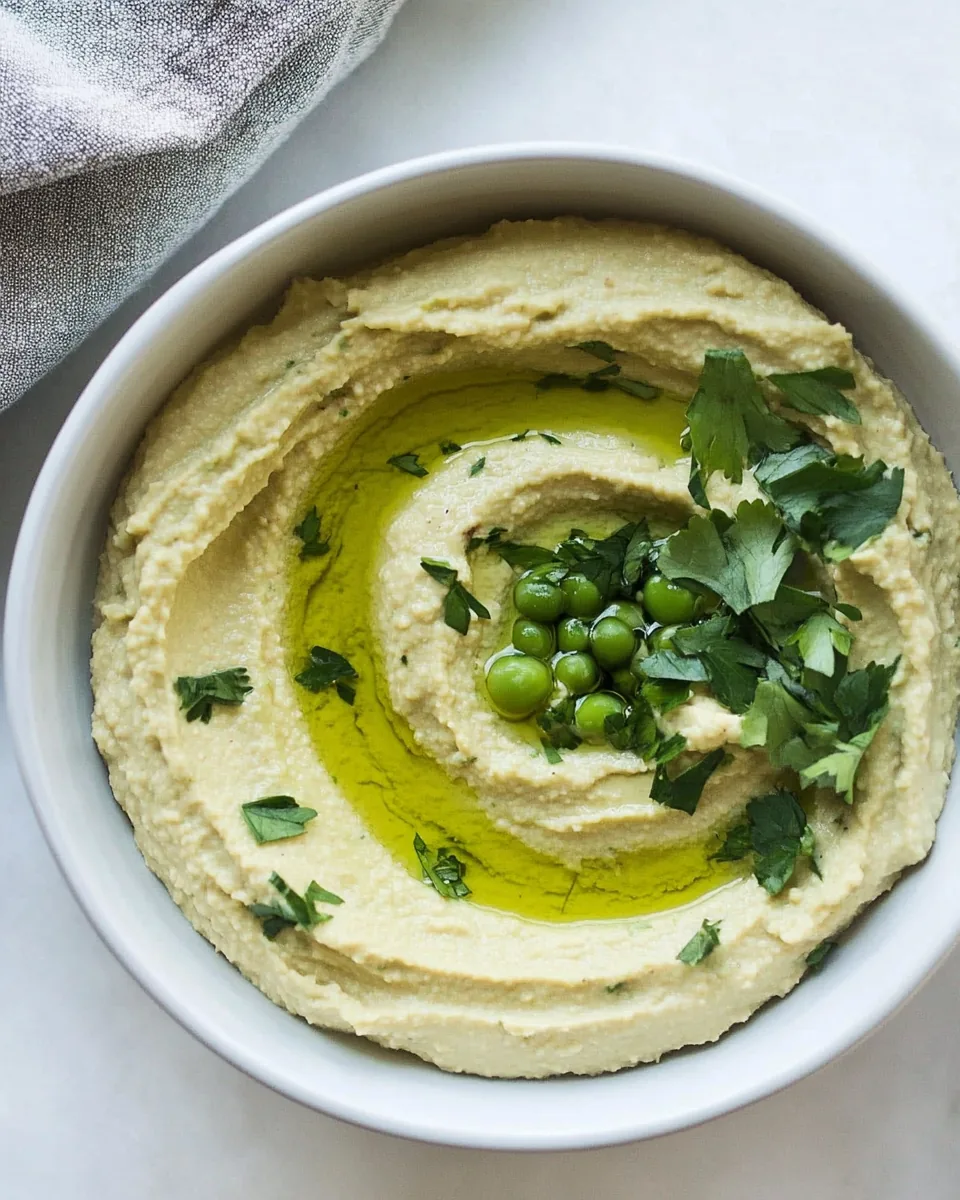
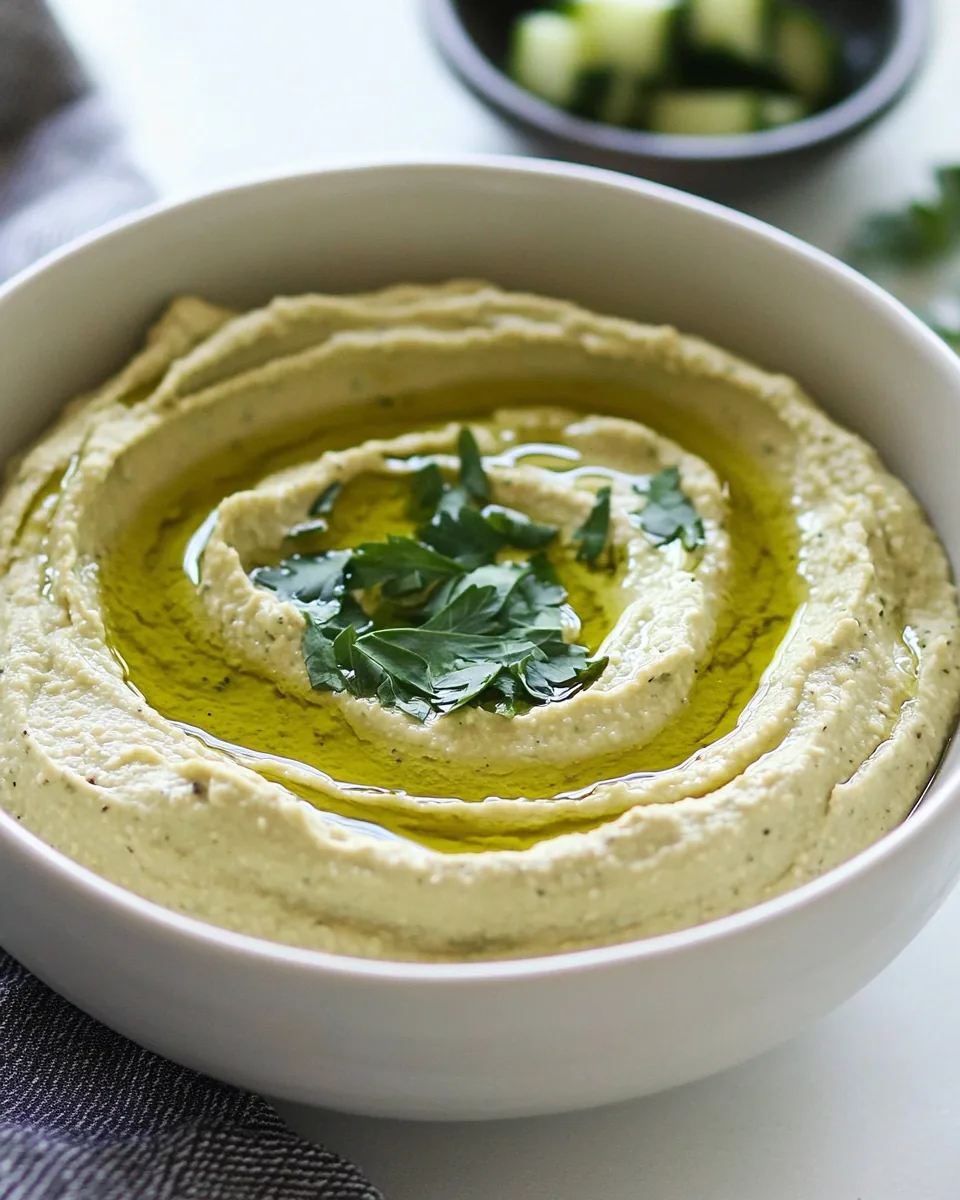
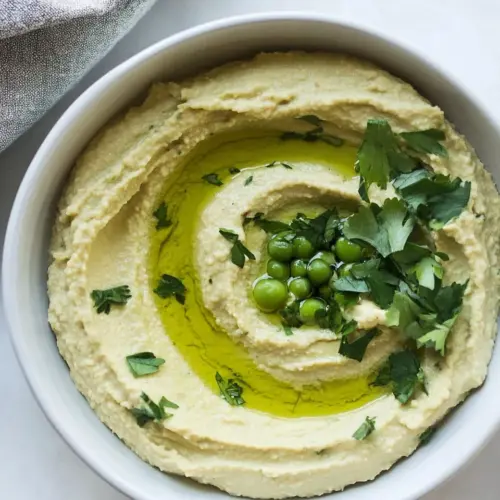
Finally, let’s talk about presentation. The bright green color of the Blistered Pea Hummus garnished with a drizzle of high-quality olive oil and fresh herbs creates a stunning visual that will captivate your guests before they even take a bite. It’s not just food; it’s a feast for the eyes!
Blistered Pea Hummus Shopping List
The ingredients for Blistered Pea Hummus are simple yet impactful. Each one plays a critical role in making this dip not only delicious but also nutritious. The key players like fresh English peas and tahini create a creamy base with vibrant flavors that make this dish stand out.
- Cumin seeds (10 to 12): These seeds add a warm, earthy flavor that complements the sweetness of the peas beautifully.
- Coriander seeds (5 to 7): With their citrus-like notes, these seeds enhance the overall brightness of the dip.
- English peas (4 cups): Freshness is key here; they provide sweetness and a beautiful green color.
- Garbanzo beans (1 24-ounce can, skins removed): They add creaminess and help achieve that hummus texture we all love.
- Lemon juice (Juice from 1 lemon): Adds acidity that balances the richness of the tahini and peas.
- Tahini (3 tablespoons): This sesame paste gives a nutty flavor and creamy texture.
- Garlic clove (1, minced): A touch of garlic adds depth and complexity to the flavor profile.
- Salt: Essential for enhancing all the flavors in the hummus.
- Italian parsley (Handful, minced): For garnish and a pop of freshness.
Directions for Blistered Pea Hummus
Preparing Blistered Pea Hummus is a delightful process that you can easily follow. Each step in the recipe brings you closer to a delicious dip that will impress everyone. Let’s get started!
First, gather your tools. You’ll need a mortar and pestle or a spice grinder to crush your cumin seeds and coriander seeds. If you don’t have these, using ground spices is okay too. Start by adding the seeds into the mortar and grinding them until they resemble a fine powder. This step is crucial as it releases the essential oils and flavors, creating a robust base for your hummus.
Next, it’s time to work with the English peas. Shuck them by pinching off the tops and pulling the string to split the seam. With your fingers, run down the seam to open the pods, releasing the sweet peas into a bowl. Don’t forget to keep the jackets; they’ll be used later to make a juice that adds color and flavor to your hummus.
If you have a juicer, add the jackets to it and turn it on; set the juice aside. You should get about 1/3 of a cup. Remember, this step is optional, but it does enhance the flavor. If you don’t have a juicer, just set the jackets aside.
Now, heat a small saucepan over high heat and add a teaspoon or two of olive oil. Once the oil is hot, toss in the blistered peas. Cook them for about 1 to 2 minutes, giving the pan a good shake occasionally. You want the skins to blister and become fragrant, which adds a lovely complexity to your hummus.
In the jar of your blender or food processor, combine the crushed cumin and coriander, blistered peas, garbanzo beans, lemon juice, tahini, minced garlic, and a few pinches of salt. Pulse until the mixture is chunky. It’s all about building flavor at this stage, so don’t rush it!
With the machine running, pour in your reserved pea juice or a splash of warm water. Keep blending until the hummus reaches a smooth consistency. If it’s too thick, add a bit more water. Always taste as you go; you can add more salt or lemon juice if needed to balance the flavors.
Once your hummus is smooth-ish, transfer it to a beautiful serving bowl. Drizzle some high-quality olive oil on top, sprinkle with the minced Italian parsley, and finish with a pinch of salt. This finishing touch not only looks appealing but also enhances the flavor with freshness.
Finally, serve your Blistered Pea Hummus with an assortment of crudités, pita chips, or spread it on your favorite sandwich. Enjoy the compliments!
Things Worth Knowing
- Freshness is Key: Always use fresh English peas for the best flavor and texture. Frozen peas can be used as a substitute, but fresh will give you the brightest taste.
- Mind Your Seasoning: Taste your hummus as you blend. Adjust the salt and lemon juice according to your preference for a balanced flavor.
- Storage: Store any leftover hummus in an airtight container in the refrigerator for up to three days. It may thicken over time, so add a touch of water or olive oil before serving again.
- Experiment with Flavors: Feel free to add other spices or herbs, like smoked paprika or fresh mint, to create your unique twist on this recipe.
- Presentation Matters: For a beautiful presentation, serve your hummus in a wide bowl and create a swirl in the center to hold the olive oil.
Expert Tips about Blistered Pea Hummus
To elevate your experience while making Blistered Pea Hummus, here are some expert tips that might help you along the way. Each tip cultivates a deeper understanding and enhances your dish!
- Storage: Store any leftovers in an airtight container in the fridge for up to three days. The flavors may meld and deepen over time, making it even more delicious!
- Freezing: You can freeze the hummus in a tightly sealed container for up to two months. Just make sure to let it thaw in the fridge the night before you plan to serve it.
- Pairing: This hummus pairs beautifully with crispy vegetables, pita chips, or even as a spread on sandwiches and wraps. It also complements grilled meats and fish.
- Garnishing: Consider garnishing with additional herbs like chives or microgreens for a pop of color and flavor.
- Spice It Up: If you enjoy a kick, add a pinch of cayenne or a drizzle of chili oil on top before serving.
What to Serve With Blistered Pea Hummus
When it comes to serving your Blistered Pea Hummus, the options are endless. It’s incredibly versatile and can be enjoyed in many ways:
- Fresh Vegetables: Serve with an array of fresh, crunchy vegetables like carrot sticks, cucumber slices, or bell pepper strips for a healthy appetizer.
- Pita Chips: Crunchy pita chips pair perfectly with the creamy hummus, making for an irresistible snack.
- Spread on Sandwiches: Use the hummus as a spread on sandwiches or wraps. It adds moisture and flavor without the need for heavy sauces.
- As a Dip for Grilled Meats: This hummus works wonderfully as a dip alongside grilled chicken or fish, adding a fresh twist to your meal.
- Picnic or Party Dish: Bring this hummus to your next picnic or gathering; it’s sure to be a crowd-pleaser!
- Seasonal Pairings: In the spring, its bright flavor pairs beautifully with fresh spring vegetables. In the fall, it complements roasted vegetables perfectly.
FAQ
Conclusion
The Blistered Pea Hummus is a refreshing and flavorful dip that beautifully showcases seasonal ingredients. It’s a wonderful way to enjoy the natural sweetness of peas while providing a creamy texture that everyone loves. I encourage you to give this recipe a try; it’s sure to become a favorite at your gatherings!
Blistered Pea Hummus
Equipment
- Mortar and pestle
- Juicer
- Small Saucepan
- Blender
Ingredients
- 10 to 12 cumin seeds Cumin seeds
- 5 to 7 coriander seeds Coriander seeds
- 4 cups English peas
- 1 24-ounce can Garbanzo beans skins removed
- Juice from 1 lemon Lemon juice
- 3 tablespoons Tahini
- 1 clove Garlic minced
- to taste Salt
- 1 handful Italian parsley minced
Instructions
- First, gather your tools. You’ll need a mortar and pestle or a spice grinder to crush your cumin seeds and coriander seeds. If you don’t have these, using ground spices is okay too. Start by adding the seeds into the mortar and grinding them until they resemble a fine powder. This step is crucial as it releases the essential oils and flavors, creating a robust base for your hummus.
- Next, it’s time to work with the English peas. Shuck them by pinching off the tops and pulling the string to split the seam. With your fingers, run down the seam to open the pods, releasing the sweet peas into a bowl. Don’t forget to keep the jackets; they’ll be used later to make a juice that adds color and flavor to your hummus.
- If you have a juicer, add the jackets to it and turn it on; set the juice aside. You should get about 1/3 of a cup. Remember, this step is optional, but it does enhance the flavor. If you don’t have a juicer, just set the jackets aside.
- Now, heat a small saucepan over high heat and add a teaspoon or two of olive oil. Once the oil is hot, toss in the blistered peas. Cook them for about 1 to 2 minutes, giving the pan a good shake occasionally. You want the skins to blister and become fragrant, which adds a lovely complexity to your hummus.
- In the jar of your blender or food processor, combine the crushed cumin and coriander, blistered peas, garbanzo beans, lemon juice, tahini, minced garlic, and a few pinches of salt. Pulse until the mixture is chunky. It’s all about building flavor at this stage, so don’t rush it!
- With the machine running, pour in your reserved pea juice or a splash of warm water. Keep blending until the hummus reaches a smooth consistency. If it’s too thick, add a bit more water. Always taste as you go; you can add more salt or lemon juice if needed to balance the flavors.
- Once your hummus is smooth-ish, transfer it to a beautiful serving bowl. Drizzle some high-quality olive oil on top, sprinkle with the minced Italian parsley, and finish with a pinch of salt. This finishing touch not only looks appealing but also enhances the flavor with freshness.
- Finally, serve your Blistered Pea Hummus with an assortment of crudités, pita chips, or spread it on your favorite sandwich. Enjoy the compliments!
Notes
- Storage: Store any leftovers in an airtight container in the fridge for up to three days. The flavors may meld and deepen over time, making it even more delicious!
- Freezing: You can freeze the hummus in a tightly sealed container for up to two months. Just make sure to let it thaw in the fridge the night before you plan to serve it.
- Pairing: This hummus pairs beautifully with crispy vegetables, pita chips, or even as a spread on sandwiches and wraps. It also complements grilled meats and fish.
- Garnishing: Consider garnishing with additional herbs like chives or microgreens for a pop of color and flavor.
- Spice It Up: If you enjoy a kick, add a pinch of cayenne or a drizzle of chili oil on top before serving.