Veggie Bunnies
Whenever I think of fun and creative ways to get kids excited about eating their vegetables, Veggie Bunnies always comes to mind. I remember the first time I made these delightful little creations; it was Easter Sunday, and the kids were buzzing with excitement for the egg hunt. Instead of serving the usual snacks, I decided to surprise them with these adorable veggie bunnies that not only looked cute but tasted fresh and delicious. The joy on their faces as they dug into their edible art was priceless! Each bite was filled with vibrant flavors, and the best part? You can get your little ones involved in making them!
Recipe Snapshot
15 mins
5 mins
10 mins
Medium
75 kcal
3 g
Keto, Gluten-Free, Low FODMAP
2 g
Chef’s Knife, Whisk, Peeler
What Makes This Veggie Bunnies Special
Creative Presentation
One of the standout features of Veggie Bunnies is how they encourage creativity. The process of assembling the veggies into bunny shapes allows for endless imagination. You can customize the bunnies to look however you or your kids want, making it an engaging activity that sparks joy.
Healthy and Nutritious
We’re all looking for ways to boost our families’ health, and this recipe does just that! With ingredients like jicama, cucumbers, and cherry tomatoes, you’re serving a plate full of vitamins and minerals. These veggies are not only low in calories but also packed with fiber, making them a guilt-free snack option.
Perfect for Celebrations
Whether it’s Easter, spring picnics, or birthday parties, Veggie Bunnies are perfect for any occasion. Their cute and colorful appearance makes them a hit at gatherings, enticing even the pickiest eaters to munch on their vegetables. Plus, they’re a fantastic conversation starter!
Quick and Easy to Prepare
One of my favorite things about this recipe is how quick it is to whip up. With just a few simple ingredients and minimal prep time, you can have a healthy and eye-catching dish ready to serve. It’s perfect for busy weeknights or last-minute gatherings.
Fun Family Activity
Making Veggie Bunnies is more than just cooking; it’s an opportunity to bond with your family. Kids love being hands-on in the kitchen, and assembling these bunnies together can create lasting memories. It’s a fun way to teach them about healthy eating while encouraging teamwork.
Versatile Ingredients
The beauty of Veggie Bunnies lies in their versatility. You can easily swap out vegetables based on what you have at home or what’s in season. This allows you to experiment with different flavors while still keeping the dish colorful and fun!
What to Gather for Veggie Bunnies
Gathering the right ingredients for Veggie Bunnies is key to creating a colorful and nutritious dish. Each ingredient not only enhances the flavor but also contributes to the vibrant presentation that makes this dish so appealing. Let’s explore the key players that come together to form this delightful veggie creation.
- Jicama: This crunchy root vegetable serves as the main base for our bunnies. When sliced into circles, jicama adds a satisfying crunch and slight sweetness.
- Whipped Light Cream Cheese: This creamy spread acts as both a delicious topping and an adhesive to hold our veggies in place. It’s light and fluffy, making it a perfect complement to the fresh veggies.
- Chives: These slender green herbs add a mild onion flavor and are perfect for whiskers on your bunny creations.
- Cherry Tomatoes: Halved cherry tomatoes bring a burst of sweetness and color, serving as the adorable bunny noses.
- Persian Cucumbers: These crunchy cucumbers are ideal for creating the ears and add a refreshing taste.
- Edamame: These green soybeans are not just for snacking; they make cute little eyes! They’re also packed with protein.
- Breakfast Radishes: Sliced lengthwise, these radishes add a pop of color and a peppery flavor.
- Red Radishes: Using coin-shaped slices for the eyes adds a fun visual element to your bunnies.
- Broccoli Florets: These small green trees make a cute addition as they give your bunnies a little greenery around them.
- Bolthouse Farms Carrots: These small carrots not only serve as cute feet but also add sweetness and crunch to the overall presentation.
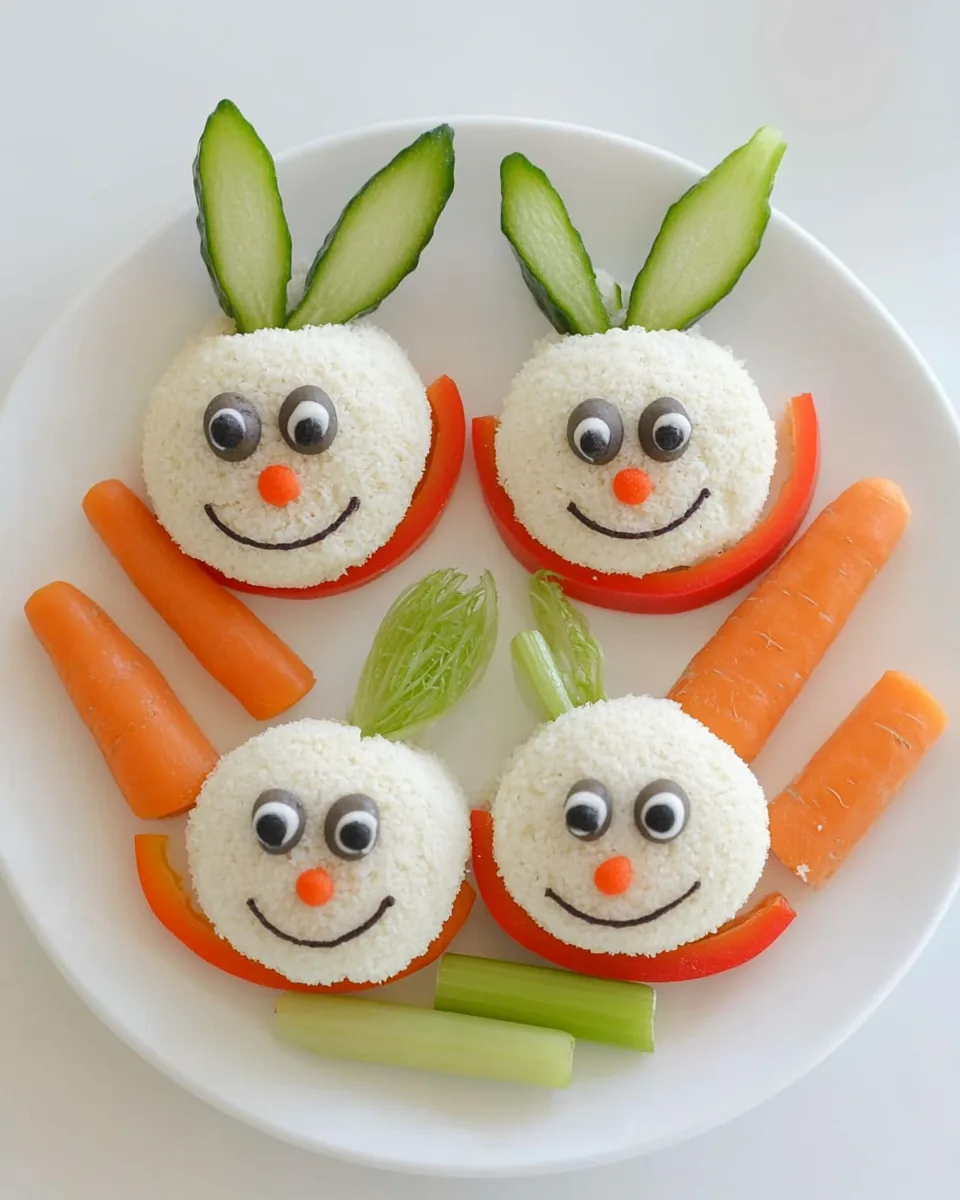
Veggie Bunnies Instructions
Making Veggie Bunnies is as enjoyable as eating them! Follow these steps, and you’ll create a delightful veggie dish that’s not only fun to look at but also delicious to eat. Let’s hop to it!
- Begin by placing a jicama circle on a plate. This will be the base of your bunny. Make sure it’s stable and evenly cut for a good foundation.
- Take the whipped cream and place it in a ziplock bag. Cut a small piece off the corner to create a makeshift piping bag. This will make it easier to apply the cream cheese later.
- Slice one half of the persian cucumber into coins for the ears. The other half should be sliced on the bias, which gives them a unique look.
- Attach the cucumber slices at the top of the jicama circle to create bunny ears. Squeeze a dollop of cream cheese onto the cucumbers to hold them in place, then top with two slices of breakfast radish for added flair.
- Near the top of the jicama circle, squeeze two small dots of cream cheese to create the eyes. Press a coin-sized red radish onto each dot to form the bunny’s eyes. Using the cream cheese as a “glue”, press a cucumber coin and an edamame onto each radish eye for extra detail.
- Add a small dot of cream cheese onto the center of the jicama circle and place three chives on top, spreading them out to create whiskers. Place a cherry tomato half on top of the chives to serve as the bunny’s nose.
- Finally, place two carrots next to the Veggie Bunny, using them as the feet, and arrange broccoli florets at the top of the carrots to complete your adorable creation.
- Repeat these steps to create as many bunnies as you’d like for your table display!
Things Worth Knowing
- Freshness is Key: Ensure all vegetables are fresh for the best flavor and texture. Crisp veggies will make your bunnies look more appealing.
- Prep Ahead: You can prepare the cut vegetables in advance and assemble the bunnies right before serving for optimal freshness.
- Kid-Friendly: This recipe is a fantastic way to involve children in the kitchen. Let them help assemble their own bunnies for added fun!
- Presentation Matters: Use colorful plates or platters to make your Veggie Bunnies stand out even more during gatherings.
Tips and Variations
Here are some helpful tips and variations to enhance your experience with Veggie Bunnies. These suggestions ensure that this delightful recipe remains a versatile favorite in your kitchen.
- Storage: Leftover assembled bunnies can be stored in an airtight container in the refrigerator for up to two days, but they are best eaten fresh.
- Freezing: This dish is not suitable for freezing due to the fresh veggies losing their texture when thawed.
- Pairing: Serve your Veggie Bunnies with a light ranch dressing or hummus for dipping to enhance flavors.
- Customization: Feel free to use other vegetables like bell peppers or celery for different shapes and flavors.
- Seasonal Variations: You can create seasonal bunnies using different colors of vegetables to match holidays or events.
Great Combinations for Veggie Bunnies
When serving Veggie Bunnies, think about complementing them with other delicious sides and treats. Here are some great combinations:
- Spring Salads: Pair with a light, refreshing spring salad featuring leafy greens, fruits, and a vinaigrette.
- Sandwiches: These bunnies go wonderfully with a variety of sandwiches, making for a fun lunch option.
- Picnic Platters: Include them in your picnic spread alongside fresh fruit, nuts, and cheese for a well-rounded meal.
- Brunch Buffets: They make a cute addition to brunch buffets, especially when served with egg dishes and pastries.
- Seasonal Celebrations: Perfect for spring festivities, Veggie Bunnies can also be a fun treat for birthdays or any cheerful gathering!
FAQ
Conclusion
Veggie Bunnies are not just a delicious way to eat vegetables; they’re a fantastic opportunity to engage with your family over food. Creating these adorable bunnies can turn a simple snack into a fun culinary adventure. I encourage you to gather your ingredients and give this playful recipe a try. You’ll be surprised at how much joy these little creations can bring to your table!
Veggie Bunnies
Equipment
- Chef's Knife
- Whisk
- Peeler
Ingredients
- 1 piece Jicama peeled and sliced into 1/2" circles
- 2 tablespoons Whipped Light Cream Cheese
- 12 stalks Chives
- 2 pieces Cherry Tomatoes halved
- 1 piece Persian Cucumbers
- 8 pieces Edamame
- 2 pieces Breakfast Radishes tops removed and sliced lengthwise
- 2 pieces Red Radishes cut into coins
- 8 pieces Broccoli Florets
- 8 pieces Bolthouse Farms Carrots peeled
Instructions
- Begin by placing a jicama circle on a plate. This will be the base of your bunny. Make sure it’s stable and evenly cut for a good foundation.
- Take the whipped cream and place it in a ziplock bag. Cut a small piece off the corner to create a makeshift piping bag. This will make it easier to apply the cream cheese later.
- Slice one half of the persian cucumber into coins for the ears. The other half should be sliced on the bias, which gives them a unique look.
- Attach the cucumber slices at the top of the jicama circle to create bunny ears. Squeeze a dollop of cream cheese onto the cucumbers to hold them in place, then top with two slices of breakfast radish for added flair.
- Near the top of the jicama circle, squeeze two small dots of cream cheese to create the eyes. Press a coin-sized red radish onto each dot to form the bunny's eyes. Using the cream cheese as a "glue", press a cucumber coin and an edamame onto each radish eye for extra detail.
- Add a small dot of cream cheese onto the center of the jicama circle and place three chives on top, spreading them out to create whiskers. Place a cherry tomato half on top of the chives to serve as the bunny's nose.
- Finally, place two carrots next to the Veggie Bunny, using them as the feet, and arrange broccoli florets at the top of the carrots to complete your adorable creation.
- Repeat these steps to create as many bunnies as you’d like for your table display!