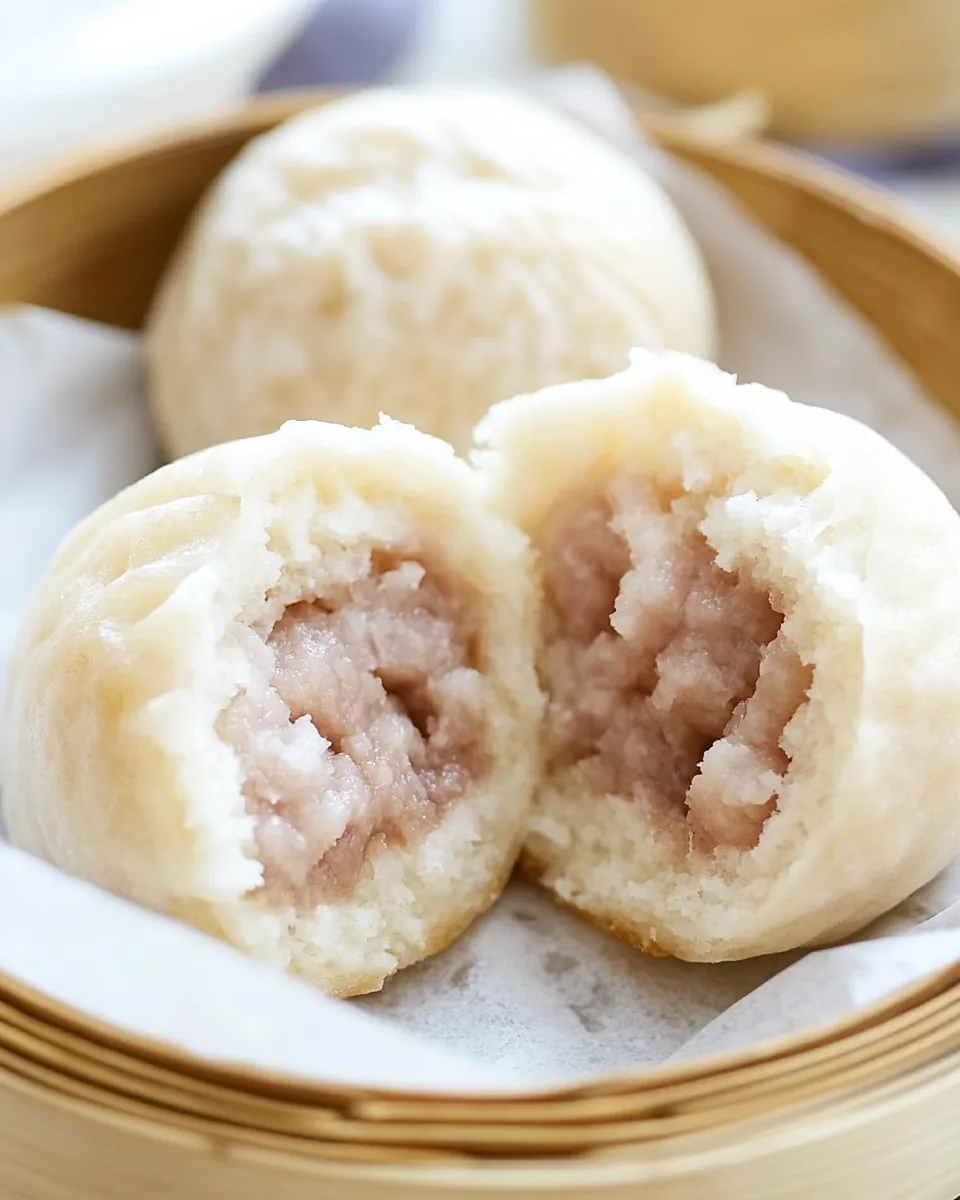
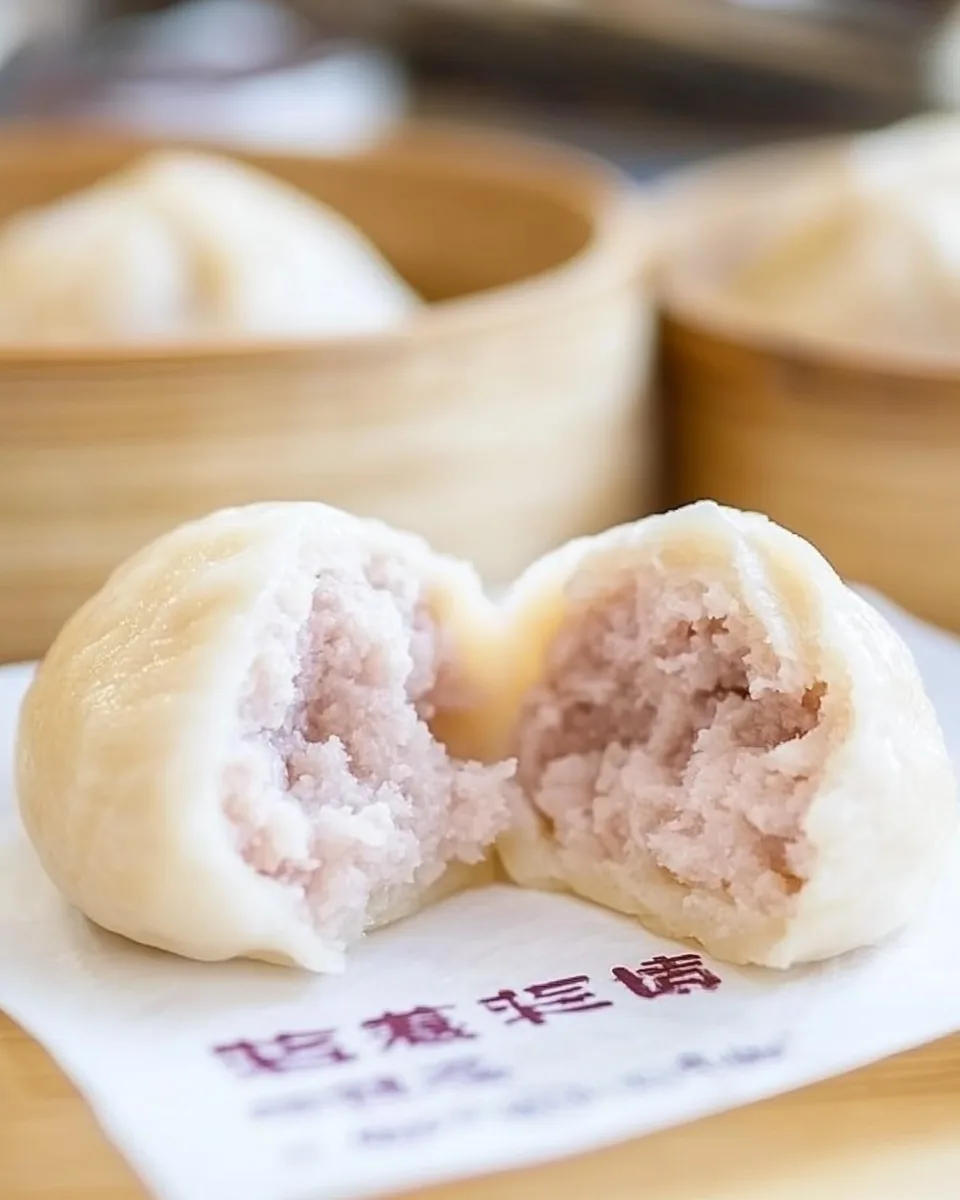
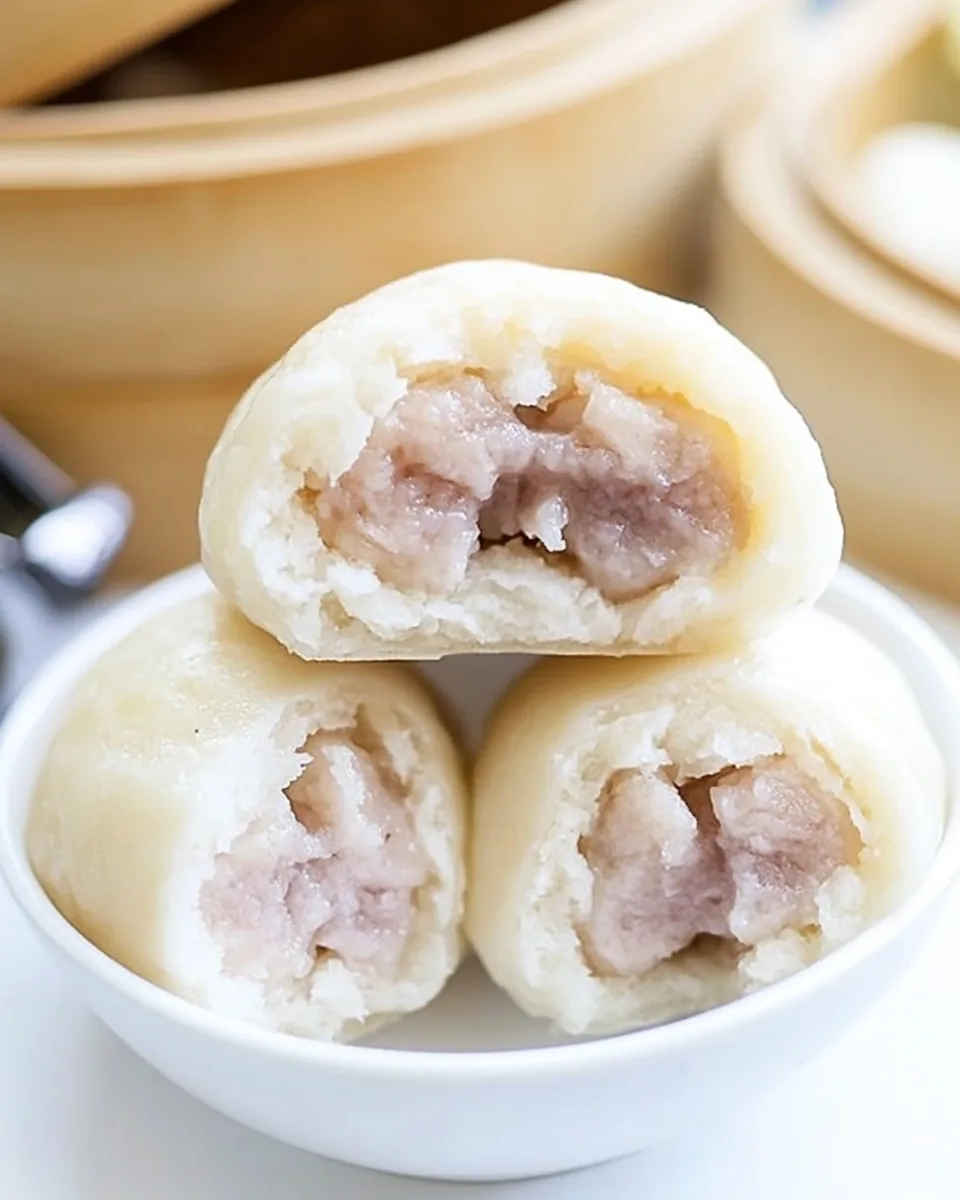
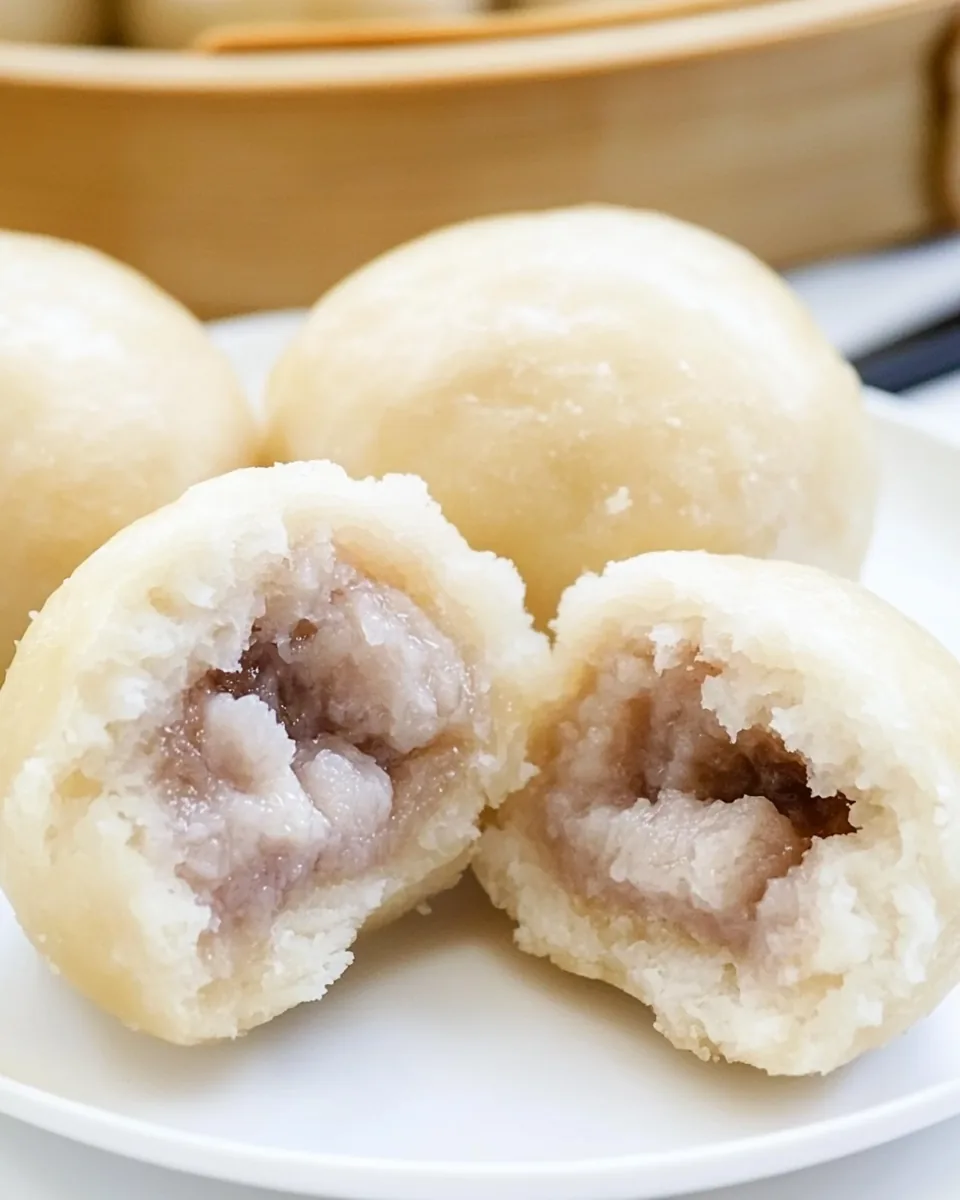
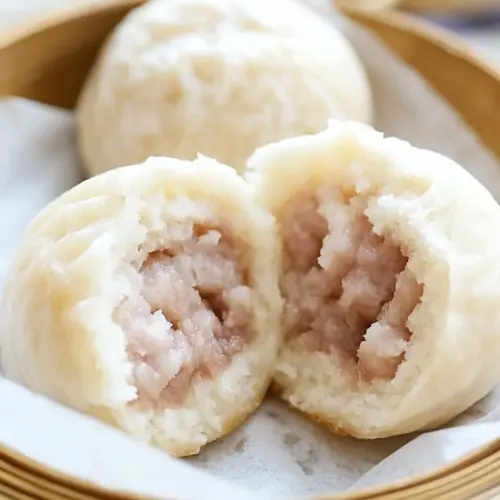
Taro Bun
When I think about comfort food, Taro Bun always comes to mind. These delightful little buns are not only visually stunning with their soft, fluffy texture but also bursting with a sweet, earthy flavor that is simply irresistible. I remember the first time I tried making these at home; the aroma of the steaming buns filled the kitchen, inviting everyone in the house to gather around. They are reminiscent of warm, family gatherings, where every bite feels like a big hug. Whether enjoyed as a snack or dessert, I love how Taro Bun can brighten up even the dullest day.
Recipe Snapshot
40 mins
30 mins
10 mins
Hard
180 kcal
2 g
Vegan, Gluten-Free, AIP
2 g
Frying Pan, Food Processor, Peeler, Chef’s Knife, Mixing Bowl, Wooden Spoon
Why You’ll Love This Taro Bun
1. Perfectly Light and Fluffy
One of the standout features of Taro Bun is how incredibly light and fluffy they are. When you bite into one, the softness practically melts in your mouth, creating an unforgettable experience. The unique texture is achieved by steaming, which locks in moisture and results in buns that are airy yet substantial.
2. Versatile Flavor Profile
Taro Bun has a subtly sweet flavor that pairs well with various dips or fillings. You can enjoy them plain or experiment with different sweet fillings, like red bean paste or custard. This versatility makes them perfect for any occasion.
3. A Sweet Reminder of Tradition
These buns have a rich history and are a beloved treat in many cultures. Making Taro Bun brings me closer to my roots and allows me to share a piece of my heritage with others. It’s more than just food; it’s a way to connect with loved ones and celebrate traditions.
4. Easy to Customize
One of the things I love most about Taro Bun is how easy they are to customize. You can adjust the sweetness to your liking or try incorporating different flavors into the dough. This ensures that the recipe can be tailored to suit your preferences or dietary needs, making it a hit with everyone.
5. Great for Sharing
These buns are perfect for gatherings. They are easy to serve and encourage sharing, making them a great addition to any potluck or family meal. There’s something special about breaking bread—or buns—together that brings people closer.
6. Fun and Engaging to Make
Making Taro Bun is a fun activity that can involve the whole family. Whether you’re shaping the buns or helping with the steaming process, it’s a wonderful way to bond over cooking. Plus, watching those buns rise and steam is a rewarding sight!
What You Need for Taro Bun
The ingredients for Taro Bun come together to create a delightful balance of flavors and textures. Each component plays a crucial role in achieving that perfect bun, from the starchy taro to the sweetness of fine sugar. They work harmoniously to create something truly special.
- Taro root – 1 lb: The star of this recipe, taro root adds a unique flavor and creamy texture when mashed.
- Fine sugar – 2 1/2 tablespoons: Sweetens the taro for a delightful flavor.
- Milk – 1 cup: Adds moisture and richness to the dough.
- Active dry yeast – 1 teaspoon: Essential for the dough to rise and become fluffy.
- All-purpose flour – 12 oz: The foundation of the dough, providing structure.
- Fine sugar – 1/2 cup: Used to enhance the sweetness to your taste.
Recipe Directions for Taro Bun
Cooking Taro Bun is not only about following steps but also about enjoying the process. Grab your ingredients and let’s get started with this delightful recipe that will fill your home with a wonderful aroma. Each step is straightforward, and soon you’ll have a batch of fluffy buns ready to enjoy!
- Start by cutting the taro into pieces. This is essential for even cooking, so make sure they are about the same size. You want them to steam uniformly.
- Next, prepare the taro paste. Place the cut taro pieces in a steamer and cook over high heat for 10 to 15 minutes, or until they are tender and break apart easily. This is crucial for achieving a smooth paste.
- Once cooked, remove the taro from the steamer and add the fine sugar to the warm taro. Using a masher, mash the taro until it becomes a smooth paste. Divide this mixture into 12 equal portions and shape them into small balls. Cover and set aside.
- Now, let’s prepare the dough. In a bowl of a stand mixer fitted with a dough hook, combine the milk, active dry yeast, and 2 1/2 tablespoons of fine sugar. Stir gently with chopsticks or a spoon to mix.
- Add the all-purpose flour to the yeast mixture. Turn the mixer on to speed 1 and knead the ingredients together until a smooth dough forms. This should take about 6 minutes. If you notice the dough climbing up the hook, stop the mixer and push it back down into the bowl.
- Once the dough is well kneaded, transfer it to a lightly greased surface. Cover it with plastic wrap and let it rest for 5 minutes. This resting period allows the gluten to relax.
- After resting, on a lightly floured surface, roll the dough into a smooth ball. Divide the dough into 12 equal pieces, shaping each into a ball. Then, roll out each ball on the floured surface.
- Take one of the rolled-out dough pieces and place a taro ball in the center. Wrap the dough around the taro ball, pinching to seal tightly. Repeat this for all the dough and taro balls.
- Place each Taro Bun on a piece of pre-cut rectangular parchment paper. Arrange them inside a steamer, leaving enough space between each bun to prevent sticking.
- Cover the steamer and let the buns rise for 60 minutes. You’ll notice them expanding in size as they proof, becoming fluffy and airy.
- Finally, add water to the bottom of the steamer and cover the lid tightly. Heat on high and steam the buns for 10 to 12 minutes, or until they are soft and puffy. Once done, turn off the heat and serve the buns warm.
Things Worth Knowing
- Steaming Technique: Steaming is key for these buns. It ensures even cooking and keeps them moist.
- Resting Dough: Allowing the dough to rest helps develop gluten, making it easier to shape.
- Sealing Buns: Ensure the buns are sealed tightly to keep the filling inside during steaming.
- Uniform Size: Cutting the taro into even pieces helps achieve consistent cooking.
Expert Tips about Taro Bun
To make the most of your Taro Bun, here are some expert tips that can enhance your experience in the kitchen. Whether it’s the cooking technique or storage, these suggestions will help you enjoy your buns even more!
- Storage: Store leftover buns in an airtight container in the refrigerator for up to 3 days. Reheat them in a steamer for best results.
- Freezing: You can freeze the unsteamed buns. Place them on parchment paper and freeze until solid, then transfer to a freezer bag. Steam directly from frozen, adding a few extra minutes to the cooking time.
- Pairing: Serve Taro Bun with a dipping sauce like sweetened condensed milk or coconut cream for added flavor.
- Serving Warm: These buns are best enjoyed warm and fresh out of the steamer, enhancing their fluffy texture.
- Experimenting: Feel free to try different fillings, like sweetened red bean or even chocolate, to suit your taste.
What to Serve Alongside Taro Bun
When it comes to enjoying Taro Bun, the possibilities are endless. Here are some fantastic ideas for what to serve alongside these delightful buns:
- Tea: Pair your buns with a warm cup of green tea or jasmine tea for a refreshing break.
- Fruits: Fresh fruits, like mango or lychee, provide a sweet contrast to the savory bun.
- Salads: A light salad with sesame dressing complements the buns, adding a crunchy texture.
- Occasions: These buns are perfect for sharing at family gatherings, potlucks, or even as a delightful snack during tea time.
- Seasonal Pairing: Enjoy these buns during festive seasons like Lunar New Year, where they symbolize prosperity and good fortune.
FAQ
Conclusion
Overall, Taro Bun is a unique and comforting dish that can bring warmth and joy to your table. With its soft texture and delightful filling, it’s sure to please everyone. I encourage you to try making these delicious buns at home. They are not only fun to create but also a wonderful way to share a piece of culture and love with family and friends. Enjoy every fluffy bite!
Taro Bun
Equipment
- Frying Pan
- Food Processor
- Peeler
- Chef's Knife
- Mixing Bowl
- Wooden Spoon
Ingredients
- 1 lb Taro root
- 1/2 cup Fine sugar or to taste
- 1 cup Milk
- 1 teaspoon Active dry yeast
- 2 1/2 tablespoons Fine sugar
- 12 oz All-purpose flour
Instructions
- Cut the taro into pieces.
- Prepare the taro paste by steaming the taro pieces in a steamer over high heat for 10 to 15 minutes, or until completely cooked through.
- Add the sugar to the steamed taro. Using a masher, mash the taro into a smooth paste.
- Divide the paste into 12 equal portions and shape them into taro balls. Cover and set aside.
- Prepare the dough by adding the milk, yeast, and sugar to the bowl of a stand mixer fitted with a dough hook.
- Add the flour to the yeast mixture. Turn on the mixer to speed 1 and knead the ingredients until a smooth dough forms, about 6 minutes.
- Transfer the dough to a lightly greased surface, cover with plastic wrap, and let it rest for 5 minutes.
- On a lightly floured surface, roll the dough with your hands until the surface is smooth.
- Divide the dough into 12 equal pieces and shape each piece into a ball.
- Roll out each dough ball on a lightly floured surface, then place a taro ball in the center of the dough.
- Wrap the dough around the taro ball, pinching to seal tightly.
- Place each taro bun on a piece of pre-cut rectangular parchment paper.
- Arrange the taro buns inside a steamer, leaving enough space between each bun to prevent sticking.
- Cover the steamer lid and let them rise for 60 minutes, or until the dough balls have expanded in size.
- Add water to the bottom of the steamer and cover the lid tightly.
- Turn on high heat and steam the buns for 10 to 12 minutes, or until the taro buns are soft, puffy, and fluffy.
- Turn off the heat and serve the steamed taro buns warm.
Notes
- Tip 1: Store leftover buns in an airtight container in the refrigerator for up to 3 days.
- Tip 2: You can freeze the unsteamed buns for later use.
- Tip 3: Serve with sweetened condensed milk or coconut cream.
- Tip 4: Enjoy warm for the best experience.
- Tip 5: Experiment with various fillings for more flavor.