
Rhubarb Pie
There’s something uniquely nostalgic about baking a Rhubarb Pie. Growing up, my grandmother would always have her kitchen bustling with activity, the air infused with that unmistakable tartness of freshly cut rhubarb. I’d watch her, mesmerized as she transformed the seasonal bounty into a beautiful pie, its crust golden and flaky, waiting to be adorned with a dollop of whipped cream. Whenever I bite into a slice today, I can’t help but be transported back to those cherished moments in her kitchen. This Rhubarb Pie not only brings back memories but also connects me to the joys of springtime, when rhubarb is at its peak. It’s a reminder of the beauty found in simplicity—fresh ingredients, love, and a little patience are all you truly need.
Recipe Snapshot
1 hr 45 mins
30 mins
75 mins
Medium
220 kcal
2 g
Standard
10 g
Frying Pan, Oven, Grater, Chef’s Knife, Mixing Bowl, Wooden Spoon, Baking Sheet
Why This Rhubarb Pie Is a Winner
Seasonal Delight
There’s something truly special about making a Rhubarb Pie in the spring. As the weather warms and gardens come alive, rhubarb emerges, bringing with it a unique tartness that’s simply irresistible. The vibrant green and pink stalks are not just beautiful; they offer a delightful contrast to the sweetness of the sugar you’ll add.
Textural Harmony
The combination of tender rhubarb filling with a flaky crust creates an unforgettable mouthfeel. When baked, the rhubarb softens, releasing its juices, while the crust develops a golden, crisp texture that complements the filling perfectly. Each bite provides a satisfying crunch followed by a burst of tangy flavor.
Perfect for Any Occasion
This pie is versatile enough to be the star of a family gathering or a simple weekday dessert. Whether you’re hosting a spring brunch, a summer picnic, or just enjoying a quiet evening at home, serving a slice of Rhubarb Pie always feels right. It’s the kind of dessert that brings people together, sparking conversations and creating memories.
Customizable Goodness
Feel free to play with the recipe! Love a sweeter pie? Add extra sugar. Want to spice things up? Incorporate some cinnamon or ginger into the filling. The Rhubarb Pie is your canvas; let your creativity shine through!
Whipped Cream Optional
While some might argue that a slice of pie isn’t complete without a generous dollop of whipped cream, I often find that my favorite way to enjoy Rhubarb Pie is just as it is. Its natural flavors shine, presenting a delightful balance between tart and sweet.
What Goes Into Rhubarb Pie
Creating a Rhubarb Pie requires a handful of straightforward ingredients that harmonize beautifully. The key players here include the tart rhubarb, which forms the star of the filling, and sugar, which balances its acidity. A good crust, made from flour and butter, provides a delicious base that encases the filling. Each ingredient plays a vital role, ensuring the pie is not only flavorful but also has the right texture.
- Double Crust Darn Good Whole Wheat Pie Crust: Enough for two 10-inch rounds. This crust is the foundation of your pie, providing a flaky and tender texture that’s essential for a great pie.
- Sliced Rhubarb: About 1 1/3 pounds. This fruit offers a beautiful tartness that defines the flavor of your pie.
- Granulated Sugar: ¾ cup plus 1 teaspoon, divided. This sweetness helps to balance the tartness of the rhubarb.
- All-Purpose Flour: 5 tablespoons. This is used to thicken the filling, ensuring it sets nicely.
- Kosher Salt: ⅛ teaspoon. A touch of salt enhances the overall flavors.
- Freshly Grated Nutmeg: ⅛ teaspoon (optional). Adds a subtle warmth to the pie.
- Unsalted Butter: 1 tablespoon, cut into small pieces. This enriches the filling and enhances its flavor.
- Large Egg: Beaten with 1 teaspoon water for an egg wash. This gives the crust a beautiful golden finish.
- Turbinado Sugar: 1 tablespoon. This coarse sugar adds a delightful crunch to the top crust.
- Whipped Cream: Optional for serving. A classic accompaniment for adding creaminess.
Recipe Directions for Rhubarb Pie
In this section, I’ll guide you through each step of making your own Rhubarb Pie. From preparing the crust to baking it to golden perfection, every detail matters. Take your time, enjoy the process, and let your kitchen fill with the sweet aroma of baking pie.
- Start by preparing your double crust as directed, and allow it to chill for one hour, or up to two days if you’re planning ahead. This resting period is crucial as it ensures the dough is easier to roll and results in a flakier crust.
- When you’re ready to bake, preheat your oven to 425°F, placing a rack in the center. This temperature is vital for getting that initial rise in your pie.
- Divide the chilled dough in two—one half should be slightly larger than the other. Return the smaller half to the refrigerator to keep it cool.
- On a lightly floured surface (a piece of parchment or wax paper works beautifully), roll out the larger half into a 12-inch circle. If the dough feels too stiff, let it rest at room temperature for a few minutes. Aim for a smooth and even circle, rotating the dough as you roll.
- Transfer the rolled dough to a regular 9-inch pie plate. I like to fold it over the rolling pin to make this easier. Don’t stretch it; just ease it down into the plate and pop it in the freezer while you prepare the filling.
- Now, roll out the smaller portion of dough into an 11-inch circle. If you want a lattice top, cut it into 1-inch strips and keep it refrigerated until you’re ready to assemble.
- In a large bowl, stir together the sliced rhubarb, ¾ cup granulated sugar, flour, salt, and nutmeg until well combined. This mixture will be your filling.
- Remove the bottom crust from the freezer and sprinkle the remaining 1 teaspoon of granulated sugar over the bottom. Then, transfer the rhubarb mixture into the crust, spreading it into an even layer.
- Scatter the small pieces of butter over the top of the filling, allowing it to melt into the pie as it bakes.
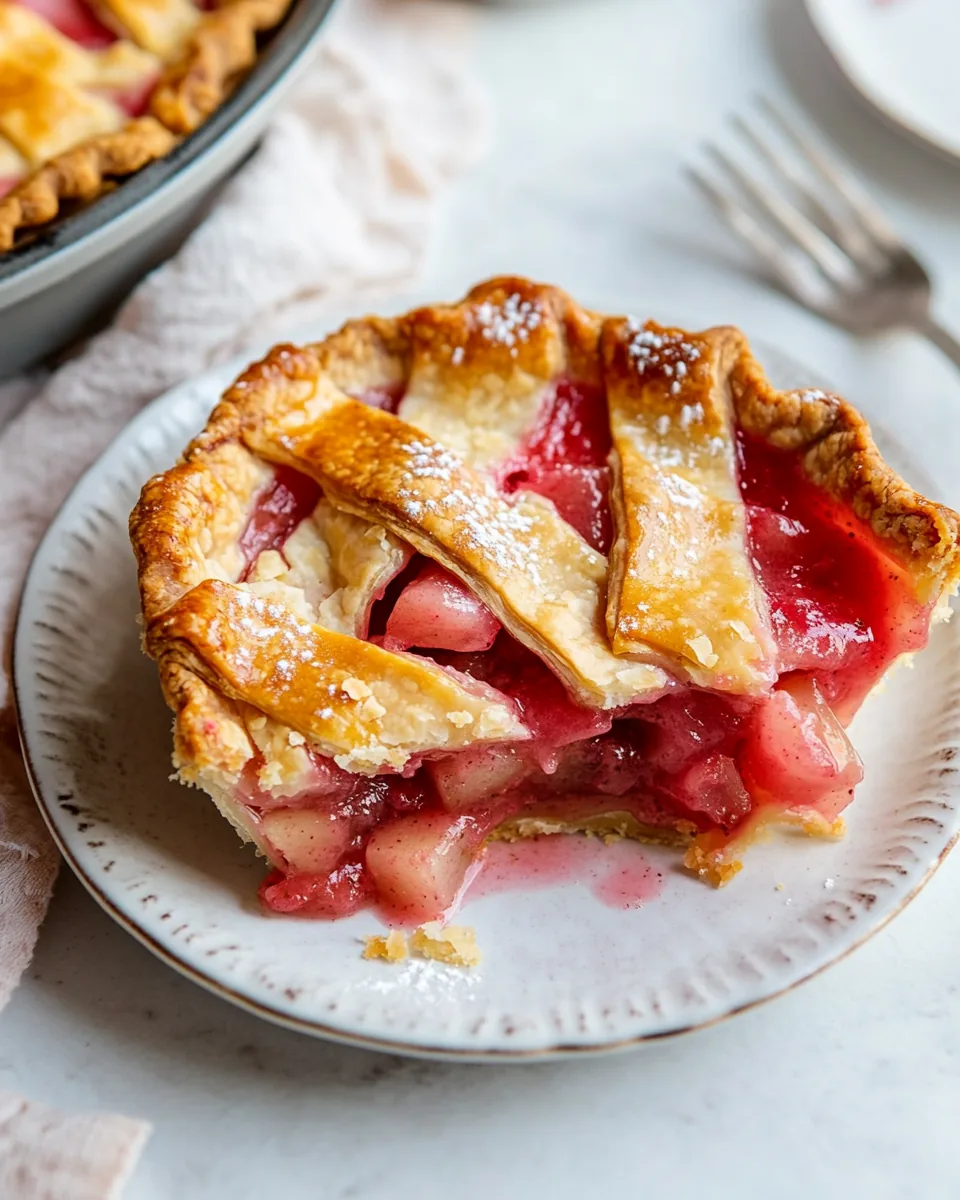
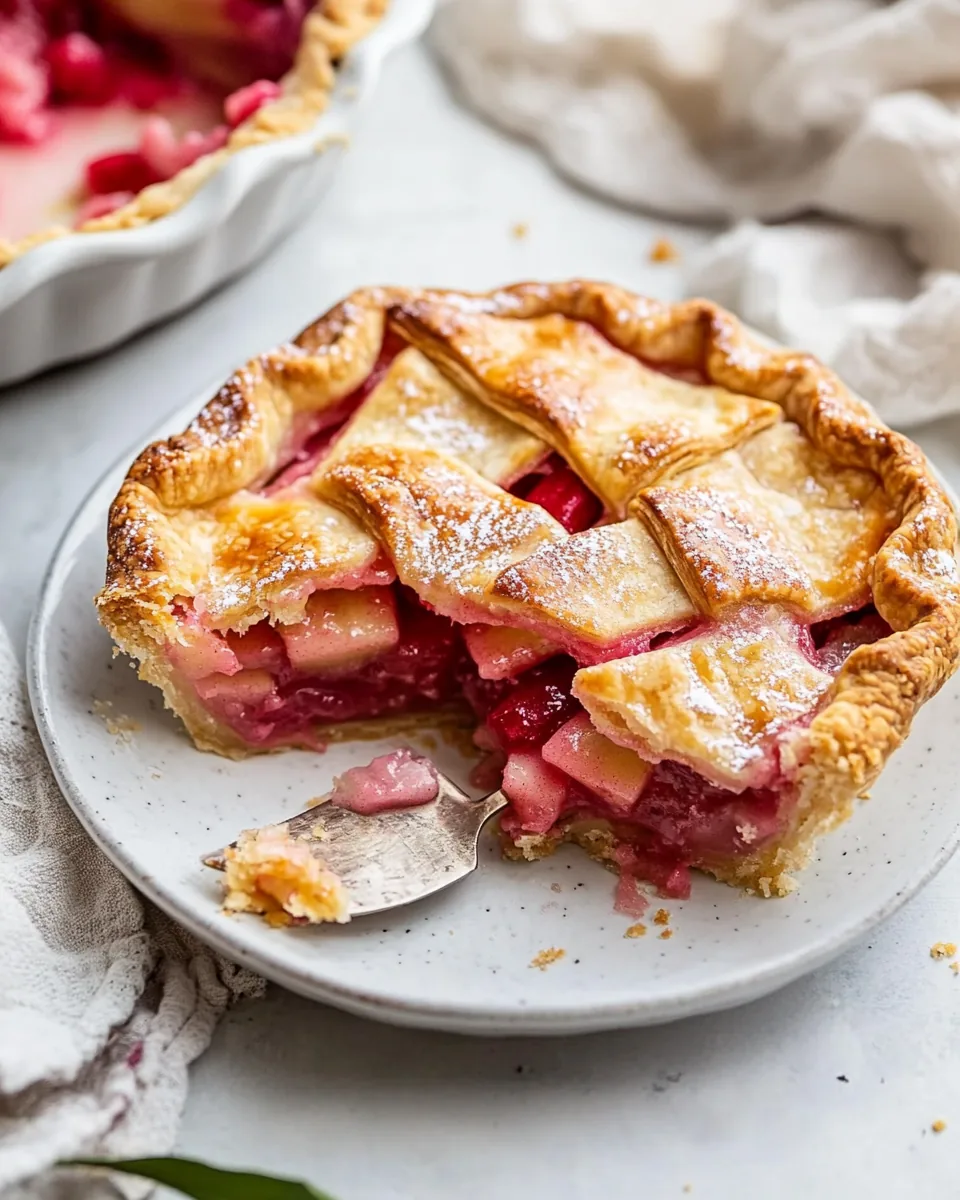
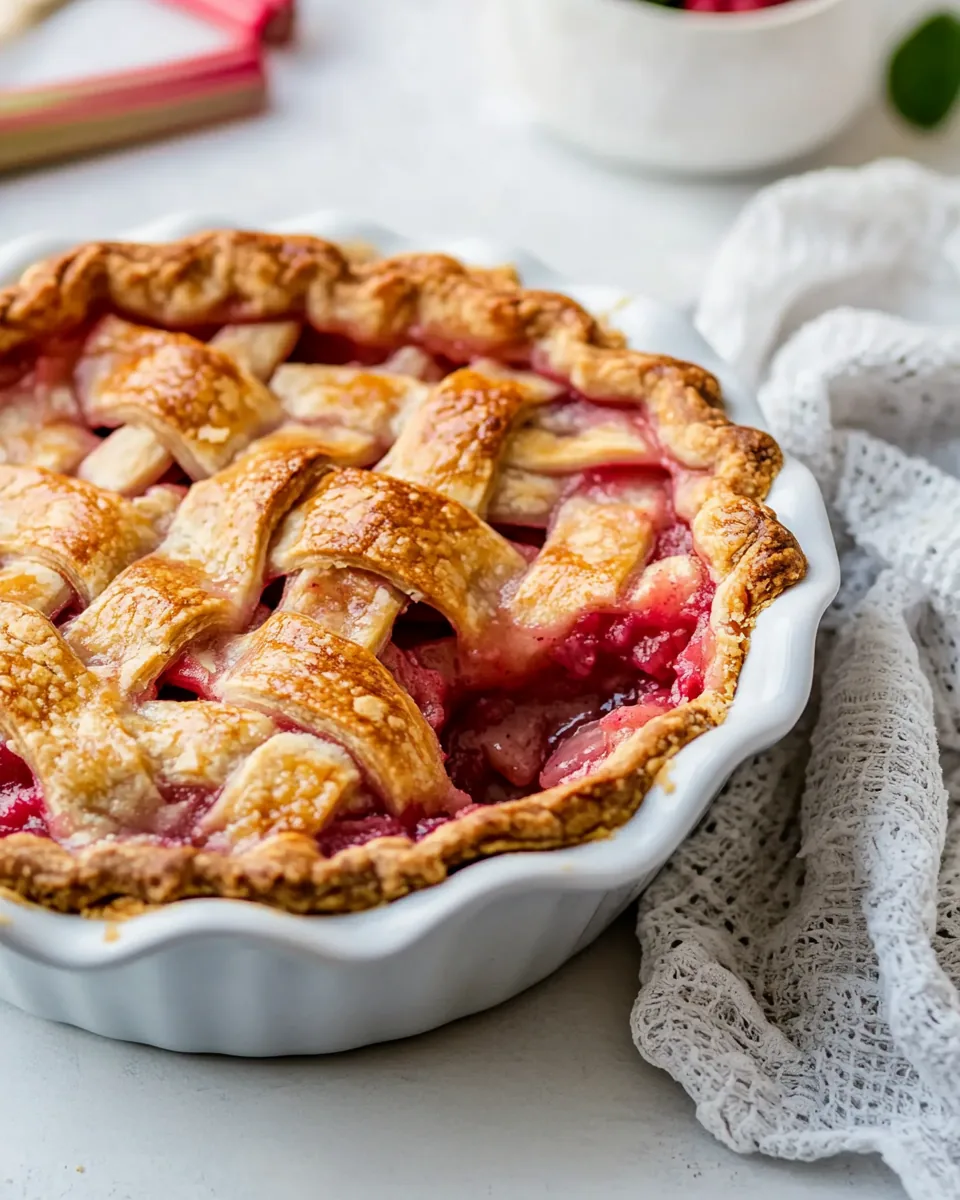
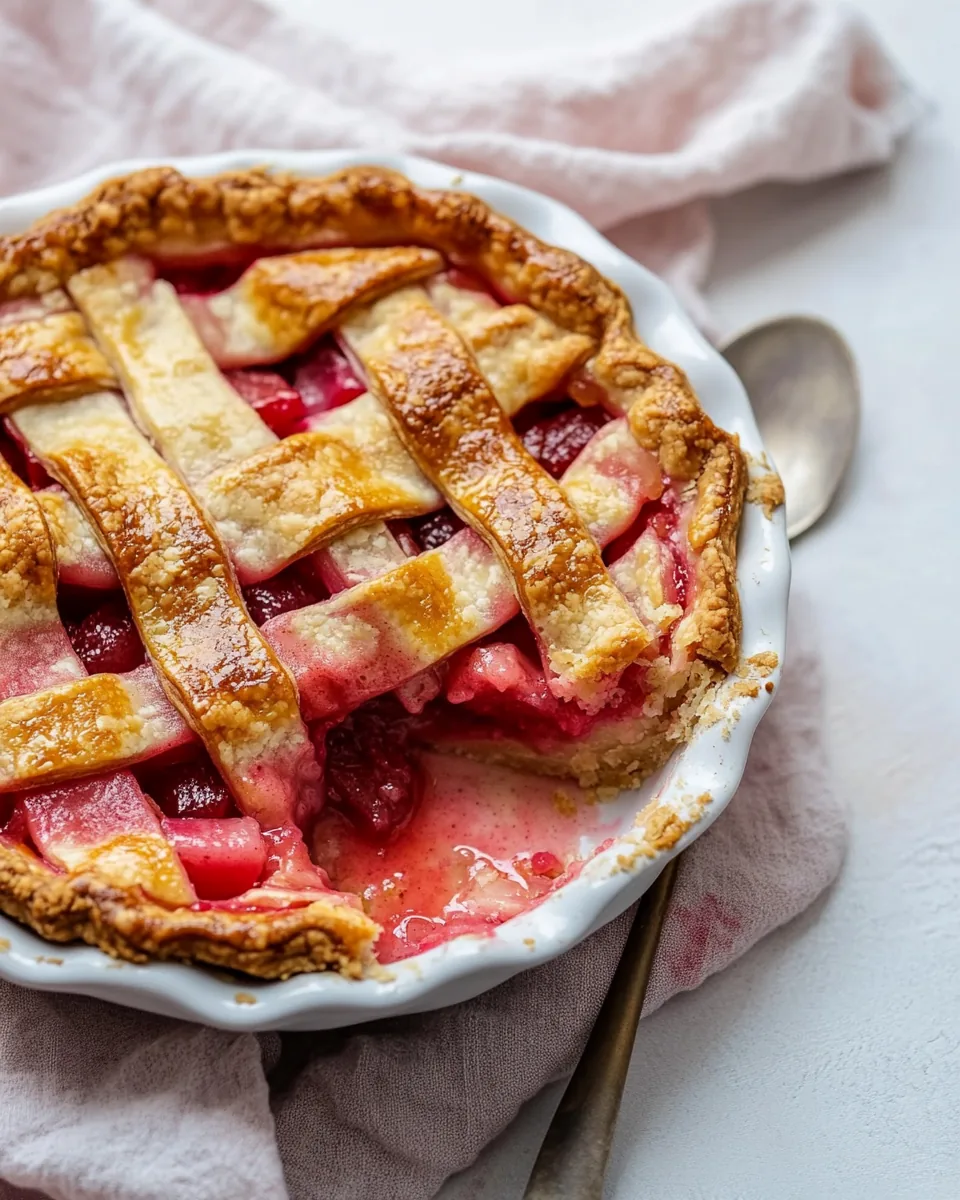
- Drape the top crust over the rhubarb filling or arrange the lattice strips you cut earlier. Trim the edges to leave a ½-inch overhang and tuck it under itself. Crimp the edges with your fingers for a nice finish.
- Cut 5 to 6 vents into the top crust to allow steam to escape. This is important to prevent the pie from bubbling over.
- Brush away any excess flour from the crust with a dry brush, then use the egg wash to coat the entire surface of the crust.
- Place your pie on a parchment-lined baking sheet to catch any drips. Sprinkle the top with turbinado sugar for a lovely crunch.
- Bake the pie for 15 minutes at 425°F. After that, reduce the temperature to 375°F and continue baking for about 50 to 55 minutes more. Keep an eye on it, and if the edges start to darken too much, cover them with foil.
- Once baked, allow the pie to cool completely at room temperature. This can take at least 4 hours but is worth the wait. Slice and enjoy either plain or with a dollop of whipped cream!
Things Worth Knowing
- Choosing the Right Rhubarb: Look for firm, vibrant stalks. Avoid any that have a dull color or soft spots, as they won’t provide the best flavor.
- Flavor Balance: A tart rhubarb pie benefits from the right amount of sugar. The recipe can be adjusted to suit your taste—feel free to sample the filling before baking!
- Cooling Time: Allowing the pie to cool completely before slicing is crucial. This helps the filling set properly, making for cleaner slices.
- Using Frozen Rhubarb: If you’re using frozen rhubarb, don’t thaw it before adding it to the pie, as this could make the filling too watery.
Recipe Notes about Rhubarb Pie
Every baker has their unique insights, and I want to share some tips to make your Rhubarb Pie experience even better. These notes will help enhance your baking skills and ensure your pie turns out perfectly every time.
- Storage: Wrap cooled Rhubarb Pie with foil or plastic wrap, or transfer leftovers to an airtight container. Store at room temperature for up to 5 days.
- Freezing: You can freeze the pie for up to 2 months. Let it thaw in the refrigerator before serving to maintain the best texture.
- Sweetness Level: The amount of sugar in the recipe yields a tart pie. For a sweeter flavor, consider adding an additional ¼ cup of sugar.
- Egg Wash Alternatives: If you prefer not to use an egg for the crust, brushing it with half-and-half, cream, or milk works just as well for a golden finish.
- Serving Suggestions: While whipped cream is a traditional accompaniment, many find that Rhubarb Pie is delightful on its own, allowing the rhubarb flavor to shine.
What Goes Well With This Rhubarb Pie
Serving your Rhubarb Pie can be just as delightful as making it. Here are some ideas on how to enjoy this delicious dessert:
- Classic Pairing: Enjoy a slice with a dollop of fresh whipped cream or vanilla ice cream for a creamy contrast.
- Spring Gatherings: This pie makes a perfect centerpiece for spring brunches or picnics, bringing a burst of color and flavor to your table.
- Tea Time Treat: Serve with a cup of tea or coffee as a delightful afternoon pick-me-up.
- Storage Tips: If you have leftovers, make sure to store them properly in an airtight container, and they can be enjoyed for several days.
- Seasonal Celebrations: Pair with other seasonal dishes or desserts to create a well-rounded feast that highlights spring flavors.
- Personal Touch: Feel free to experiment with toppings, adding toasted nuts or a sprinkle of cinnamon for an extra layer of flavor.
FAQ
Conclusion
The Rhubarb Pie is a celebration of spring flavors, combining the tartness of fresh rhubarb with a buttery, flaky crust. It’s a beloved recipe that has been passed down through generations, bringing warmth and nostalgia to every bite. I encourage you to try this recipe and experience the unique and delicious flavors that a homemade Rhubarb Pie has to offer. Share it with loved ones and create your own memories, just as I did in my grandmother’s kitchen.

Rhubarb Pie
Equipment
- Frying Pan
- Oven
- Grater
- Chef's Knife
- Mixing Bowl
- Wooden Spoon
- Baking Sheet
Ingredients
- 1 double crust Double Crust Darn Good Whole Wheat Pie Crust or your favorite pie crust or store-bought crust (enough for 2, 10-inch rounds)
- 5 cups Sliced Rhubarb about 1 1/3 pounds; if frozen, do not thaw
- ¾ cup Granulated Sugar plus 1 teaspoon, divided
- 5 tablespoons All-Purpose Flour
- ⅛ teaspoon Kosher Salt
- ⅛ teaspoon Freshly Grated Nutmeg optional
- 1 tablespoon Unsalted Butter cut into small pieces
- 1 large egg Large Egg beaten with 1 teaspoon water for an egg wash
- 1 tablespoon Turbinado Sugar or similar coarse sugar
- Whipped Cream optional for serving
Instructions
- Prepare the pie crust and chill for 1 hour as directed (or up to 2 days). When ready to bake, place a rack in the center of your oven preheat to 425°F.
- Divide the dough in two, making one half slightly larger than the other. Return the smaller half to the refrigerator.
- On a moderately floured work surface (I like to use a piece of parchment or wax paper so I can easily move the dough), roll out the larger half into a 12-inch circle (if it’s too stiff from being in the fridge, let it rest at room temperature for a few minutes, until you can roll it). When rolling, always work from the center of the dough outward, rotating the dough every now and then as you go (this will give you a better, more even circle, less tearing, and you’ll be able to gauge if the dough is sticking to your work surface, which you do not want). Work fast, because the dough gets sticky as it warms. Flour the work surface and your rolling pin as little as is manageable (but don’t be afraid to use flour if dough is sticking). If at any point the dough gets too sticky to handle, just pop it back in the fridge to firm up for a few minutes (this is where the parchment paper comes in handy). If you have any tears or cracks along the way, don’t stress. Just patch them together.
- Transfer the dough to a regular 9-inch pie plate (not deep dish)—I like to fold the circle over the rolling pin, then use the rolling pin to unfurl it gently into the plate. Ease the dough down into the plate (don’t pull to stretch it or it will bounce back). Pop into the freezer.
- On a sheet of parchment or wax paper, roll out the second (smaller) portion of dough in an 11-inch circle; if you’d like to make a lattice, cut it into 1-inch strips. Use the paper to place it in the refrigerator while you prepare the filling.
- In a large bowl, stir together the rhubarb, 3/4 cup granulated sugar, flour, salt, and nutmeg.
- Remove the bottom crust from the freezer. Sprinkle the remaining 1 teaspoon granulated sugar over the bottom. With a large spoon, transfer all of the rhubarb mixture (including any juices if the rhubarb is fresh or dry bits of flour and sugar if it’s frozen) to the plate, spreading it into an even layer.
- Scatter the butter over the top of the rhubarb filling.
- Drape the top crust over the filling (or arrange the lattice). Trim the pie crust to 1/2-inch overhang all the way around. Tuck the top crust under the bottom crust. Crimp the edges with your fingers (or keep it easy and simply press along the edges with the tines of a fork). If not using a lattice, with a sharp knife, cut 5 to 6 vents in the top.
- Use a dry brush to brush away any excess flour from the crust, then brush the crust all over with the eggwash.
- Place the pie on a parchment-lined baking sheet and sprinkle with the turbinado sugar. Bake on the center rack at 425°F for 15 minutes, then reduce the temperature to 375°F. Continue baking until the crust is deep golden and you see bits of filling bubbling out of the vents, about 50 to 55 minutes more, rotating the pan 180° halfway through (if your rhubarb was frozen, you might need to extend the baking time by 10 minutes or more). If at any point, the crust edges get too dark, shield the edges with foil or a pie crust guard.
- Let the pie cool at room temperature COMPLETELY! (This will take at least 4 hours and is hard but worth it). Slice and enjoy with whipped cream, or nothing at all!
Notes
- Tip 1: The amount of sugar as written yields a tart, rhubarb-forward pie that we and our taste testers loved. If you like your pie sweeter, add an additional 1/4 cup.
- Tip 2: If you prefer not to use an egg, you can brush the crust with half-and-half, cream, or milk.
- Tip 3: While I usually adore my fruit pies a la mode, rhubarb actually tastes better without ice cream. If you’d like to top it, serve with whipped cream.
- Tip 4: TO STORE: Wrap cooled rhubarb pie with foil or plastic wrap, or transfer leftovers to an airtight container. Store at room temperature for up to 5 days.
- Tip 5: TO FREEZE: Freeze for up to 2 months and let the pie thaw in the refrigerator before serving.

