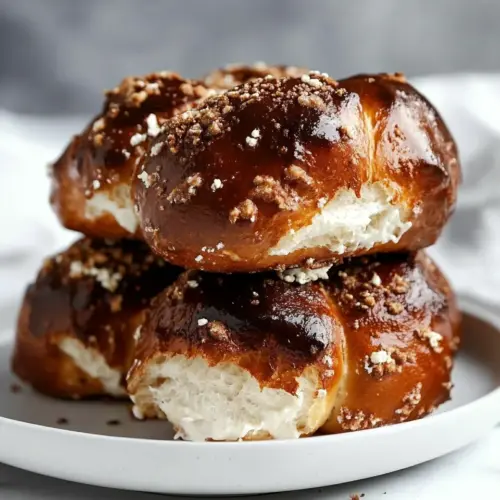
Pretzel Buns
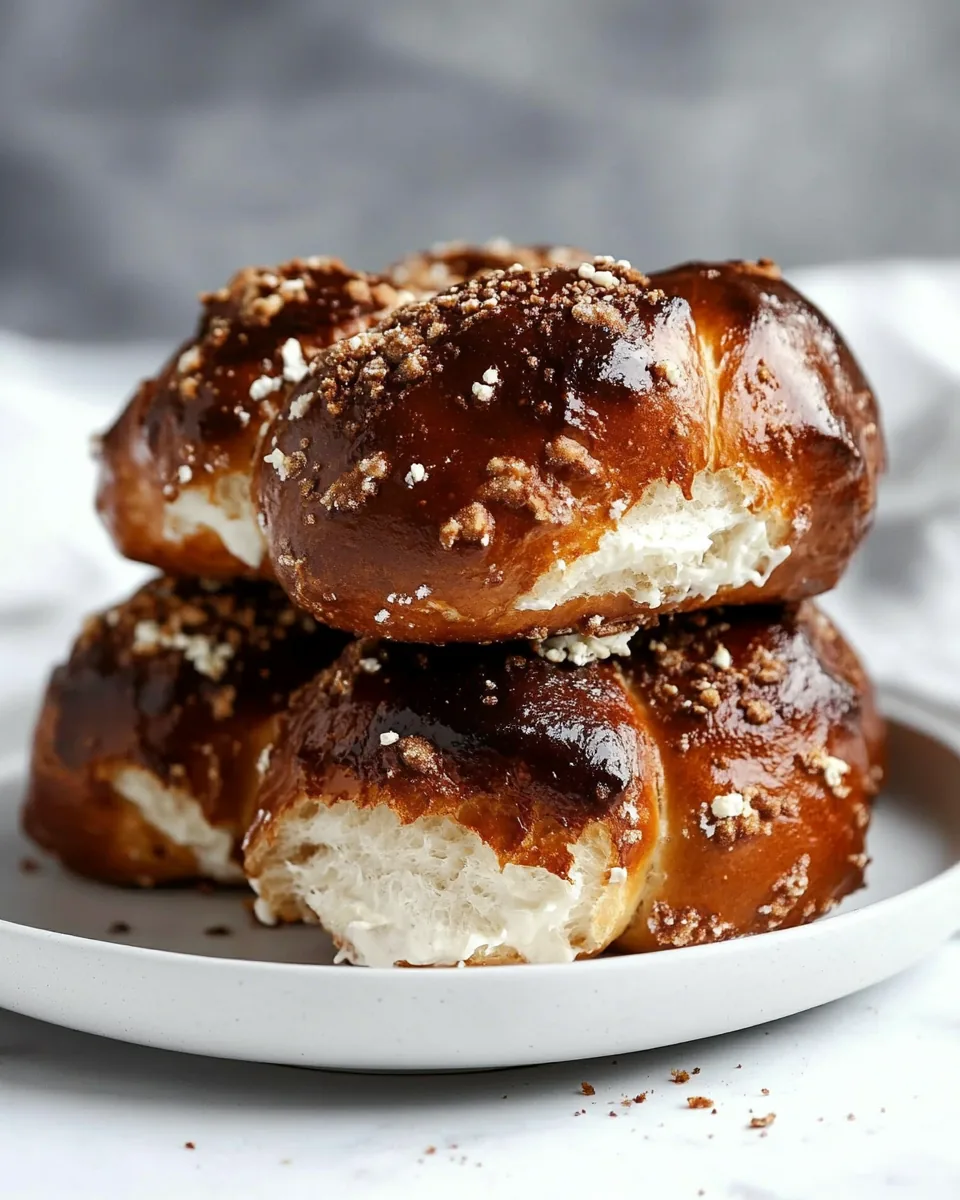
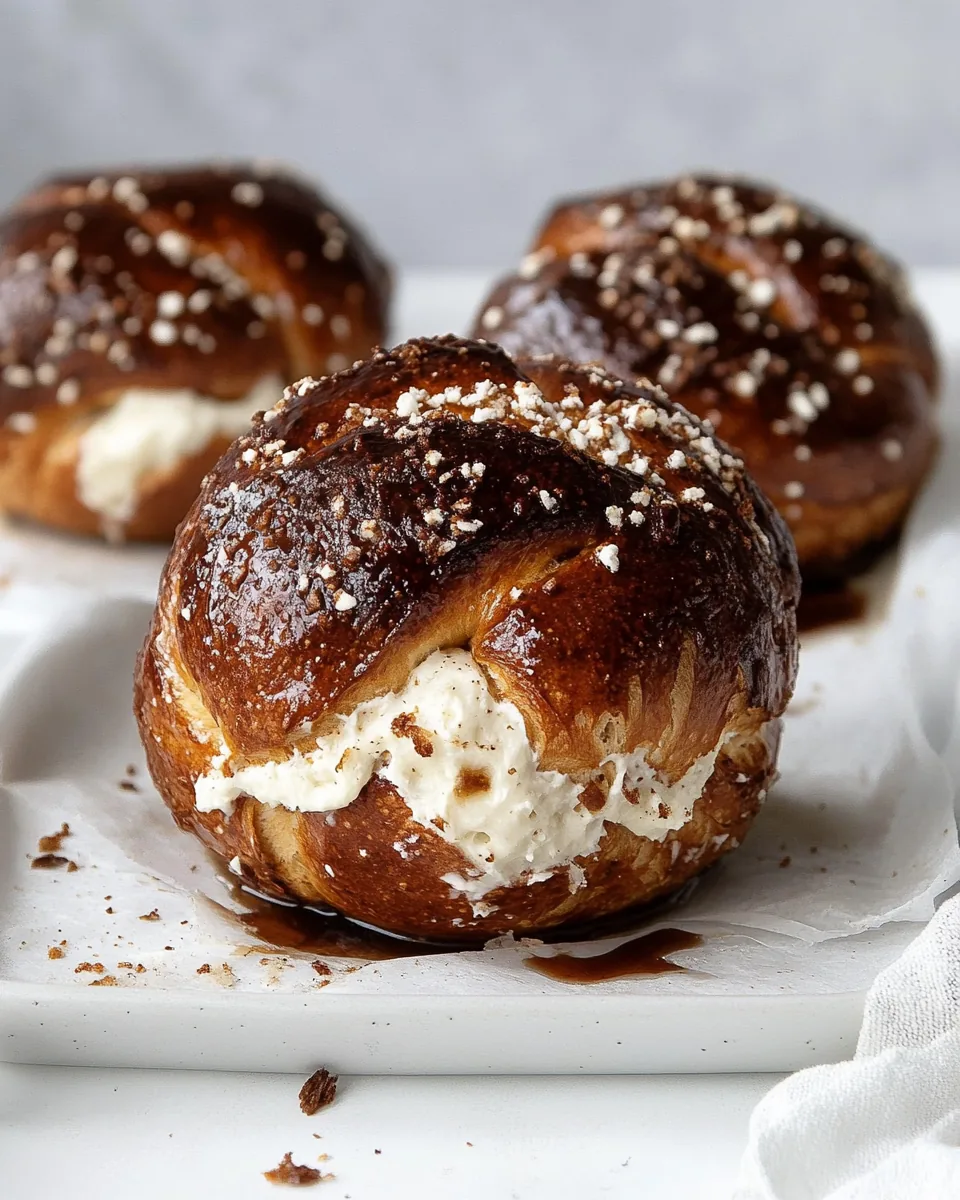
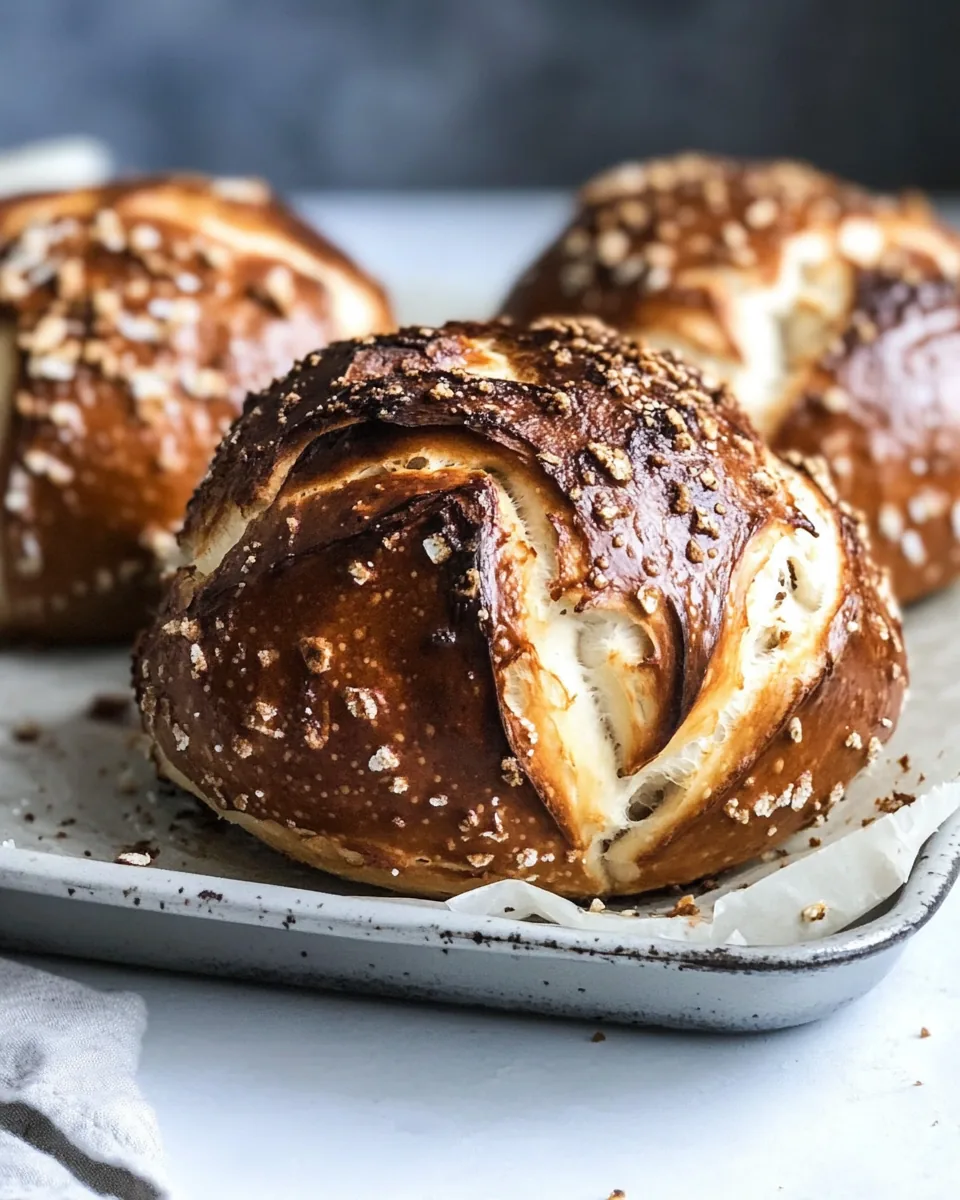
There’s something truly special about Pretzel Buns that brings a wave of nostalgia with every bite. Growing up, my family often took weekend trips to our local fair, where the scent of warm pretzels wafted through the air, drawing us in like a moth to a flame. I remember the excitement of watching the vendors twist the dough into intricate shapes, then dunking them in a hot bath before baking them to perfection. It felt like magic, and now, I’ve brought that same joy to my kitchen. These Pretzel Buns are not just any ordinary buns; they are soft, chewy, and brushed with melted butter and coarse salt, creating a delightful balance of flavors. Whether you’re serving them at a barbecue or enjoying them fresh out of the oven, these buns have a way of brightening any meal.
Recipe Snapshot
1 hr 11 mins
60 mins
11 mins
Hard
180 kcal
5 g
Gluten-Free, Low FODMAP
1 g
Frying Pan, Whisk, Oven, Saucepan, Wooden Spoon, Mixing Bowl, Baking Sheet
What Makes This Pretzel Buns Special
Comforting and Satisfying
The first reason I absolutely adore Pretzel Buns is their texture. The chewy exterior paired with a soft, fluffy interior creates a delightful contrast that’s simply irresistible. It’s a texture that comforts and fills you up, perfect for slathering with butter or piling high with your favorite toppings.
Versatile in Pairings
Another standout feature of these buns is their versatility. You can serve Pretzel Buns with a variety of dishes, from hearty soups to gourmet burgers. They’re fantastic as a side for chili or even as the base for a delicious sandwich. The options are endless, making them a true kitchen staple!
Easy to Make at Home
Many people shy away from making buns at home, thinking it’s a daunting task. However, making Pretzel Buns is surprisingly simple! With just a few ingredients and some patience, you’ll find the process immensely rewarding. Plus, there’s nothing quite like the smell of freshly baked bread wafting through your home.
Perfect for Any Occasion
These buns are perfect for any occasion, whether you’re hosting a casual get-together or a holiday feast. Their warm, inviting aroma and delightful appearance can elevate even the simplest meals. Serve them at your next gathering, and watch your guests rave about them!
Fun to Customize
Another reason I love Pretzel Buns is that they can be customized to suit your taste. Feel free to experiment by adding different toppings, such as sesame seeds or everything bagel seasoning, before baking. This way, you can create a unique twist that reflects your personal style.
A Family Tradition
Finally, making Pretzel Buns has become a family tradition in my home. It’s a great way to spend quality time with loved ones, bonding over the kneading and shaping of the dough. It’s a fun activity that results in delicious treats, ensuring that the joy of cooking is shared with those you care about.
What You’ll Need for Pretzel Buns
When it comes to making Pretzel Buns, the ingredients are simple yet effective. Each one plays a vital role in creating the perfect bun, resulting in a delightful blend of flavors and textures. The key players include water, flour, yeast, and a touch of sugar, all working harmoniously to create that signature taste.
- 1 1/4 cups (284g) water: This is essential for hydrating the dough and activating the yeast, ensuring the buns rise properly.
- 1 teaspoon (4g) granulated sugar: A small amount of sweetness that helps activate the yeast, giving the buns a lovely flavor.
- 1 1/4 teaspoons (4g) yeast: The leavening agent that makes these buns fluffy and light.
- 1/2 cup (99g) granulated sugar: This adds sweetness to the dough, balancing out the savory flavor of the pretzel.
- 1 1/2 teaspoons (4g) Kosher salt: Enhances the overall flavor and brings out the sweetness of the dough.
- 4 – 4 1/2 cups (480-540g) all-purpose flour: The main ingredient that gives structure to the buns, creating that perfect chewy texture.
- 1/2 cup (115g) baking soda: Used to create that signature pretzel flavor and color during the boiling process.
- 4 cups (908g) water: Used for boiling the buns, which gives them their chewy crust.
- 1/4 cup (57g) butter, melted: Adds richness and a glossy finish to the buns.
- sea salt: A final sprinkle on top for that distinctive pretzel taste.
Step by Step Guide for Pretzel Buns
Making Pretzel Buns might seem complex, but trust me, the results are worth every minute. The process is straightforward and enjoyable, especially when you see the dough transform into golden brown perfection. Let’s dive into the steps!
- First, heat water to about 110º to 120º F in a medium glass bowl in the microwave. You want it warm but not too hot. Stir in the granulated sugar until it dissolves completely. This step activates the yeast, so take your time.
- Once the sugar is dissolved, sprinkle the yeast into the water mixture and allow it to sit for about 5 minutes. You should see it foam up as it proofs, indicating that it’s alive and ready to work!
- While the yeast is doing its thing, whisk together the remaining granulated sugar, Kosher salt, and 3 cups of the all-purpose flour in the mixing bowl of your stand mixer. This mixture will form the base of your dough.
- Next, pour the yeast mixture into the dry ingredients. Stir everything together until all the flour is well incorporated, scraping the bottom of the bowl to ensure no dry flour remains. If the mixture seems too wet, you can gradually add more flour.
- Now, using the dough hook on your stand mixer, knead the dough. Add flour 1/4 cup at a time until the dough forms a ball that doesn’t stick to the bottom of the bowl. It’s important to get the right consistency during this step.
- Set the mixer to medium speed and knead for about 7 to 10 minutes. The dough should feel tacky but not sticky, creating a silky texture.
- While the dough is kneading, prepare a medium glass bowl by lightly coating it with butter. This will keep the dough from sticking as it rises.
- Once kneaded, remove the dough from the mixer and give it 5 to 7 gentle kneads by hand. Form the dough into a ball and roll it in the buttered bowl to coat it entirely. Cover the bowl with plastic wrap and place it in a warm, dry area free of drafts. Let it rise until doubled in size, which may take about 1 1/2 hours.
- After the dough has risen, prepare your baking sheets by spraying parchment paper lined rimmed baking sheets with nonstick cooking spray. This will prevent the buns from sticking.
- Once the dough is ready, remove it from the bowl and divide it into 8 to 12 even pieces using a bench scraper or knife. Roll each piece into a smooth ball using the palm of your hand.
- In a large saucepan, add baking soda to the water and heat it over medium-low heat until it simmers. This step is crucial for creating that signature pretzel texture and flavor.
- Carefully add the pretzel balls to the simmering water, one at a time. They will sink initially and then rise to the surface. Use a slotted spoon to remove them and place them on the parchment-lined baking sheets to dry completely for about 5 minutes.
- Preheat your oven to 400º F. This is the perfect temperature for achieving a golden brown finish.
- Before baking, brush each pretzel bun with melted butter and sprinkle generously with sea salt. This will enhance the flavor and give them that classic pretzel appearance.
- Bake in the preheated oven for about 11 to 14 minutes, or until they are golden brown. Keep an eye on them toward the end to avoid overbaking.
- Once baked, remove from the oven and allow the buns to rest until they’re cool enough to handle. Serve them warm and watch them disappear!
Things Worth Knowing
- Proofing Yeast: Ensure your yeast is fresh for the best results. If it doesn’t foam after 5 minutes, start over with new yeast.
- Kneading Technique: Kneading develops gluten in the dough, which gives it structure. Don’t skip this step!
- Boiling the Buns: Boiling in baking soda water is what gives Pretzel Buns their unique flavor and chewy texture.
- Cool Down: Let the buns cool slightly after baking to enhance the flavor and make them easier to handle.
Helpful Notes about Pretzel Buns
Making Pretzel Buns is a delightful experience, and a few notes can enhance your success. Here are some tips to keep in mind as you whip up these delicious treats:
- Storage: Keep leftover Pretzel Buns in an airtight container at room temperature for up to 2 days. If you need to store them longer, consider freezing.
- Freezing: You can freeze the baked buns. Wrap each one in plastic wrap and place them in a freezer bag. They can last up to three months!
- Pairing: These buns are perfect for pairing with your favorite dips or spreads, such as mustard or cheese sauce.
- Experiment: Try adding spices or herbs to the dough for an extra flavor boost. Garlic powder or rosemary work wonderfully!
- Serving Warm: For the best experience, serve Pretzel Buns warm. Just pop them in the oven for a few minutes to reheat.
How to Enjoy Pretzel Buns
- As a Snack: Pretzel Buns are great on their own as a snack. Serve them with mustard or your favorite dipping sauce for a tasty treat.
- With Soups: Pair these buns with hearty soups like chili or potato soup. They’re perfect for dipping!
- Sandwiches: Use Pretzel Buns as the base for delicious sandwiches. Fill them with your favorite fillings, like turkey or roasted vegetables.
- Barbecues: They make a fantastic side dish for barbecues. Serve them alongside grilled meats and fresh salads.
- On Game Day: These buns are a hit at game day parties. Serve them with various toppings for a fun DIY station!
- Seasonal Pairing: During colder months, enjoy them with warm dips or as a side for holiday meals.
FAQ
Conclusion
In summary, Pretzel Buns are a delightful addition to any meal, boasting a unique flavor and texture that sets them apart. I encourage you to bring this recipe into your kitchen and experience the joy of making these delicious buns yourself. You’ll impress your friends and family, and who knows, it might just become a new tradition in your home!
Pretzel Buns
Equipment
- Frying Pan
- Whisk
- Oven
- Saucepan
- Wooden Spoon
- Mixing Bowl
- Baking Sheet
Ingredients
- 1 1/4 cups Water
- 1 teaspoon Granulated Sugar
- 1 1/4 teaspoons Yeast
- 1/2 cup Granulated Sugar
- 1 1/2 teaspoons Kosher Salt
- 4 - 4 1/2 cups All-Purpose Flour
- 1/2 cup Baking Soda
- 4 cups Water
- 1/4 cup Butter, melted
- Sea Salt
Instructions
- First, heat water to about 110º to 120º F in a medium glass bowl in the microwave. You want it warm but not too hot. Stir in the granulated sugar until it dissolves completely. This step activates the yeast, so take your time.
- Once the sugar is dissolved, sprinkle the yeast into the water mixture and allow it to sit for about 5 minutes. You should see it foam up as it proofs, indicating that it’s alive and ready to work!
- While the yeast is doing its thing, whisk together the remaining granulated sugar, Kosher salt, and 3 cups of the all-purpose flour in the mixing bowl of your stand mixer. This mixture will form the base of your dough.
- Next, pour the yeast mixture into the dry ingredients. Stir everything together until all the flour is well incorporated, scraping the bottom of the bowl to ensure no dry flour remains. If the mixture seems too wet, you can gradually add more flour.
- Now, using the dough hook on your stand mixer, knead the dough. Add flour 1/4 cup at a time until the dough forms a ball that doesn’t stick to the bottom of the bowl. It’s important to get the right consistency during this step.
- Set the mixer to medium speed and knead for about 7 to 10 minutes. The dough should feel tacky but not sticky, creating a silky texture.
- While the dough is kneading, prepare a medium glass bowl by lightly coating it with butter. This will keep the dough from sticking as it rises.
- Once kneaded, remove the dough from the mixer and give it 5 to 7 gentle kneads by hand. Form the dough into a ball and roll it in the buttered bowl to coat it entirely. Cover the bowl with plastic wrap and place it in a warm, dry area free of drafts. Let it rise until doubled in size, which may take about 1 1/2 hours.
- After the dough has risen, prepare your baking sheets by spraying parchment paper lined rimmed baking sheets with nonstick cooking spray. This will prevent the buns from sticking.
- Once the dough is ready, remove it from the bowl and divide it into 8 to 12 even pieces using a bench scraper or knife. Roll each piece into a smooth ball using the palm of your hand.
- In a large saucepan, add baking soda to the water and heat it over medium-low heat until it simmers. This step is crucial for creating that signature pretzel texture and flavor.
- Carefully add the pretzel balls to the simmering water, one at a time. They will sink initially and then rise to the surface. Use a slotted spoon to remove them and place them on the parchment-lined baking sheets to dry completely for about 5 minutes.
- Preheat your oven to 400º F. This is the perfect temperature for achieving a golden brown finish.
- Before baking, brush each pretzel bun with melted butter and sprinkle generously with sea salt. This will enhance the flavor and give them that classic pretzel appearance.
- Bake in the preheated oven for about 11 to 14 minutes, or until they are golden brown. Keep an eye on them toward the end to avoid overbaking.
- Once baked, remove from the oven and allow the buns to rest until they’re cool enough to handle. Serve them warm and watch them disappear!
Notes
- Storage: Keep leftover Pretzel Buns in an airtight container at room temperature for up to 2 days. If you need to store them longer, consider freezing.
- Freezing: You can freeze the baked buns. Wrap each one in plastic wrap and place them in a freezer bag. They can last up to three months!
- Pairing: These buns are perfect for pairing with your favorite dips or spreads, such as mustard or cheese sauce.
- Experiment: Try adding spices or herbs to the dough for an extra flavor boost. Garlic powder or rosemary work wonderfully!
- Serving Warm: For the best experience, serve Pretzel Buns warm. Just pop them in the oven for a few minutes to reheat.