No Bake Chocolate Wafer Cheesecake
The No Bake Chocolate Wafer Cheesecake is a pure delight that brings back fond memories of summer gatherings and family celebrations. I remember the first time I made this cheesecake; it was a hot day, and the thought of baking felt daunting. Instead, I opted for a no-bake version that not only saved me from turning on the oven but also resulted in a dessert that was creamy, rich, and utterly satisfying. The combination of smooth, whipped cream cheese and layers of crunchy chocolate wafers creates a delightful contrast of textures, making each bite an experience to savor. Not to mention, it’s a hit among friends and family, and it often turns into the star of the dessert table. Whether you’re hosting a party, celebrating a special occasion, or just indulging your sweet tooth, this cheesecake is sure to impress.
Recipe Snapshot
15 mins
15 mins
0 mins
Medium
350 kcal
4 g
Gluten-Free, Low FODMAP
28 g
Mixing Bowl
Why This No Bake Chocolate Wafer Cheesecake Hits Different
Effortless Preparation
One of the most significant advantages of the No Bake Chocolate Wafer Cheesecake is how incredibly easy it is to prepare. With minimal ingredients and no need for baking, you can whip this delightful dessert together in no time. The process is straightforward, making it perfect for novice bakers or those who want a quick recipe that doesn’t compromise on taste.
Decadent Flavors
The flavor profile of this cheesecake is simply irresistible. The creaminess of the whipped cream and cream cheese pairs beautifully with the rich taste of the chocolate wafers. Additionally, the hint of sweetness from the confectioners’ sugar perfectly balances the flavors, creating a dessert that tastes luxurious without being overly indulgent.
Perfect for Any Occasion
This cheesecake is versatile and can be enjoyed during various occasions. Whether it’s a summer barbecue, a birthday party, or a holiday gathering, it suits any event perfectly. Its no-bake nature means you can prepare it ahead of time, freeing up your day for other preparations.
Customizable Delight
Another fantastic aspect of the No Bake Chocolate Wafer Cheesecake is its adaptability. You can easily modify the recipe by adding different fruit toppings, such as fresh strawberries or blueberries, or even experimenting with flavored whipped cream. This flexibility allows you to tailor the cheesecake to suit your guests’ preferences or the seasonal availability of ingredients.
Freezer Friendly
If you’re ever in need of a make-ahead dessert, this cheesecake has you covered. It freezes beautifully, allowing you to prepare it weeks in advance. Just take it out a couple of hours before serving, and you’ll have a refreshing treat ready to enjoy.
Impressive Presentation
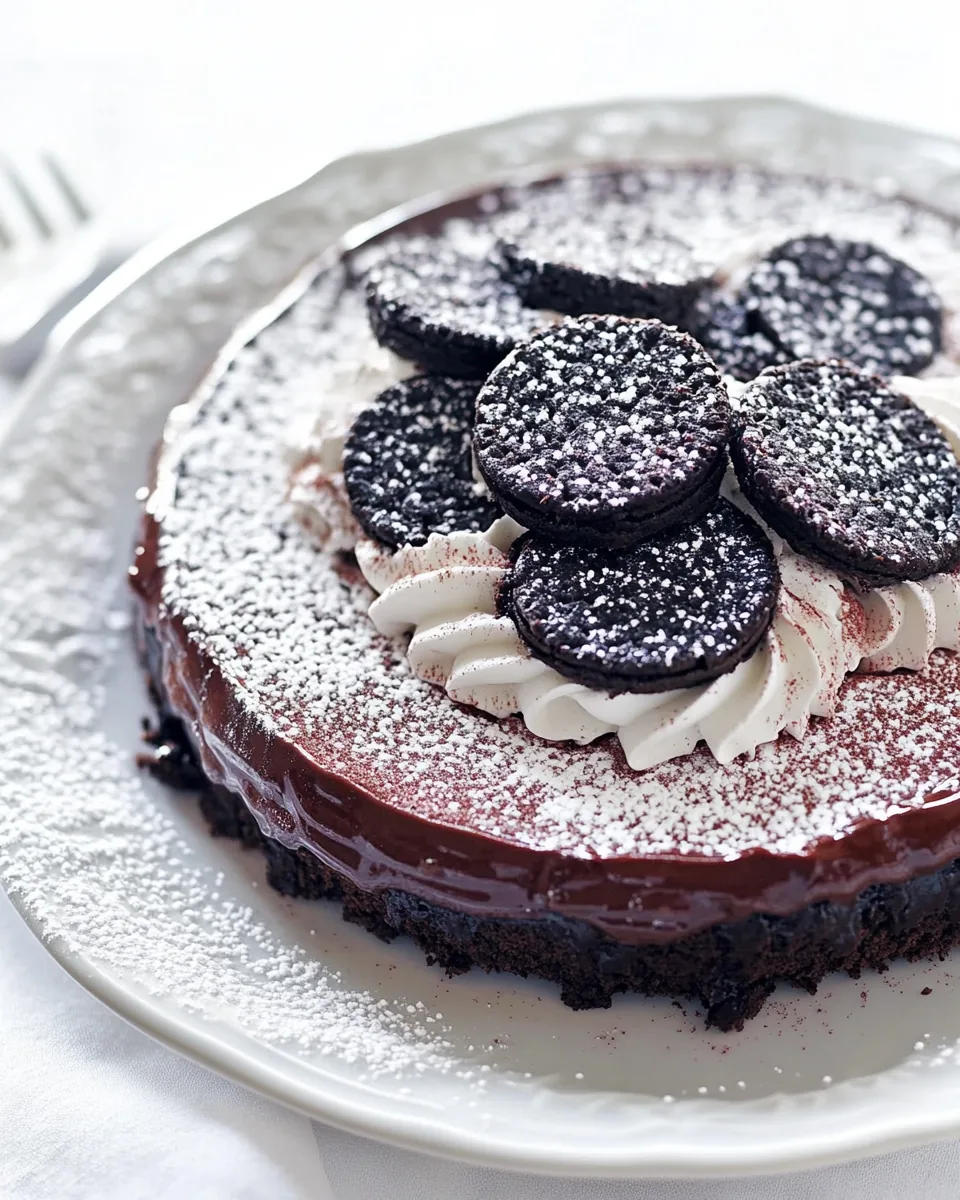
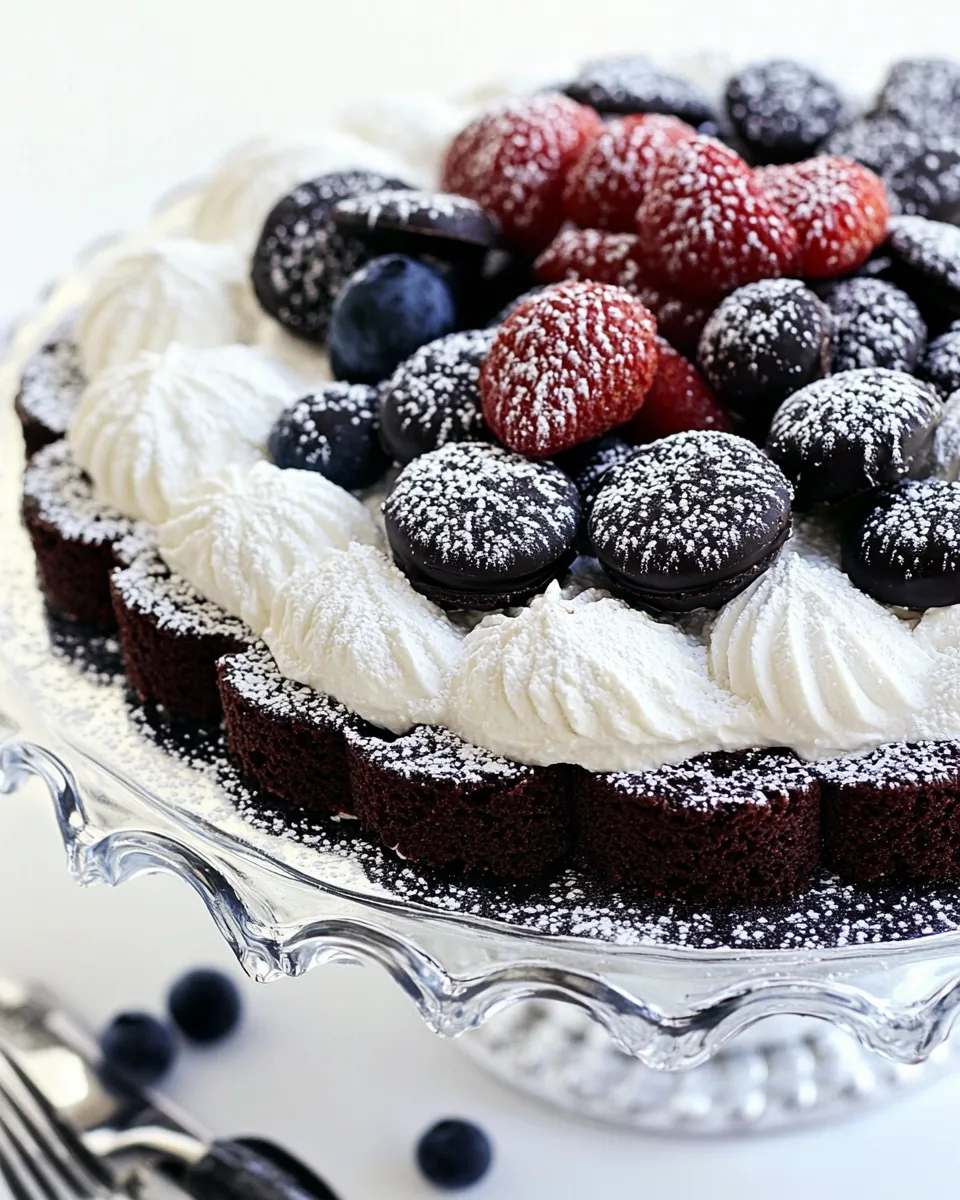
Lastly, the visual appeal of the No Bake Chocolate Wafer Cheesecake is enough to impress anyone. The layers of chocolate wafers and cream cheese create a stunning presentation that will have your guests reaching for their cameras before their forks. It’s a dessert that not only tastes good but looks great too.
No Bake Chocolate Wafer Cheesecake Ingredients
When it comes to the ingredients for the No Bake Chocolate Wafer Cheesecake, each component plays a crucial role in achieving that perfect texture and flavor blend. The combination of creamy and crunchy elements makes this dessert a standout. Here’s a closer look at the key ingredients that make this cheesecake truly special.
- Cream cheese: 16 ounces (452g) softened cream cheese provides a rich and creamy base for the cheesecake, ensuring it holds its shape while remaining deliciously smooth.
- Confectioners sugar: 6 tablespoons (48g) of confectioners sugar adds the perfect touch of sweetness without making the cheesecake overly sugary.
- Vanilla extract: 2 teaspoons (9g) of vanilla extract enhances the flavor profile, bringing a warm, comforting taste to the dessert.
- Heavy whipping cream: 1 quart (955g) of heavy whipping cream is essential for achieving that light and fluffy texture, making every bite melt in your mouth.
- Chocolate wafer cookies: 55 (330g) chocolate wafer cookies are the backbone of this cheesecake, providing a crunchy texture that contrasts beautifully with the creamy filling.
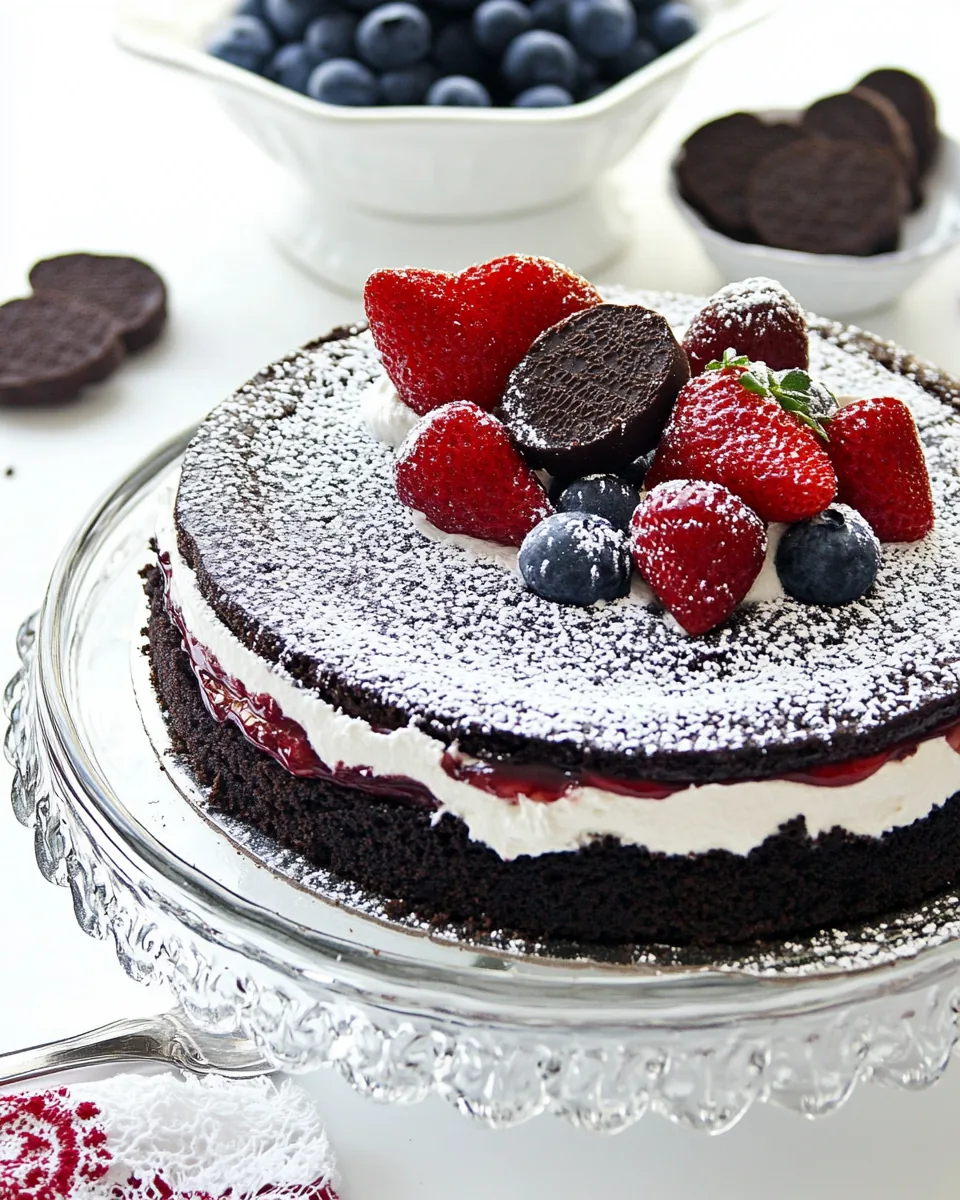
- Strawberries: 1 pint (357g) of hulled strawberries serves as a fresh and vibrant topping, adding a fruity balance to the rich cheesecake.
- Blueberries: 1 pint (296g) of blueberries enhances the flavor and provides a lovely pop of color to the presentation.
- Confectioners sugar for dusting: 1 tablespoon (8g) is used for a final touch, giving the cheesecake an elegant finish.
The Method for No Bake Chocolate Wafer Cheesecake
Making the No Bake Chocolate Wafer Cheesecake is an enjoyable and straightforward process, making it a great activity to share with family or friends. Let’s dive into the steps to create this delicious dessert together.
- Start by preparing your workspace. Place a 30-inch length of foil lengthwise on a baking sheet. Then, take another 30-inch length and place it perpendicular across the first piece of foil to form a large plus sign. Mark an 8-inch circle on the top layer of foil, and set this aside; this will help shape the cheesecake.
- In a large, cold mixing bowl, add the cream cheese. Use an electric mixer to whip the cream cheese until it becomes fluffy and airy, which usually takes about 2 to 3 minutes. This step is crucial to ensure your cheesecake has a light texture.
- Next, add the 6 tablespoons of confectioners sugar and the 2 teaspoons of vanilla extract to the whipped cream cheese. Continue to whip the mixture until everything is well combined and smooth.
- Slowly pour in the 1 quart of heavy whipping cream into the mixture while you continue to whip. This step is important to ensure that the cream is incorporated evenly, leading to a stable and fluffy filling. Whip until the mixture is light, fluffy, and holds firm peaks—this will typically take another 3 to 5 minutes.
- Now, it’s time to assemble your cheesecake! Take the whipped cheesecake mixture and pipe or spread it around the circle marked on the foil, creating the bottom layer. Make sure to fill the area completely for a solid base.
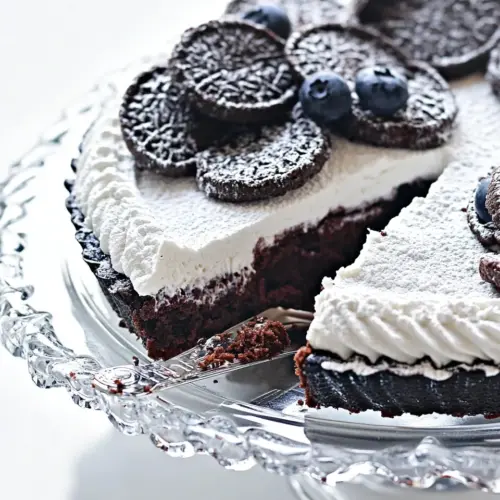
- Take a single layer of chocolate wafers and place them on top of the cheesecake mixture. Gently press them down to secure them in place.
- Pipe more of the cheesecake mixture over the first layer of chocolate wafers, ensuring they are well-covered. Next, add another layer of chocolate wafers on top, repeating the process until you have a total of five layers of chocolate wafers and cheesecake mixture.
- After the final layer of chocolate wafers, use the remaining cheesecake mixture to pipe around the base inside the ring of wafers and on the outside space between each stack. This seals the layers together beautifully.
- Carefully bring the sides of the foil up over the chocolate wafers, ensuring not to let the foil touch the cheesecake mixture. This will help maintain its shape during freezing.
- Place the assembled cheesecake in the freezer and allow it to freeze for at least 30 minutes or until solid.
- When you’re ready to serve, gently unfold the foil and use the long strips to lift the cheesecake onto a serving plate. It should come off easily, thanks to the foil lining.
- Finally, place the 1 pint of hulled strawberries and 1 pint of blueberries inside the center of the cheesecake ring for a fresh and colorful presentation. Dust with 1 tablespoon of confectioners sugar to finish, and serve immediately!
Things Worth Knowing
- Use cold ingredients: Ensure your cream cheese and mixing bowl are well-chilled. This helps in whipping the cream to the perfect consistency.
- Whipping technique: When whipping the heavy whipping cream, start on a low speed and gradually increase. This prevents splattering, and it helps in achieving stable peaks.
- Layering: Be patient when layering the chocolate wafers and cheesecake. Press them down gently to avoid breaking the wafers and ensure a clean presentation.
- Freezing time: Allow the cheesecake to freeze for at least 30 minutes for the best texture. If you plan to make it ahead, it can be frozen for up to two months.
- Serving suggestion: Use a sharp knife to cut the cheesecake for clean slices, and serve with extra strawberries and blueberries for an added touch.
Customization Ideas
There are endless possibilities for customizing the No Bake Chocolate Wafer Cheesecake to suit your tastes and occasions. Explore these ideas to make the recipe your own!
- Fruit Variations: Swap out the strawberries and blueberries for other fruits like raspberries, sliced bananas, or even a mix of tropical fruits for a refreshing twist.
- Chocolate Lovers: For an even richer dessert, consider drizzling melted chocolate over the top before serving or adding chocolate shavings as a garnish.
- Nutty Crunch: Incorporate crushed nuts or granola between the layers for an extra crunch that complements the smooth cheesecake.
- Flavored Whipped Cream: Experiment by adding different flavors to your whipped cream, such as almond extract or citrus zest, to give your cheesecake a unique twist.
- Seasonal Spices: During the holidays, consider adding a pinch of cinnamon or nutmeg to the cheesecake mixture for a seasonal touch.
- Special Occasion Toppings: Top the cheesecake with whipped cream and edible flowers for a fancy presentation at celebrations or gatherings.
- Layered Dessert Cups: Instead of a whole cheesecake, create individual dessert cups by layering the cheesecake mixture and chocolate wafers in clear glasses for a beautiful presentation.
How to Enjoy No Bake Chocolate Wafer Cheesecake
The No Bake Chocolate Wafer Cheesecake is not just a treat; it’s a delightful centerpiece for any occasion. Here are some fantastic ways to serve and enjoy it:
- As a Dessert: Serve the cheesecake as a sweet ending to any meal, whether it’s a casual family dinner or a formal gathering.
- With Coffee or Tea: Pair slices of cheesecake with your favorite coffee or tea for a cozy afternoon treat that everyone will love.
- At Summer Barbecues: This cheesecake is perfect for summer barbecues. Its refreshing flavors and chilled nature make it an ideal dessert for hot days.
- Celebratory Events: Bring this cheesecake to celebrations like birthdays, anniversaries, or any special event where a delicious dessert is needed.
- Seasonal Occasions: Decorate the cheesecake based on the season, using seasonal fruits or decorations for holidays like Easter or Independence Day.
- Leftover Storage: Store any leftovers in an airtight container in the refrigerator for up to four days. Just be sure to keep it chilled to maintain its creamy texture.
- Freezing for Later: If you have leftovers or want to prepare ahead of time, this cheesecake can be frozen for up to two months. Just thaw it overnight in the fridge before serving.
FAQ
Conclusion
The No Bake Chocolate Wafer Cheesecake is a delightful dessert that balances rich flavors and creamy textures with effortless preparation. It’s perfect for any occasion, bringing joy to family gatherings or serving as a sweet treat after dinner. I encourage you to try making this cheesecake for yourself; it’s bound to become a favorite among your friends and family. Trust me, once you taste it, you’ll want to make it again and again!
No Bake Chocolate Wafer Cheesecake
Equipment
- Mixing Bowl
Ingredients
- 16 ounces Cream cheese softened
- 6 tablespoons Confectioners sugar
- 2 teaspoons Vanilla extract
- 1 quart Heavy whipping cream
- 55 pieces Chocolate wafer cookies
- 1 pint Strawberries hulled
- 1 pint Blueberries
- 1 tablespoon Confectioners sugar for dusting
Instructions
- Place a 30-inch length of foil lengthwise on a baking sheet. Place another 30-inch length perpendicular across the first piece of foil to form a +. Mark an 8-inch circle on the top layer of foil. Set aside.
- Add the cream cheese to a large cold mixing bowl and whip the cream cheese until fluffy. Add 6 tablespoons confectioners sugar and vanilla, continuing to whip until well combined. Add heavy whipping cream slowly as you continue to whip until all combined and mixture is light and fluffy and holds a firm peak.
- Pipe or spread the cheesecake mixture around the circle marked on foil. Place a single layer of chocolate wafers on top of cheesecake mixture. Pipe cheesecake mixture on top of each chocolate wafer and place another single layer of chocolate wafers on top. Continue layering cheesecake mixture and the chocolate wafers until you have 5 layers of chocolate wafers. Pipe cheesecake mixture on top of the final layer of chocolate wafers.
- Pipe cheesecake mixture around the base inside the ring of wafers and outside in space between each stack of the chocolate wafers.
- Bring sides of foil up over the chocolate wafers, being careful not to let the foil touch cheesecake mixture. Place in the freezer and freeze for at least 30 minutes.
- When ready to serve, unfold foil. Using the long strips of foil, lift cheesecake onto a cake plate for serving.
- Place strawberries and blueberries inside center of ring of the cheesecake. Dust with 1 tablespoon of confectioners sugar and serve.
Notes
- Tip 1: Freezer Friendly! Once the cheesecake has been placed into the freezer, it may be frozen for up to 2 months.