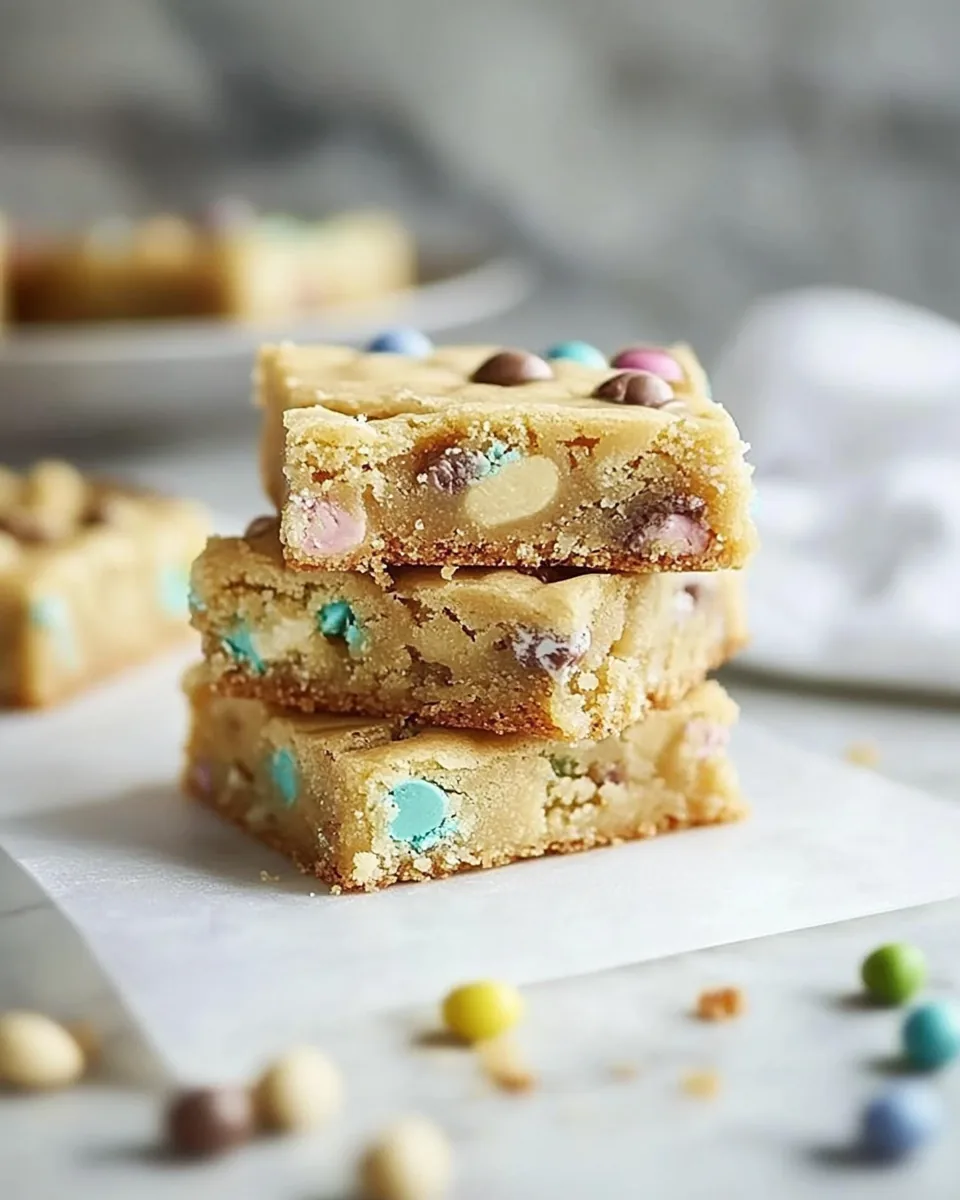
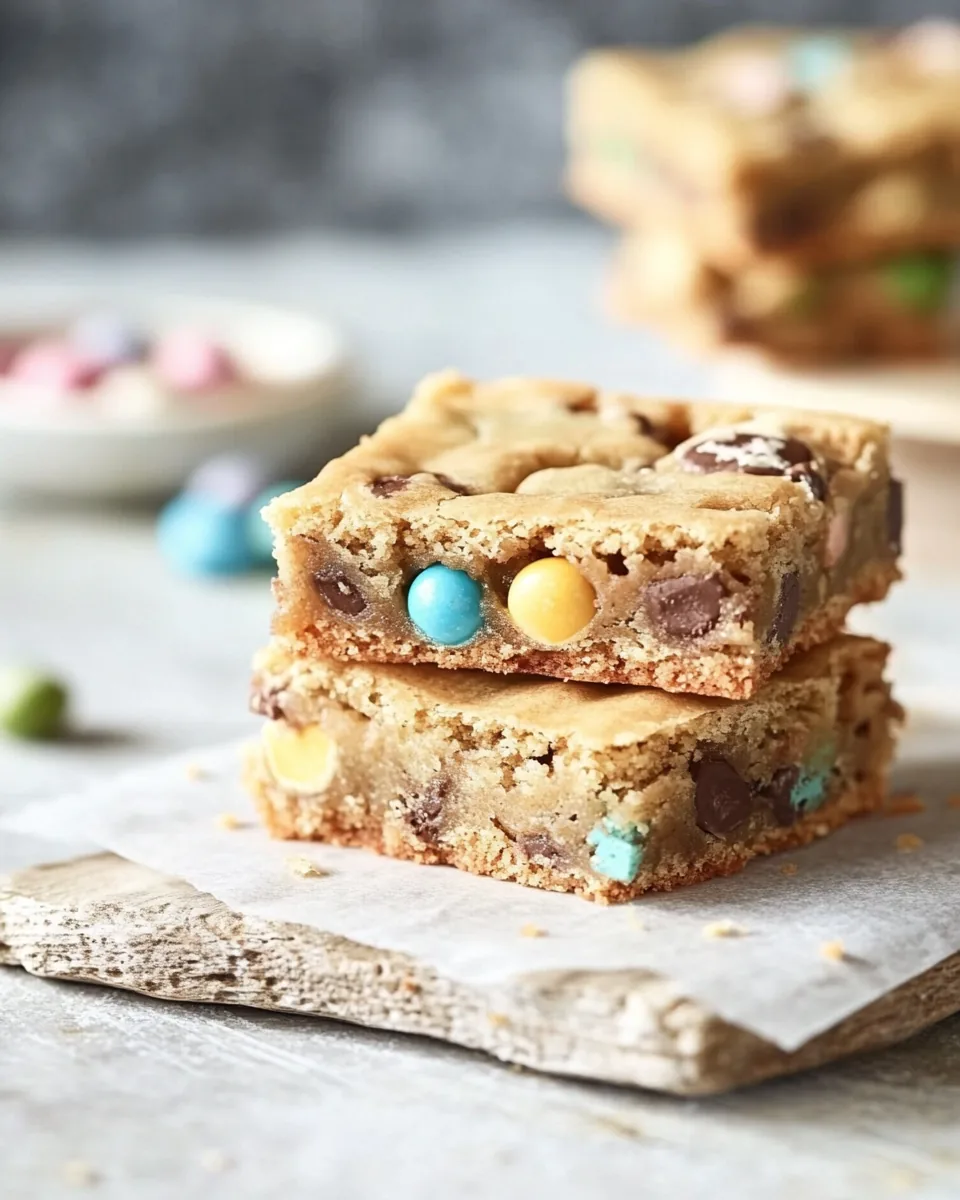
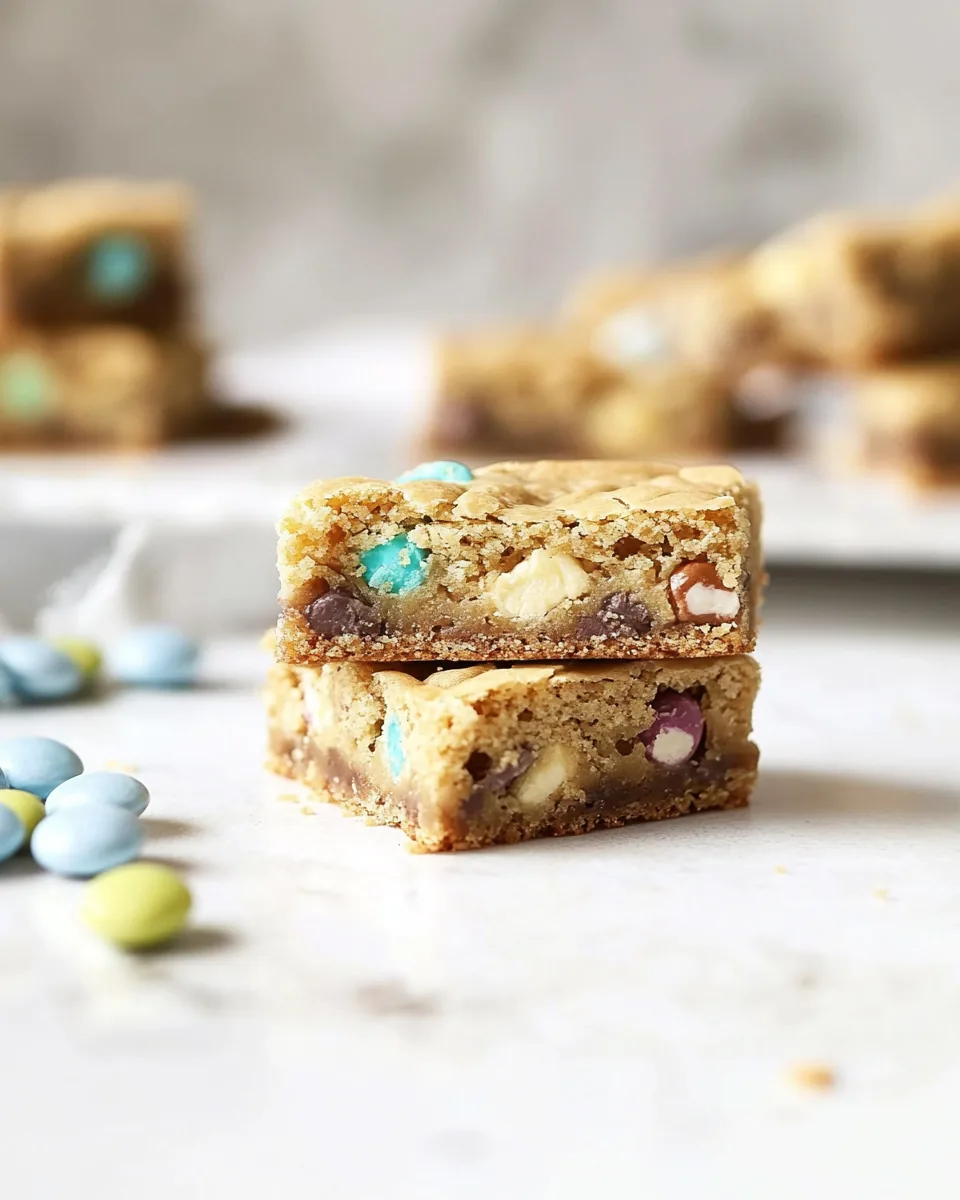
Loaded Candy Cookie Bars
There’s something magical about the combination of textures and flavors in a good cookie bar. The first time I made Loaded Candy Cookie Bars, I remember the kitchen filled with the sweet aroma of melting chocolate and warm dough. It was a rainy afternoon, and my kids were buzzing with energy, wanting something special. We decided to whip up a batch together, and it turned into an unforgettable bonding experience. As we mixed the ingredients, laughter and chaos reigned, but the joy of creating something delicious made it all worthwhile.
Recipe Snapshot
60 mins
0 mins
0 mins
Medium
320 kcal
4 g
Keto, Gluten-Free, Low FODMAP
15 g
Frying Pan, Whisk, Oven, Chef’s Knife, Mixing Bowl, Baking Sheet
What We Adore About This Loaded Candy Cookie Bars
Unleash Your Creativity
One of the most exciting aspects of Loaded Candy Cookie Bars is the opportunity for customization. Feel free to swap in your favorite candies or add nuts for an extra crunch. Each variation opens up a new world of flavors, allowing you to tailor the treat to your liking.
A Perfect Treat for Any Occasion
Whether it’s a birthday party, holiday gathering, or just a cozy family night, these cookie bars fit right in. Their vibrant colors and enticing aroma make them a showstopper on any dessert table.
Easy to Make
Even for novice bakers, whipping up a batch of Loaded Candy Cookie Bars is a breeze. With just a few simple steps, you can create a dessert that looks and tastes like it came from a bakery. It’s a perfect recipe to have on hand for unexpected guests or last-minute cravings.
Shared Joy
The best part about baking is sharing, and these cookie bars are perfect for that! They can be easily cut into generous squares for sharing with friends and family, making them a delightful addition to any gathering.
Indulgent Flavors
The combination of chocolate, candy, and marshmallows creates a symphony of sweetness in each bite. When you sink your teeth into a piece of Loaded Candy Cookie Bars, the blend of textures from chewy to crunchy is an experience you won’t forget. It’s hard to resist going back for seconds!
Key Ingredients for Loaded Candy Cookie Bars
The ingredients for Loaded Candy Cookie Bars are not just staples; they are the building blocks of a delicious dessert. Each one plays a vital role, contributing to the overall flavor and texture. The combination of all-purpose flour, baking powder, salt, butter, and brown sugar creates a rich, tender base, while the assortment of candies elevates it to a whole new level.
- All-Purpose Flour: The backbone of the cookie bars, providing structure and tenderness.
- Baking Powder: This ingredient helps the bars rise, ensuring they are light and fluffy.
- Coarse Salt: A pinch of salt enhances the sweetness and balances flavors perfectly.
- Unsalted Butter: Adds richness and moisture to the cookie dough, making it irresistibly delicious.
- Light Brown Sugar: This gives the cookie bars a wonderful caramel flavor and chewy texture.
- Eggs: They bind everything together, creating a soft, moist treat.
- Cadbury Mini Eggs: These add a crispy, chocolatey crunch that takes the cookie bars to the next level.
- Miniature Marshmallows: They provide a soft, chewy element that complements the other ingredients.
- Dark Chocolate Chips: Rich and decadent, they are perfect for chocolate lovers.
- White Chocolate: Adds a creamy contrast to the dark chocolate and mini eggs.
The Method for Loaded Candy Cookie Bars

Let’s dive into the delicious process of making Loaded Candy Cookie Bars. It’s surprisingly simple and fun, especially when you get the kids involved. You’ll start by preheating your oven and preparing your baking pan, and before you know it, your kitchen will be filled with the sweet scent of baking.
- Preheat your oven to 350 degrees Fahrenheit. While it heats up, grease a 9×13 inch baking pan with non-stick spray to prevent the cookie bars from sticking later.
- In a medium bowl, whisk together all-purpose flour, baking powder, and coarse salt. This dry mixture will create the base of your cookie bars. Set it aside for now.
- In the bowl of a stand mixer, cream together unsalted butter and light brown sugar until the mixture is light and fluffy. This step is crucial as it incorporates air into the dough, contributing to a lighter texture.
- Add three large eggs, one at a time, and beat briefly between each addition. It’s important to mix well to ensure that everything is combined smoothly.
- Pour in one teaspoon of pure vanilla extract and beat for an additional 30 seconds. The vanilla adds a lovely aromatic flavor to the cookie bars.
- With the mixer on low, slowly add the dry ingredients from the first step into the mixer bowl. Beat until the ingredients are just combined; be careful not to overmix, as this can lead to tougher cookie bars.
- Using a sturdy wooden spoon or spatula, fold in half of the chopped Cadbury Mini Eggs, half of the miniature marshmallows, half of the dark chocolate chips, and half of the white chocolate. The dough will be very stiff at this point, but that’s exactly what you want!
- Spread the thick cookie dough evenly into the prepared baking pan. Using a spatula, smooth the top to ensure even baking.
- Sprinkle the remaining Cadbury Mini Eggs, marshmallows, and both kinds of chocolate chips over the top of the cookie dough, pressing gently to adhere them.
- Bake the cookie bars in the preheated oven for about 35 minutes. You’ll know they’re done when the top is golden brown and a toothpick inserted into the center comes out clean.
- Allow the cookie bars to cool completely in the pan. Once cool, cut into 24 squares and serve. Any extra bars can be stored, covered, at room temperature for up to 4 days.
Things Worth Knowing
- Room Temperature Ingredients: Ensure all ingredients, especially butter and eggs, are at room temperature for a better emulsion, leading to a smoother dough.
- Don’t Overmix: When combining dry and wet ingredients, mix until just combined to prevent tough cookie bars.
- Cool Before Cutting: Allow the bars to cool completely to set properly, making it easier to cut into neat squares.
- Use Quality Chocolate: For the best flavor, use high-quality chocolate chips and candies.
Ways to Adapt This Recipe
There are countless ways to make Loaded Candy Cookie Bars your own! Whether you want to change up the flavor profile or make it more festive, these tips will help you adapt this recipe with ease.
- Storage: Keep any leftover cookie bars in an airtight container at room temperature for up to four days to maintain freshness.
- Freezing: These cookie bars freeze well! Cut them into squares and wrap each one in plastic wrap, then store them in a freezer-safe bag for up to three months.
- Nutty Variation: Add a cup of your favorite nuts, like walnuts or pecans, for an extra crunch and flavor.
- Seasonal Flavors: Try incorporating seasonal candies, like peppermint for winter or fruity candies in the summer.
- Layered Bars: Create a base layer with chocolate cookie dough, then add a layer of marshmallow fluff before baking for a gooey twist.
- Smaller Batches: Halve the recipe for a smaller batch or use a smaller baking dish for thicker bars.
Side Dish Ideas for Loaded Candy Cookie Bars
Pairing your Loaded Candy Cookie Bars with the right accompaniments can take your dessert experience to the next level. Here are some delightful ideas to enhance your serving:
- Coffee: Enjoy these cookie bars with a hot cup of coffee or espresso for a delightful afternoon pick-me-up.
- Milk: A classic pairing, a cold glass of milk is perfect for balancing the sweetness of the cookie bars.
- Ice Cream: Serve a warm cookie bar topped with a scoop of vanilla ice cream for a decadent dessert.
- Fruit Salad: A light and refreshing fruit salad can contrast the richness of the bars beautifully.
- Chocolate Sauce: Drizzle some warm chocolate sauce over the top for an extra indulgent treat.
- Picnic Treat: These cookie bars are perfect for outdoor gatherings or picnics, making them a great portable dessert.
FAQ
Conclusion
Loaded Candy Cookie Bars are a delightful mix of flavors and textures that will satisfy any sweet tooth. Their ease of preparation and customizable nature make them a favorite in many kitchens, perfect for gatherings or a simple treat at home. I encourage you to try making these scrumptious bars for your next occasion—you won’t be disappointed. Gather your ingredients and get ready to indulge in a cookie bar experience that everyone will love!

Loaded Candy Cookie Bars
Equipment
- Frying Pan
- Whisk
- Oven
- Chef's Knife
- Mixing Bowl
- Baking Sheet
Ingredients
- 2 1/4 cups All-Purpose Flour
- 2 1/4 teaspoons Baking Powder
- 1 teaspoon Coarse Salt
- 1/2 cup Unsalted Butter
- 1 1/2 cups Light Brown Sugar
- 3 Large Eggs
- 1 teaspoon Pure Vanilla Extract
- 1 cup Chopped Cadbury Mini Eggs
- 1 cup Miniature Marshmallows
- 1 cup Dark Chocolate Chips
- 1 cup White Chocolate
Instructions
- Preheat your oven to 350 degrees Fahrenheit. While it heats up, grease a 9x13 inch baking pan with non-stick spray to prevent the cookie bars from sticking later.
- In a medium bowl, whisk together all-purpose flour, baking powder, and coarse salt. This dry mixture will create the base of your cookie bars. Set it aside for now.
- In the bowl of a stand mixer, cream together unsalted butter and light brown sugar until the mixture is light and fluffy. This step is crucial as it incorporates air into the dough, contributing to a lighter texture.
- Add three large eggs, one at a time, and beat briefly between each addition. It’s important to mix well to ensure that everything is combined smoothly.
- Pour in one teaspoon of pure vanilla extract and beat for an additional 30 seconds. The vanilla adds a lovely aromatic flavor to the cookie bars.
- With the mixer on low, slowly add the dry ingredients from the first step into the mixer bowl. Beat until the ingredients are just combined; be careful not to overmix, as this can lead to tougher cookie bars.
- Using a sturdy wooden spoon or spatula, fold in half of the chopped Cadbury Mini Eggs, half of the miniature marshmallows, half of the dark chocolate chips, and half of the white chocolate. The dough will be very stiff at this point, but that’s exactly what you want!
- Spread the thick cookie dough evenly into the prepared baking pan. Using a spatula, smooth the top to ensure even baking.
- Sprinkle the remaining Cadbury Mini Eggs, marshmallows, and both kinds of chocolate chips over the top of the cookie dough, pressing gently to adhere them.
- Bake the cookie bars in the preheated oven for about 35 minutes. You’ll know they’re done when the top is golden brown and a toothpick inserted into the center comes out clean.
- Allow the cookie bars to cool completely in the pan. Once cool, cut into 24 squares and serve. Any extra bars can be stored, covered, at room temperature for up to 4 days.