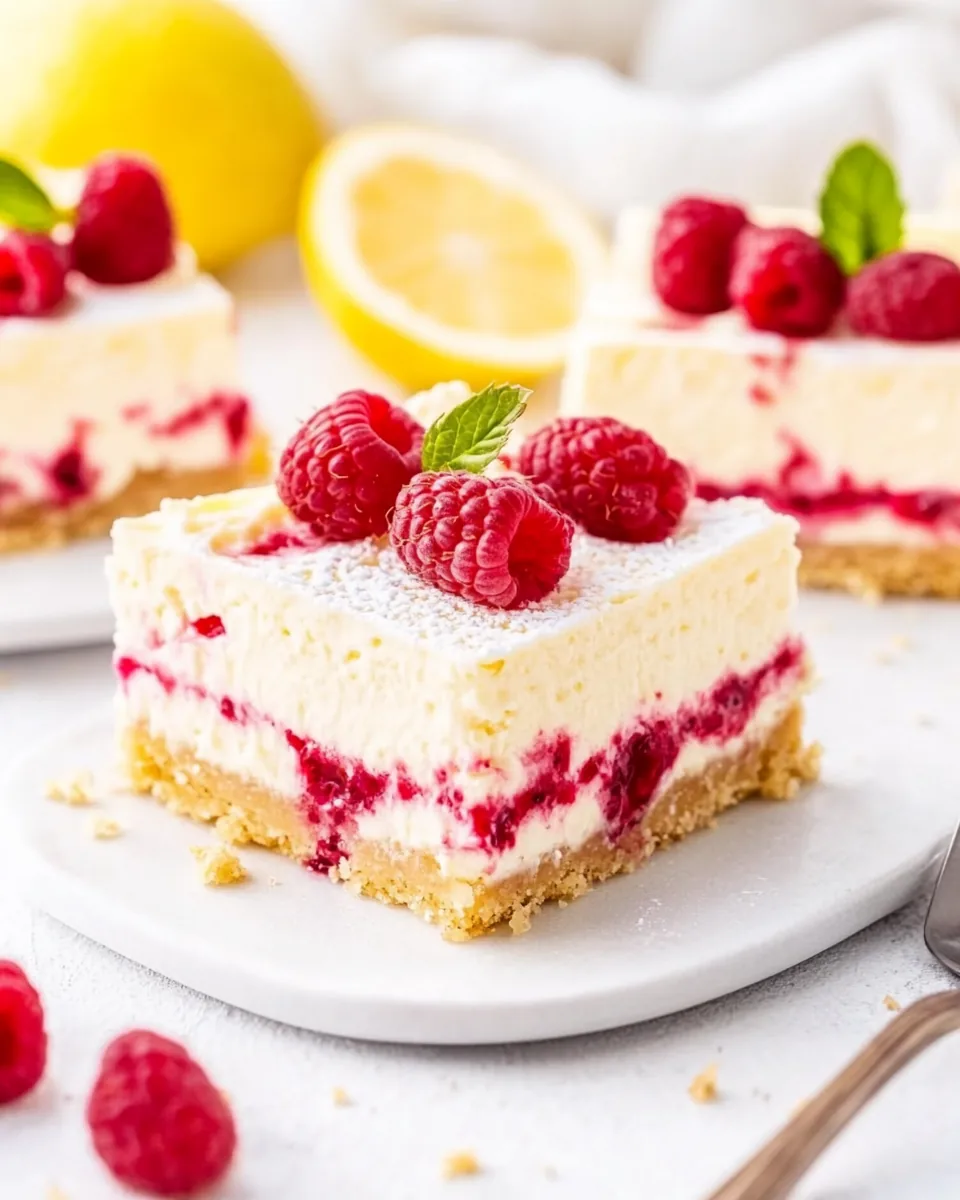
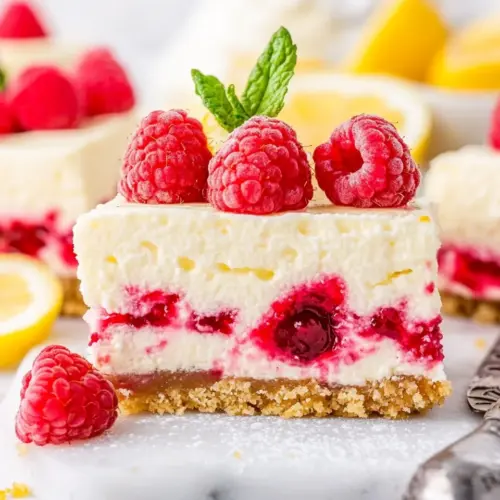
Lemon Cheesecake Bars
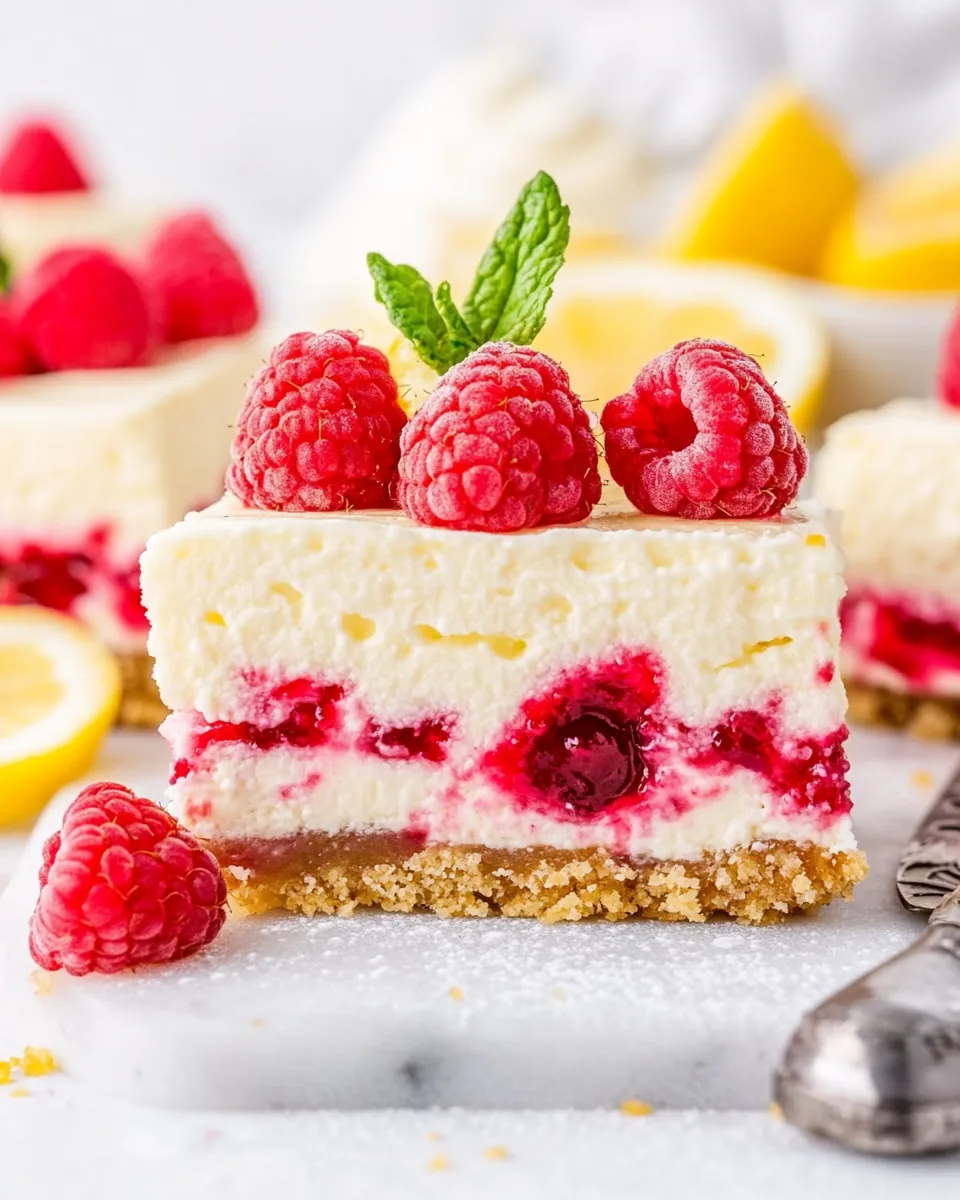
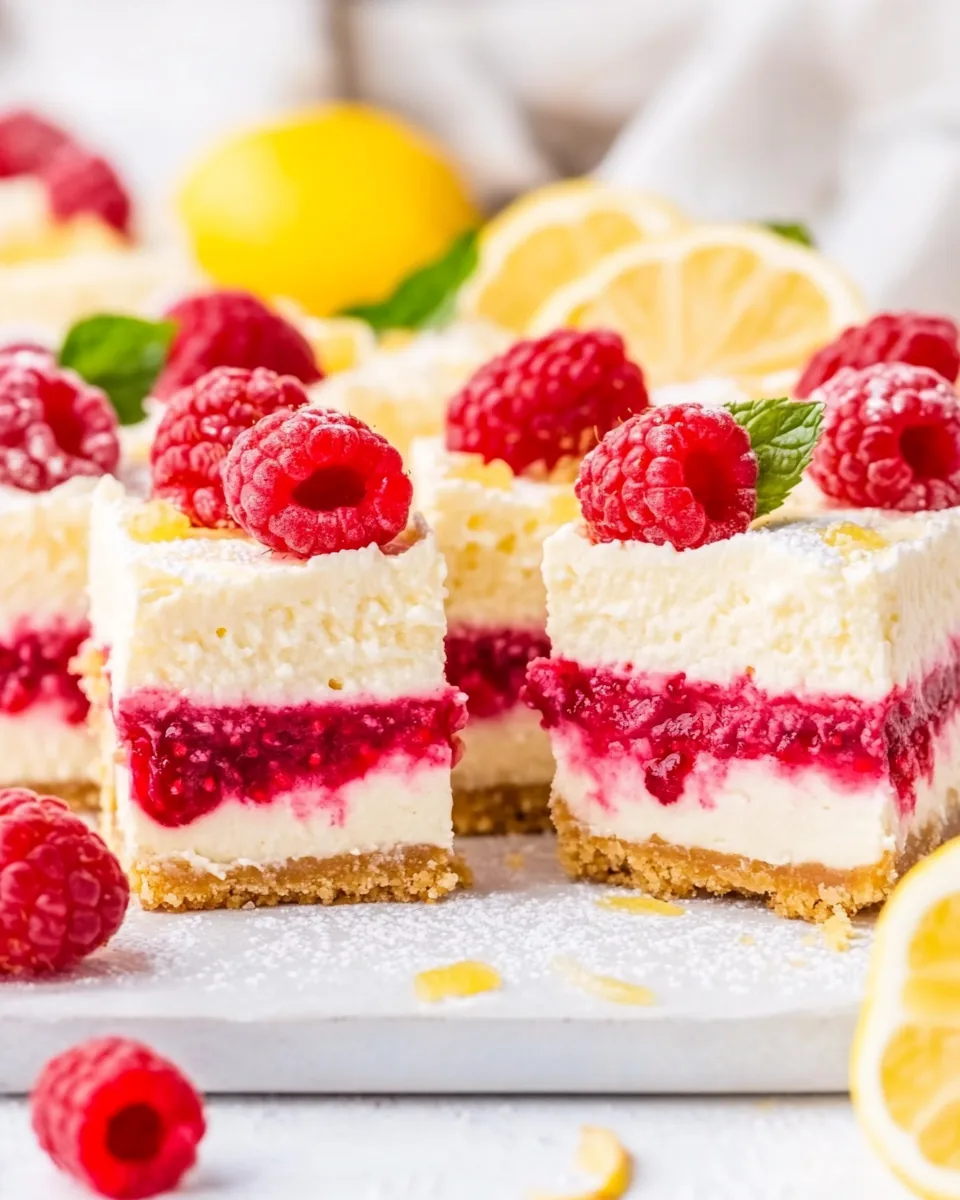
There’s something truly special about the combination of zesty lemons and rich cream cheese, and that’s precisely what makes these Lemon Cheesecake Bars so delightful. I remember the first time I made them; the sun was shining, and I had a craving for something bright and refreshing. As I whisked together the ingredients, the aroma of fresh lemons filled my kitchen, bringing a smile to my face. Each slice of these bars is a burst of flavor, perfectly balanced by the sweetness of raspberries that add a lovely pop of color and tartness. Whether it’s a sunny afternoon gathering or a cozy night in, these bars are the ideal treat to share with friends and family. You won’t be able to resist their creamy texture and the way they just melt in your mouth!
Recipe Snapshot
1 hr 22 mins
30 mins
52 mins
Medium
320 kcal
6 g
Gluten-Free, Low FODMAP
22 g
Frying Pan, Oven, Chef’s Knife, Mixing Bowl, Wooden Spoon, Baking Sheet
Why This Lemon Cheesecake Bars Works
Why You’ll Love These Bars
When it comes to dessert, these Lemon Cheesecake Bars are a real showstopper. Here are some reasons they stand out:
1. Bright and Flavorful
The main star of this recipe is, of course, the fresh lemons. Their vibrant zest and juice bring a refreshing acidity that perfectly cuts through the creaminess of the cheesecake. Each bite is a delightful explosion of citrus goodness that’s sure to brighten your day.
2. Easy to Make
You don’t have to be a professional baker to whip up these bars. With simple steps and minimal equipment, you can have these delicious treats ready in no time. It’s a great recipe for both beginners and seasoned bakers alike!
3. Perfect for Any Occasion
Whether you’re hosting a summer barbecue, celebrating a birthday, or just enjoying a quiet evening, these Lemon Cheesecake Bars fit right in. They’re a fantastic dessert that pleases a crowd and can be made ahead of time.
4. Versatile and Customizable
While the classic lemon and raspberry combo is delightful, you can easily adapt this recipe to include your favorite fruits or toppings. Strawberries, blueberries, or even a drizzle of chocolate could add exciting variations to this already fantastic dessert.
5. A Festive Touch
With their beautiful presentation and bright colors, these cheesecake bars are perfect for festive occasions. They add a touch of elegance to any dessert table and are sure to impress your guests.
Ingredient List for Lemon Cheesecake Bars
Every great dish starts with quality ingredients, and these Lemon Cheesecake Bars are no exception. The beauty of this recipe lies in the harmonious blend of sweet, tart, and creamy elements. The key players include fresh lemons, which provide that zesty kick, and rich cream cheese, ensuring a luscious texture. Together, these ingredients create a dessert that’s not only delicious but also visually stunning.
- 1 cup graham cracker crumbs: The crust forms the foundation of these bars, providing a sweet, crunchy base that complements the creamy filling.
- 2 tablespoons granulated sugar: This little bit of sweetness in the crust helps enhance the flavor and balance the tartness of the lemons.
- ¼ teaspoon kosher salt: A pinch of salt helps to elevate the overall flavor of the bars, making them even more delicious.
- ¼ cup unsalted butter, melted: The melted butter binds the graham cracker crumbs together, ensuring a firm yet tender crust.
- 16 ounces full-fat cream cheese, at room temperature: This is the heart of the cheesecake filling, adding richness and a luxurious texture.
- ½ cup granulated sugar: This sugar sweetens the filling and balances the tartness of the lemons.
- 2 large eggs, at room temperature: Eggs are essential for setting the cheesecake and contributing to its creamy texture.
- ¼ cup full-fat sour cream: Sour cream adds a tangy flavor and creaminess that elevates the cheesecake filling.
- ¼ cup freshly squeezed lemon juice: Fresh lemon juice is vital for that bright, zesty flavor that makes these bars so refreshing.
- lemon zest from 2 large lemons: Adding the zest amplifies the lemon flavor and provides aromatic oils that enhance the taste.
- 1 cup fresh raspberries: These beautiful berries add a burst of color and tartness, perfectly balancing the sweetness of the cheesecake.
The Method for Lemon Cheesecake Bars
Making these Lemon Cheesecake Bars is an enjoyable experience that leads to delicious results. Follow these steps to create your very own batch of creamy goodness. Trust me, you’ll love the process and the outcome!
- Start by preheating your oven to 325°F. As the oven warms up, lightly spray the bottom of an 8-inch by 8-inch baking pan. If you want very clean cuts on the bars, feel free to line the pan with foil for easier removal.
- In a medium bowl, combine the graham cracker crumbs, granulated sugar, and kosher salt. Stir these together until they’re well mixed. Then, add the melted butter to the mixture. Stir until everything is thoroughly combined and the crumbs are moistened.
- Press the crumb mixture evenly into the bottom of the prepared pan. Use the back of a measuring cup or your fingers to pack it down firmly. Bake this crust in the preheated oven for 10 to 12 minutes. It should become fragrant and slightly golden. Once done, set it aside on a wire rack to cool completely.
- While the crust cools, prepare the cheesecake filling. In a large mixing bowl, use an electric mixer to cream the cream cheese and sugar together on medium-high speed until smooth and creamy, about 1 to 2 minutes. Be sure to scrape down the sides of the bowl to ensure everything is well combined.
- Next, add the eggs, sour cream, lemon juice, and lemon zest to the mixture. Beat on medium speed until everything is just combined. You don’t want to overmix, as this can lead to cracks in your cheesecake.
- Spread the cheesecake mixture evenly over the cooled crust. Gently tap the pan on the counter a few times to settle the filling and release any air bubbles.
- Now it’s time to add the raspberries. Scatter them on top of the cheesecake filling, pressing them down slightly so they’re partially submerged. This will ensure that each bar has a lovely raspberry surprise!
- Place the pan back in the oven and bake for about 40 minutes. The cheesecake should be set but still slightly wobbly in the center. You’ll notice the edges might turn a light golden brown. Once done, remove it from the oven and let it cool completely on a wire rack.
- After cooling, refrigerate the cheesecake for at least 3 hours to chill thoroughly and firm up. If you can, let it sit overnight for the best texture and flavor.
- To serve, slice the cheesecake into individual bars. If you lined the pan with foil, gently lift the cheesecake out using the overhang, then place it on a cutting board. Use a sharp knife dipped in warm water for clean cuts. Wipe the knife between slices for perfectly neat bars.
Things Worth Knowing
- Chilling is Key: Ensure you chill the bars in the fridge for at least 3 hours. This helps the cheesecake set properly and enhances the flavors.
- Ingredient Temperature: Use room temperature ingredients for the filling. This helps to create a smoother batter without lumps.
- Don’t Overmix: When combining the filling ingredients, mix just until combined to avoid incorporating too much air, which can cause cracks.
- Watch the Baking Time: Keep an eye on the cheesecake towards the end of the baking time. Every oven is different, and you don’t want to overbake it.
Helpful Notes about Lemon Cheesecake Bars
Here are some helpful notes to ensure your Lemon Cheesecake Bars turn out perfectly every time:
- Storage: Store any leftovers in an airtight container in the refrigerator. They should last for up to 5 days, but I doubt they’ll stick around that long!
- Freezing: You can freeze these cheesecake bars! Wrap them tightly in plastic wrap and then in aluminum foil. They’ll last for up to 3 months in the freezer.
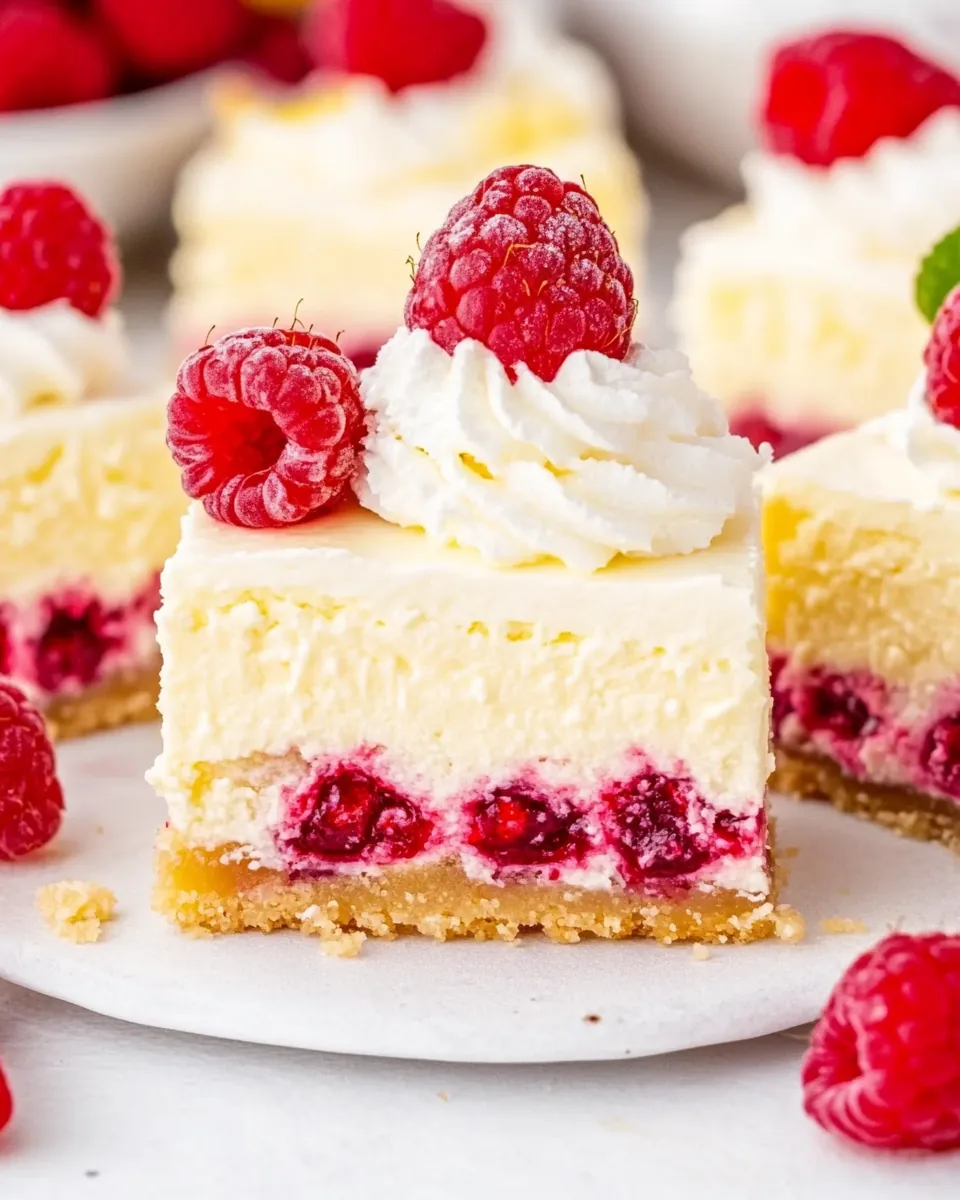
- Serving Tips: These bars are wonderful on their own, but you could also serve them with a dollop of whipped cream or a sprinkle of powdered sugar for a touch of elegance.
- Freshness: Always use fresh lemons for the best flavor. The zest and juice from fresh lemons will make a huge difference.
- Variations: Feel free to experiment with other fruits. Blueberries, strawberries, or even a swirl of raspberry puree could work beautifully!
What Goes Well With This Lemon Cheesecake Bars
Pairing these Lemon Cheesecake Bars with the right accompaniments can elevate your dessert experience. Here are some great ideas:
- Fresh Fruits: Serving these bars with a side of fresh berries enhances both flavor and presentation. Strawberries, blueberries, or even a fruit salad can be a great match.
- Tea or Coffee: Enjoy a slice with a cup of herbal tea or a rich coffee. The bitterness balances the sweetness of the cheesecake.
- Ice Cream: A scoop of vanilla or lemon sorbet can add a refreshing twist, making for a delightful dessert combination.
- Special Occasions: These bars are perfect for celebrations like birthdays or summer picnics. They’re easy to transport and serve, making them a hit at any gathering.
- Seasonal Serving: In spring and summer, these bars are especially refreshing. Serving them chilled on a warm day is nothing short of bliss.
FAQ
Conclusion
These Lemon Cheesecake Bars are not just a dessert; they are a cheerful celebration of flavors that can brighten any gathering. Their creamy texture complemented by the tangy lemon and sweet raspberries makes them a standout treat. I encourage you to try making them; you won’t regret it! Share them with friends, family, or keep them all to yourself. Either way, they’re bound to be a hit!
Lemon Cheesecake Bars
Equipment
- Frying Pan
- Oven
- Chef's Knife
- Mixing Bowl
- Wooden Spoon
- Baking Sheet
Ingredients
- 1 cup Graham Cracker Crumbs
- 2 tablespoons Granulated Sugar
- ¼ teaspoon Kosher Salt
- ¼ cup Unsalted Butter melted
- 16 ounces Full-Fat Cream Cheese at room temperature
- ½ cup Granulated Sugar
- 2 large Eggs at room temperature
- ¼ cup Full-Fat Sour Cream
- ¼ cup Freshly Squeezed Lemon Juice
- lemon zest from 2 large lemons
- 1 cup Fresh Raspberries
Instructions
- Preheat your oven to 325°F. Lightly spray the bottom of an 8-inch by 8-inch baking pan. If you want very clean cuts on the bars, feel free to line the pan with foil for easier removal.
- In a medium bowl, combine the graham cracker crumbs, granulated sugar, and kosher salt. Stir these together until they’re well mixed. Then, add the melted butter to the mixture. Stir until everything is thoroughly combined and the crumbs are moistened.
- Press the crumb mixture evenly into the bottom of the prepared pan. Use the back of a measuring cup or your fingers to pack it down firmly. Bake this crust in the preheated oven for 10 to 12 minutes. It should become fragrant and slightly golden. Once done, set it aside on a wire rack to cool completely.
- While the crust cools, prepare the cheesecake filling. In a large mixing bowl, use an electric mixer to cream the cream cheese and sugar together on medium-high speed until smooth and creamy, about 1 to 2 minutes. Be sure to scrape down the sides of the bowl to ensure everything is well combined.
- Next, add the eggs, sour cream, lemon juice, and lemon zest to the mixture. Beat on medium speed until everything is just combined. You don't want to overmix, as this can lead to cracks in your cheesecake.
- Spread the cheesecake mixture evenly over the cooled crust. Gently tap the pan on the counter a few times to settle the filling and release any air bubbles.
- Now it’s time to add the raspberries. Scatter them on top of the cheesecake filling, pressing them down slightly so they’re partially submerged. This will ensure that each bar has a lovely raspberry surprise!
- Place the pan back in the oven and bake for about 40 minutes. The cheesecake should be set but still slightly wobbly in the center. You’ll notice the edges might turn a light golden brown. Once done, remove it from the oven and let it cool completely on a wire rack.
- After cooling, refrigerate the cheesecake for at least 3 hours to chill thoroughly and firm up. If you can, let it sit overnight for the best texture and flavor.
- To serve, slice the cheesecake into individual bars. If you lined the pan with foil, gently lift the cheesecake out using the overhang, then place it on a cutting board. Use a sharp knife dipped in warm water for clean cuts. Wipe the knife between slices for perfectly neat bars.
Notes
- Storage: Store any leftovers in an airtight container in the refrigerator. They should last for up to 5 days, but I doubt they’ll stick around that long!
- Freezing: You can freeze these cheesecake bars! Wrap them tightly in plastic wrap and then in aluminum foil. They’ll last for up to 3 months in the freezer.
- Serving Tips: These bars are wonderful on their own, but you could also serve them with a dollop of whipped cream or a sprinkle of powdered sugar for a touch of elegance.
- Freshness: Always use fresh lemons for the best flavor. The zest and juice from fresh lemons will make a huge difference.
- Variations: Feel free to experiment with other fruits. Blueberries, strawberries, or even a swirl of raspberry puree could work beautifully!