Homemade Bean Dip
As a kid, I remember family gatherings where laughter and chatter filled the air, along with the delicious aroma of homemade meals. One dish that always made an appearance at these festive occasions was Homemade Bean Dip. It was a staple that brought everyone together, served with crispy tortilla chips and fresh veggies for dipping. The beauty of this dish lies not only in its rich, comforting flavors but also in its versatility. It can be enjoyed as a snack while watching a game, a side at a barbecue, or even as a centerpiece for a cozy movie night at home. Whenever I prepare Homemade Bean Dip, it takes me back to those memorable moments, sparking joy with each bite.
Recipe Snapshot
38 mins
3 mins
35 mins
Medium
200 kcal
10 g
Keto, Gluten-Free
5 g
Blender, Food Processor, Peeler, Instant Pot, Saucepan
What Makes This Homemade Bean Dip Special
It’s Incredibly Simple to Make
One of the reasons I love Homemade Bean Dip is how straightforward it is to prepare. With just a few basic ingredients, you can whip up a fantastic dip that tastes like it’s been simmering for hours. Who doesn’t appreciate a recipe that requires minimal effort yet delivers maximum flavor?
Nutritious and Satisfying
The star of this dish, the dried pinto beans, is packed with protein and fiber. This means you can enjoy a tasty snack without the guilt! Plus, when combined with pico de gallo and shredded Mexican blend cheese, it transforms into a wholesome meal that’s perfect for all ages.
Customizable to Your Liking
What I adore about Homemade Bean Dip is its adaptability. You can easily modify the recipe to suit your personal taste. Want a little heat? Add some diced jalapeños or a dash of hot sauce. Prefer a creamier texture? Toss in a scoop of sour cream. The possibilities are endless!
Perfect for Any Occasion
This dip isn’t just for parties; it can elevate any meal. Whether it’s a casual dinner with friends or a festive gathering for the holidays, Homemade Bean Dip fits right in. It’s an ideal appetizer, side dish, or even a light dinner when paired with fresh salad.
Empowers Healthy Eating
Making your own dip means you can control the ingredients, avoiding any preservatives or artificial flavors that store-bought versions often contain. This not only enhances the taste but also aligns with a healthy lifestyle. Preparing Homemade Bean Dip at home encourages you to choose fresh and nutritious ingredients.
Family-Friendly
Lastly, Homemade Bean Dip is a crowd-pleaser, especially for kids. They love dipping, and the fun flavors are sure to satisfy picky eaters. It’s an excellent way to introduce legumes into their diet without them even realizing it!
Ingredients Required for Homemade Bean Dip

When it comes to the ingredients for Homemade Bean Dip, simplicity is key. This recipe focuses on wholesome, accessible components that blend together beautifully. The combination of savory and fresh flavors makes it a standout dish that’s both satisfying and nourishing.
- 1 pound dried pinto beans: The main ingredient, these beans are not only hearty but also provide a base full of protein and fiber. They become creamy when cooked, making them perfect for dipping.
- ½ large sweet onion: Adding natural sweetness and depth, the onion enhances the overall flavor profile of the dip.
- 4-6 cloves garlic: Garlic introduces a robust aroma and a savory kick, making the dip delightful and memorable.
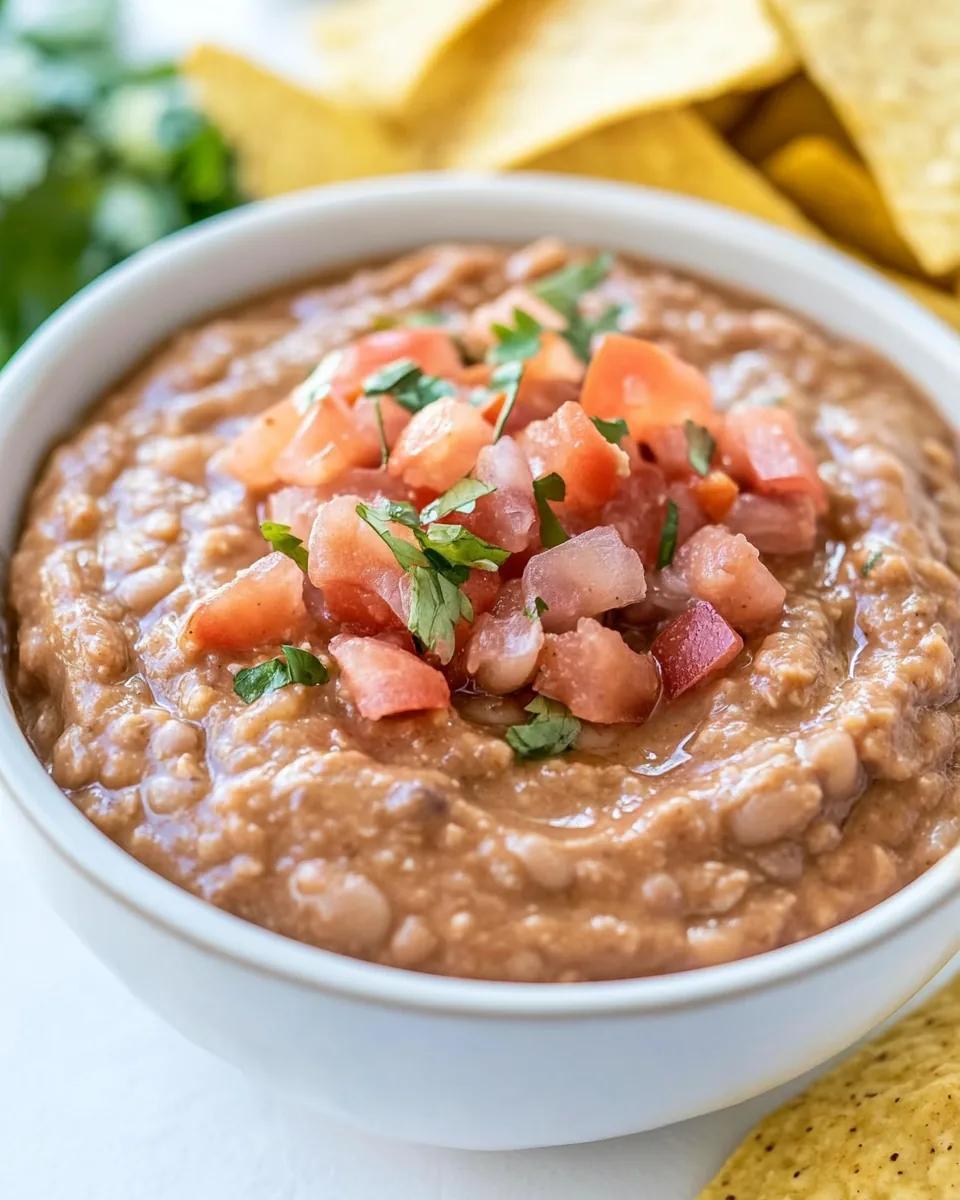
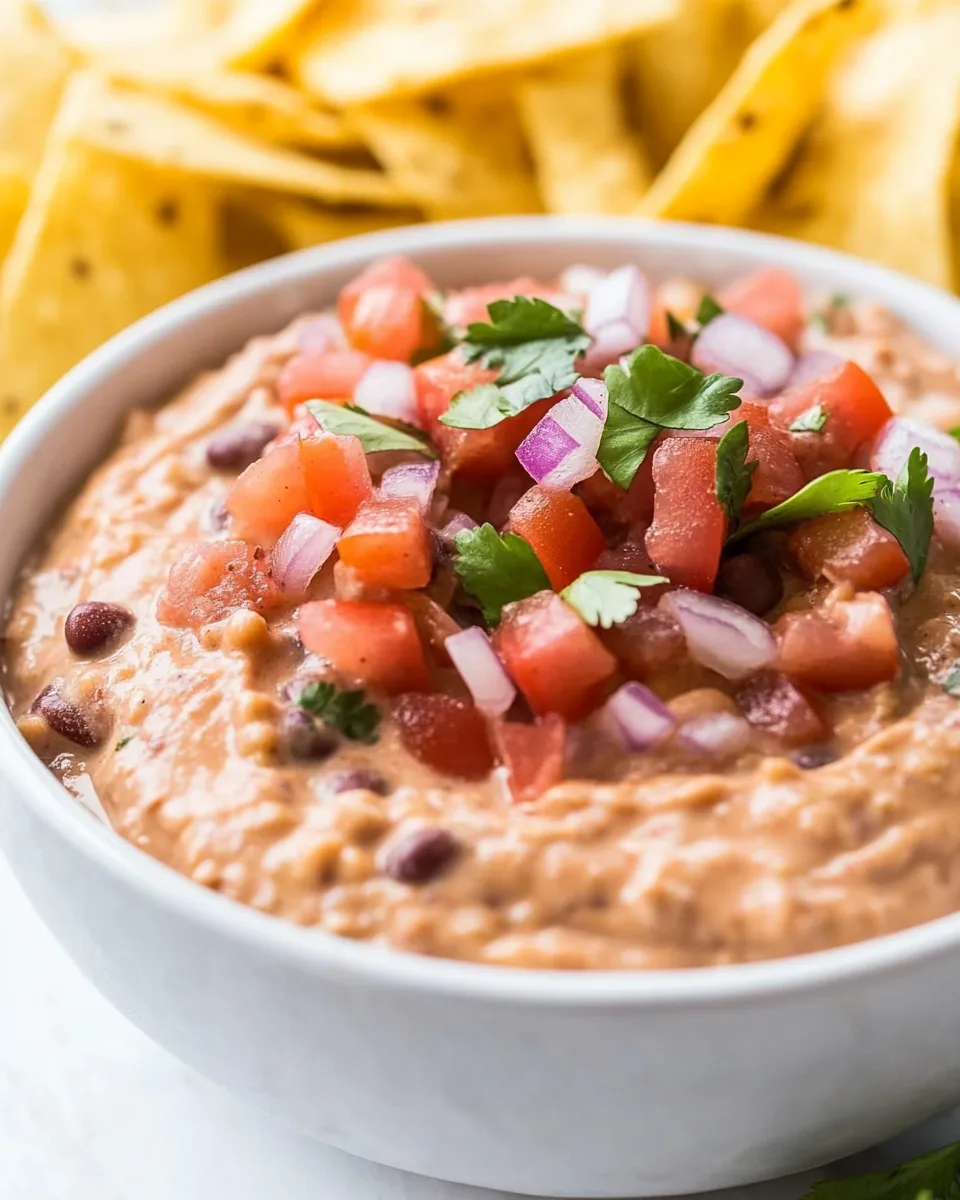
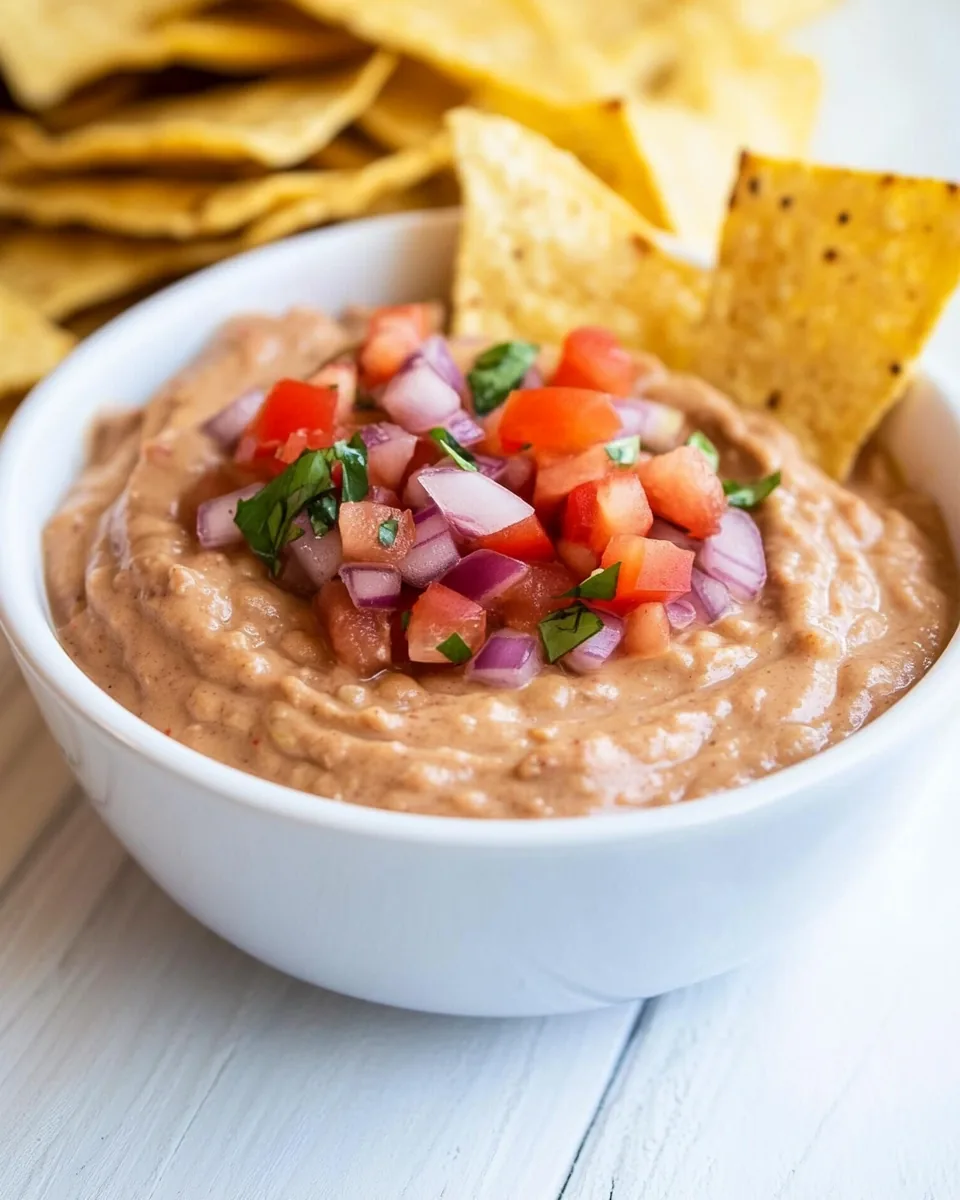
- 1 cup pico de gallo: This fresh salsa adds a burst of vibrant flavor and acidity, balancing the creamy beans beautifully.
- 1 cup shredded Mexican blend cheese: This melty goodness provides richness and enhances the dip’s texture.
- 1 teaspoon salt: A crucial seasoning that brings out the flavors of all the ingredients.
Directions for Homemade Bean Dip
Preparing Homemade Bean Dip is a delightful experience that fills your kitchen with enticing aromas. Follow these easy steps to create your own delicious dip.
- Start by soaking the dried pinto beans in cold water overnight. This step is essential for achieving the perfect texture and ensuring they cook evenly.
- Once soaked, drain the beans and place them in a large six-quart sauce pot. Add enough fresh water to cover the beans by three to four inches. This extra water will help as the beans absorb moisture during cooking.
- Set the heat to medium and add the diced onion, smashed garlic, and salt. Stir well to combine everything, then cover the pot. You’ll want to simmer this mixture for about two to four hours. Keep an eye on the beans; the older they are, the longer they’ll take to cook.
- If you’re short on time, skip the soaking and opt for an Instant Pot instead! Place the unsoaked beans in the pot with the onions, garlic, salt, and five cups of water.
- Set your Instant Pot to Pressure Cook High for thirty-five minutes. After cooking, perform a natural release. Wait for the steam button to drop before opening the lid. If the beans are still too firm, you can pressure cook them for an additional five to ten minutes, then use a quick release.
- When the beans are soft and tender, drain off any excess liquid, but reserve some for later. This liquid can help achieve your desired dip consistency.
- Next, transfer the beans to a large food processor. Add the pico de gallo and one cup of the reserved liquid. Pulse until mostly smooth. You want a creamy consistency, but a little texture is nice!
- Once blended, add the shredded Mexican blend cheese and pulse a few more times. This will melt the cheese just enough to integrate it into the dip.
- If you prefer a looser dip, feel free to add another quarter to three-quarters of a cup of the cooking liquid until you reach your desired consistency.
- To finish, top your Homemade Bean Dip with an extra scoop of pico de gallo for a fresh touch. Serve immediately with crispy tortilla chips or fresh veggies for dipping. Enjoy!
Things Worth Knowing
- Soaking the beans: Soaking beans overnight not only helps them cook faster but also improves their digestibility.
- Adjusting consistency: Feel free to modify the dip’s thickness by adding reserved cooking liquid gradually until it suits your taste.
- Flavor depth: Allowing the dip to cool slightly after blending can enhance its flavor as it sits.
- Storage options: The dip can be stored in an airtight container in the refrigerator for up to three days.
Expert Tips about Homemade Bean Dip
To elevate your Homemade Bean Dip, here are some expert tips that can enhance your experience and results.
- Storage: After preparing your dip, store leftovers in an airtight container in the fridge. It will last for up to three days, retaining its flavors.
- Freezing: You can freeze this dip! Just ensure it’s in an airtight container. It should last up to three months. Thaw in the refrigerator before serving.
- Pairing: This dip pairs beautifully with fresh veggies like carrots and bell peppers, or you can enjoy it with crispy tortilla chips.
- Spice it up: If you enjoy heat, don’t hesitate to add diced jalapeños or a sprinkle of cayenne pepper for an extra kick!
- Make it creamy: For a richer texture, consider blending in a dollop of sour cream after the beans have been processed.
- Experiment: Feel free to get creative with your toppings! Avocado slices or a sprinkle of fresh cilantro can make for a delightful garnish.
- Vegetable broth: Using vegetable broth instead of water when cooking the beans can add an extra layer of flavor to your dip.
What to Pair With Homemade Bean Dip
When it comes to serving Homemade Bean Dip, the options are endless! This dip can be enjoyed in a variety of ways, making it a versatile addition to your meal table.
- Fresh Vegetables: Serve with a colorful array of fresh vegetables like cucumber sticks, bell pepper slices, and baby carrots for healthy dipping.
- Tortilla Chips: Crispy tortilla chips are the classic pairing for this dip, providing the perfect crunch and contrast to the creamy texture.
- Nachos: Use Homemade Bean Dip as a base for nachos! Layer it with cheese, jalapeños, and your favorite toppings for a crowd-pleasing dish.
- With Salads: This dip can be served alongside salads, adding a creamy element that complements the greens beautifully.
- Game Day: Perfect for gatherings like game day, serve it with an assortment of chips and dips, making it a hit among guests.
- Festive Occasions: Bring Homemade Bean Dip to your next potluck or BBQ. It’s sure to be a favorite and can easily feed a crowd.
- Wraps and Tacos: Use it as a spread in wraps and tacos for added flavor and richness.
FAQ
Conclusion
The Homemade Bean Dip is a comforting and versatile dish that can elevate any occasion. Its creamy texture and flavorful ingredients are sure to please everyone around the table. I encourage you to try making this dip; it’s not just easy, but also incredibly satisfying. Soon, it may become your go-to recipe for gatherings, family dinners, or even a cozy night in with a movie!

Homemade Bean Dip
Equipment
- Blender
- Food Processor
- Peeler
- Instant Pot
- Saucepan
Ingredients
- 1 pound dried pinto beans
- ½ large sweet onion peeled and cut into wedges
- 4-6 cloves garlic smashed
- 1 cup pico de gallo
- 1 cup shredded Mexican blend cheese
- 1 teaspoon salt
Instructions
- Start by soaking the dried pinto beans in cold water overnight. This step is essential for achieving the perfect texture and ensuring they cook evenly.
- Once soaked, drain the beans and place them in a large six-quart sauce pot. Add enough fresh water to cover the beans by three to four inches. This extra water will help as the beans absorb moisture during cooking.
- Set the heat to medium and add the diced onion, smashed garlic, and salt. Stir well to combine everything, then cover the pot. You’ll want to simmer this mixture for about two to four hours. Keep an eye on the beans; the older they are, the longer they’ll take to cook.
- If you’re short on time, skip the soaking and opt for an Instant Pot instead! Place the unsoaked beans in the pot with the onions, garlic, salt, and five cups of water.
- Set your Instant Pot to Pressure Cook High for thirty-five minutes. After cooking, perform a natural release. Wait for the steam button to drop before opening the lid. If the beans are still too firm, you can pressure cook them for an additional five to ten minutes, then use a quick release.
- When the beans are soft and tender, drain off any excess liquid, but reserve some for later. This liquid can help achieve your desired dip consistency.
- Next, transfer the beans to a large food processor. Add the pico de gallo and one cup of the reserved liquid. Pulse until mostly smooth. You want a creamy consistency, but a little texture is nice!
- Once blended, add the shredded Mexican blend cheese and pulse a few more times. This will melt the cheese just enough to integrate it into the dip.
- If you prefer a looser dip, feel free to add another quarter to three-quarters of a cup of the cooking liquid until you reach your desired consistency.
- To finish, top your Homemade Bean Dip with an extra scoop of pico de gallo for a fresh touch. Serve immediately with crispy tortilla chips or fresh veggies for dipping. Enjoy!
Notes
- Tip 1: After preparing your dip, store leftovers in an airtight container in the fridge. It will last for up to three days, retaining its flavors.
- Tip 2: You can freeze this dip! Just ensure it’s in an airtight container. It should last up to three months. Thaw in the refrigerator before serving.
- Tip 3: This dip pairs beautifully with fresh veggies like carrots and bell peppers, or you can enjoy it with crispy tortilla chips.
- Tip 4: If you enjoy heat, don’t hesitate to add diced jalapeños or a sprinkle of cayenne pepper for an extra kick!
- Tip 5: For a richer texture, consider blending in a dollop of sour cream after the beans have been processed.
- Tip 6: Feel free to get creative with your toppings! Avocado slices or a sprinkle of fresh cilantro can make for a delightful garnish.
- Tip 7: Using vegetable broth instead of water when cooking the beans can add an extra layer of flavor to your dip.