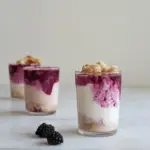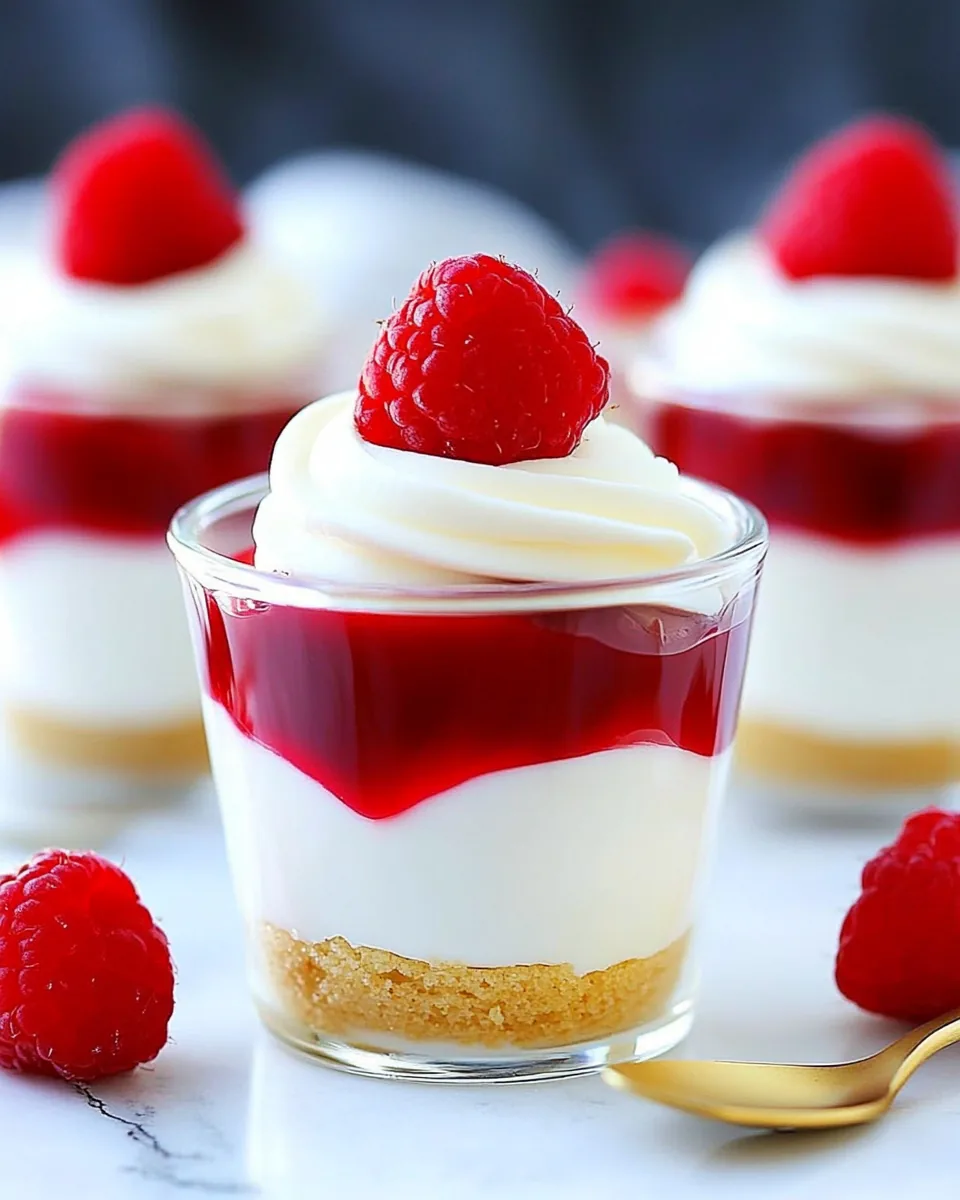
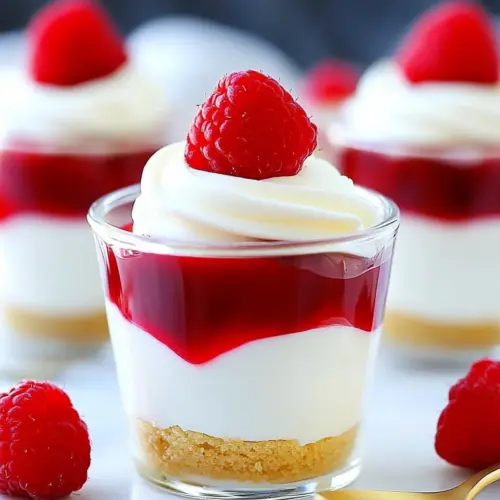
Cheesecake Dessert Cups
Ever since I was a child, there’s something utterly irresistible about Cheesecake Dessert Cups. I remember the first time I had these little delights at a family gathering, and I instantly fell in love with their creamy texture and the graham cracker crunch at the bottom. They’re just the perfect dessert for any occasion, whether it’s a birthday party, a casual get-together, or simply a night in with friends. Every time I make them, I feel a wave of nostalgia wash over me, reminding me of those sweet gatherings filled with laughter and joy. The best part? They’re incredibly easy to whip up! Just layer the flavors and let them chill. I guarantee you, they’ll be the star of any dessert table.
Recipe Snapshot
25 mins
25 mins
0 mins
Medium
320 kcal
3 g
Gluten-Free
22 g
Wooden Spoon, Mixing Bowl
When I think about Cheesecake Dessert Cups, there are so many reasons to love them. For starters, they’re a fantastic way to enjoy cheesecake without all the fuss that comes with a traditional cake. Plus, they can be made in advance, making them the perfect solution for busy days when you want to impress guests with minimal effort. The individual portions make serving a breeze, and everyone can help themselves to their own cup of creamy goodness.
Why This Cheesecake Dessert Cups Shines
Perfectly Portable
One of my favorite things about these Cheesecake Dessert Cups is how portable they are. Whether you’re heading to a picnic, a party, or just a cozy movie night at home, you can easily grab a cup and go! They fit perfectly in your hand and are less messy than a typical slice of cheesecake.
Layered Flavor Bliss
Each cup offers a wonderful combination of textures and flavors. The crumbly base made from graham cracker crumbs pairs beautifully with the rich and creamy cream cheese filling. You can customize the toppings to suit your mood, whether that’s a dollop of whipped cream, fresh fruit, or a drizzle of fruit pie filling. The possibilities are endless!
Quick and Simple Preparation
These cups are so simple to prepare that even a novice baker can impress their friends and family. It takes just a few minutes to mix everything together, layer the ingredients, and then let them chill. You don’t need any special equipment or skills—just some enthusiasm and love for dessert!
Endless Customization
Another reason I adore these Cheesecake Dessert Cups is their versatility. You can easily switch up the flavors and toppings based on the season or your guests’ preferences. Want a chocolate twist? Add some melted chocolate or cocoa powder to the filling. Looking for a fruity note? Toss in some fresh berries or a scoop of lemon zest. The options are limitless!
Make Ahead Convenience
These dessert cups can be made ahead of time, allowing you to enjoy your gathering without spending all your time in the kitchen. Prepare them a day in advance, and they’ll be ready to serve when your guests arrive. Just pull them out of the fridge, and you’re good to go!
Perfect for Portion Control
In a world where portion sizes can get out of control, these individual dessert cups are a great way to keep things in check. You can enjoy a sweet treat without overindulging. Each cup is just the right amount of sweetness to satisfy your cravings!
FAQ
Conclusion
These Cheesecake Dessert Cups truly stand out with their rich, creamy texture, and delightful flavor combinations. They are not only easy to make but also incredibly fun to customize for any occasion. I encourage you to try making them for your next gathering; your friends and family will surely be impressed. Enjoy the process of creating these treats, and don’t forget to share the joy they bring with those you love!
Cheesecake Dessert Cups
Equipment
- Wooden Spoon
- Mixing Bowl
Ingredients
- 24 2-ounce shot glasses or plastic cups
- ½ cup graham cracker crumbs
- 1 teaspoon granulated sugar
- 2 ½ tablespoons melted unsalted butter
- 2 8-ounce packages softened cream cheese
- 1 cup powdered sugar
- 1 ½ teaspoon vanilla extract
- 1 teaspoon lemon juice
- ⅓ cup sour cream
- 1 ½ cup heavy cream
- whipped cream
- cherry pie filling
Instructions
- Combine ½ cup graham cracker crumbs and 1 teaspoon granulated sugar in a medium-sized bowl. Add 2 ½ tablespoons melted unsalted butter and use a fork to stir until well-combined.
- Drop about 1 ½ teaspoons of the graham cracker mixture into the bottom of each shot glass. Use a rounded teaspoon to press the crumb mixture down into the glass. Set aside.
- Place 2 (8-ounce) packages softened cream cheese in a large bowl and use an electric mixer to beat until smooth.
- Gradually add 1 cup powdered sugar and mix until well combined.
- Mix in 1 ½ teaspoon vanilla extract, 1 teaspoon lemon juice, and 1 ½ teaspoon vanilla extract, scraping down the sides and bottom of the bowl as it mixes.
- Add ⅓ cup sour cream and mix well.
- Pour 1 ½ cup heavy cream into a separate, medium-sized bowl. Beat on high speed until stiff peaks form.
- Fold in whipped cream into the cream cheese mixture until smooth and well combined.
- Pour the cheesecake filling into a large ziplock bag and snip off one corner. Pipe the filling into each shot glass, filling about ¾ of the way until all shot glasses are evenly filled.
- Serve as is or top with your preferred topping of fruit pie filling, whipped cream, or graham cracker crumbs on top!
- Cheesecake dessert cups can be stored in the refrigerator in an airtight container. The filling will thicken as it chills.
Notes
- Storage: Store leftover cheesecake dessert cups in an airtight container in the refrigerator. They can last for up to 5 days.
- Freezing: These cups are not recommended for freezing as the texture may change.
- Variations: Feel free to experiment with different toppings like fresh fruit, chocolate shavings, or flavored whipped cream.
- Serving Size: Each cup is a perfect single serving, making it easy to share!
- Presentation: Garnish with a sprig of mint or a sprinkle of cocoa powder for an elegant touch.