
Lemon Cherry Cheese Danish
There’s nothing quite like the smell of fresh pastries filling the kitchen, and that’s exactly what you’ll experience with this Lemon Cherry Cheese Danish. One sunny morning, I woke up craving something sweet yet tangy, and this delightful treat immediately came to mind. It combines the tartness of fresh lemons with the sweetness of cherry filling, all enveloped in a flaky, buttery dough. As the aroma wafted through the house, I couldn’t help but feel giddy with anticipation. It reminded me of lazy brunches with friends and family, where the coffee flows and laughter is abundant. This Lemon Cherry Cheese Danish is perfect for elevating any breakfast or brunch experience. Whether it’s a special occasion or just a treat for yourself during the week, it brings a little sunshine to your day.
Recipe Snapshot
30 mins
10 mins
20 mins
Medium
230 kcal
3 g
Vegan, Gluten-Free, AIP
10 g
Chef’s Knife, Mixing Bowl, Oven, Baking Sheet
Why We Love This Lemon Cherry Cheese Danish
A Burst of Flavor
One of the things I absolutely love about this Lemon Cherry Cheese Danish is the vibrant combination of flavors. The sharpness of the lemon perfectly complements the sweetness of the cherry filling, creating a delightful balance that excites the palate. Each bite is a refreshing experience that will leave you wanting more.
Easy to Make
This recipe is perfect for both novice and experienced bakers alike. With simple ingredients and straightforward steps, you can whip up this delicious danish without spending hours in the kitchen. It’s a great way to impress guests or treat yourself without the stress.
Impressive Presentation
When it comes to serving, the Lemon Cherry Cheese Danish looks stunning on any table. The golden-brown pastry, the vibrant cherry filling peeking through the swirls, and a drizzle of lemon glaze add an elegant touch. It’s sure to grab attention and make everyone eager to dig in.
Perfect for Any Occasion
This danish isn’t just a breakfast item; it can be served at brunches, picnics, or even as a delightful dessert. Its versatility makes it a favorite for various gatherings, from casual hangouts to formal celebrations.
Family-Friendly Fun
Baking with family is always a joyous occasion, and this Lemon Cherry Cheese Danish is a fantastic recipe to involve kids. They can help with rolling the dough, spreading the filling, and even drizzling the glaze. It’s a great way to create lasting memories while enjoying a delicious treat.
Freezing for Later
If you find yourself with leftovers, no need to fret! This danish freezes beautifully, allowing you to enjoy it at a later time. Just reheat it in the oven for a few minutes, and it will taste just as fresh as the day it was made.
Essential Ingredients for Lemon Cherry Cheese Danish
Each ingredient in this Lemon Cherry Cheese Danish plays a vital role in creating the perfect blend of flavors and textures. The combination of buttery dough, creamy filling, and tart fruit is what makes this recipe so special. Here’s a closer look at the key players:
- Crescent dough sheet: The base of our danish, this dough is flaky and buttery, which creates the perfect texture.
- Cream cheese: Adds creaminess and a slight tang that complements the sweetness of the cherry filling.
- Granulated sugar: Sweetens the cream cheese filling, enhancing the overall flavor.
- Lemon zest: Provides a fresh and citrusy aroma, elevating the danish.
- Cherry pie filling: The star of the show, this filling adds a burst of sweetness and color.
- Powdered sugar: Used for the glaze, it adds a sweet finishing touch that ties everything together.
- Fresh lemon juice: Enhances the glaze and adds that perfect tanginess.
Making This Lemon Cherry Cheese Danish
Getting ready to make this Lemon Cherry Cheese Danish is such an exciting process! You’ll soon see how easy it is to create something that looks and tastes like it came from a bakery. Follow these steps for a delicious and beautiful result:
- Preheat your oven to 375 degrees Fahrenheit. This is crucial for achieving that golden brown exterior.
- Top a baking sheet with parchment paper and set it aside. This ensures your danish won’t stick and makes for easy cleanup.
- In a mixing bowl, add the softened cream cheese, granulated sugar, lemon zest, and lemon extract. Beat until the mixture is fully combined and smooth. Don’t forget to scrape the sides of the bowl halfway through to ensure everything is evenly mixed.
- Unroll the seamless dough sheet onto the prepared baking sheet. Make sure it’s laid out flat for easy spreading.
- Spread the lemon cream cheese filling down the middle of the dough sheet, leaving enough space on the edges for folding.
- Next, add the cherry pie filling on top of the lemon cream cheese layer. Feel free to adjust the amount of filling based on your preference; I love to use a full cup to really make it burst with flavor.
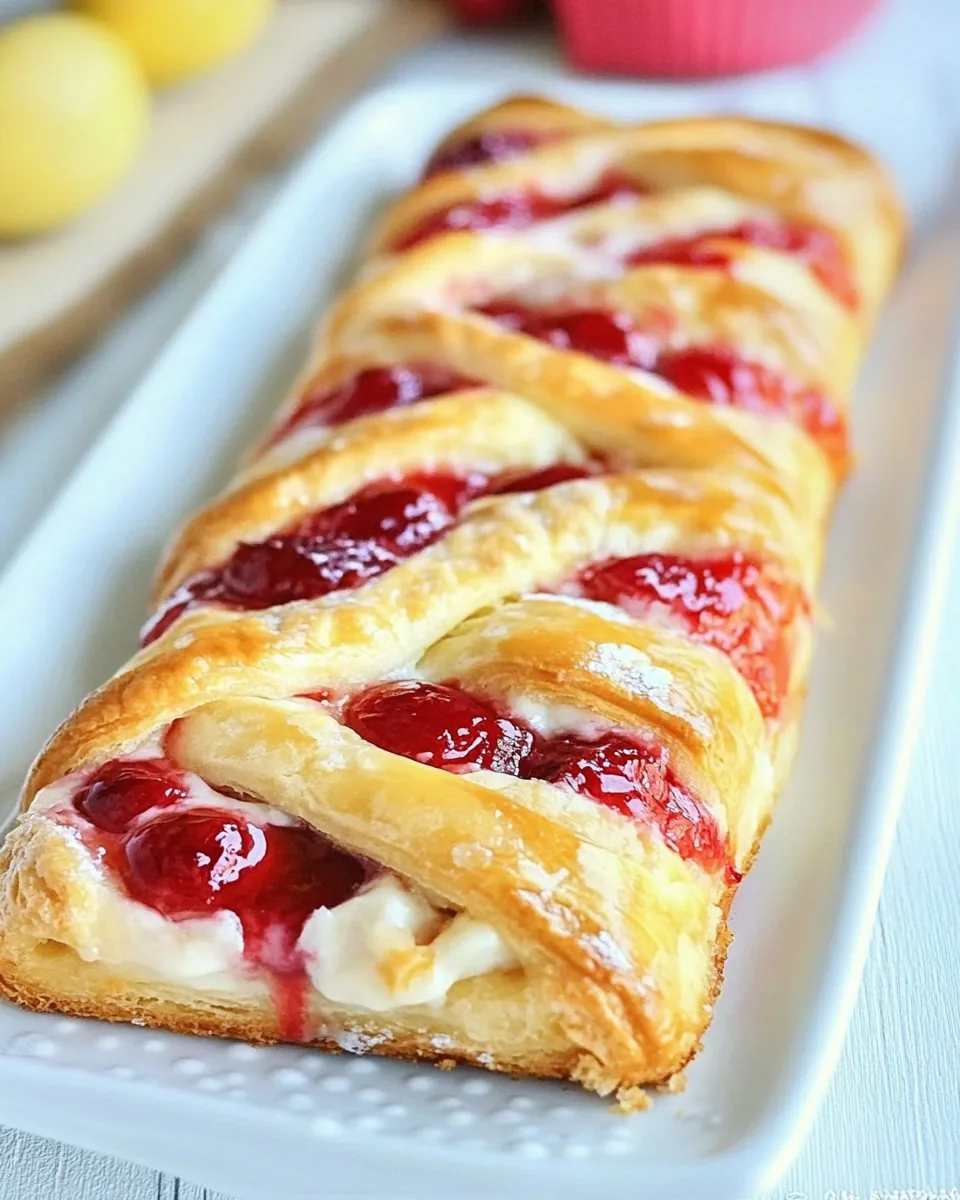
- On each long side of the dough, make 2-inch long cuts about 1 inch apart. These cuts will help create the lovely braid effect.
- Starting at one end of the dough sheet, fold the strips over the filling from one side to the other, alternating sides for a beautiful crisscross pattern.
- Bake the danish for 15 to 20 minutes or until it turns golden brown. Keep an eye on it starting at the 15-minute mark, as ovens can vary.
- Once baked, remove the danish from the oven and let it cool completely before icing, which will take around 20 to 30 minutes.
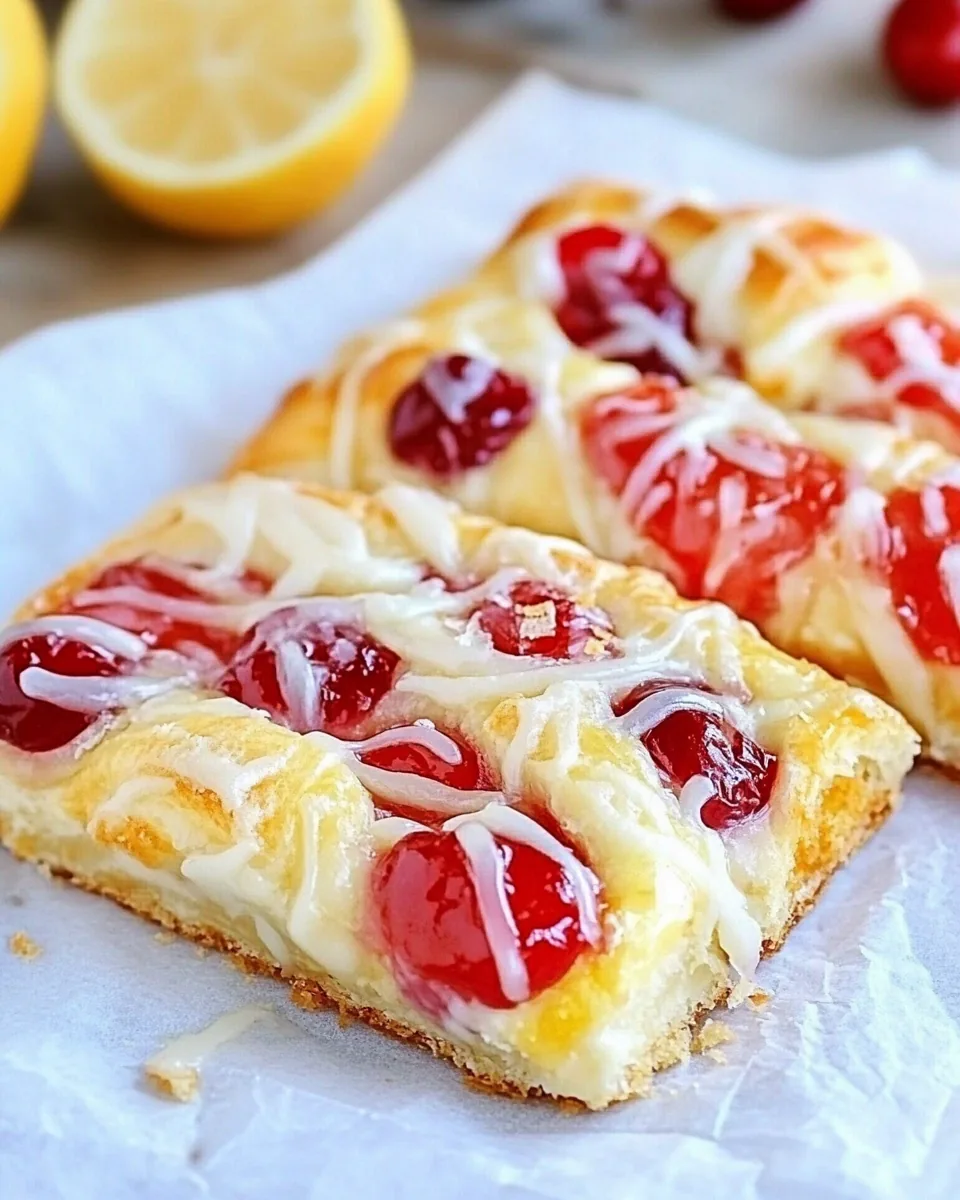
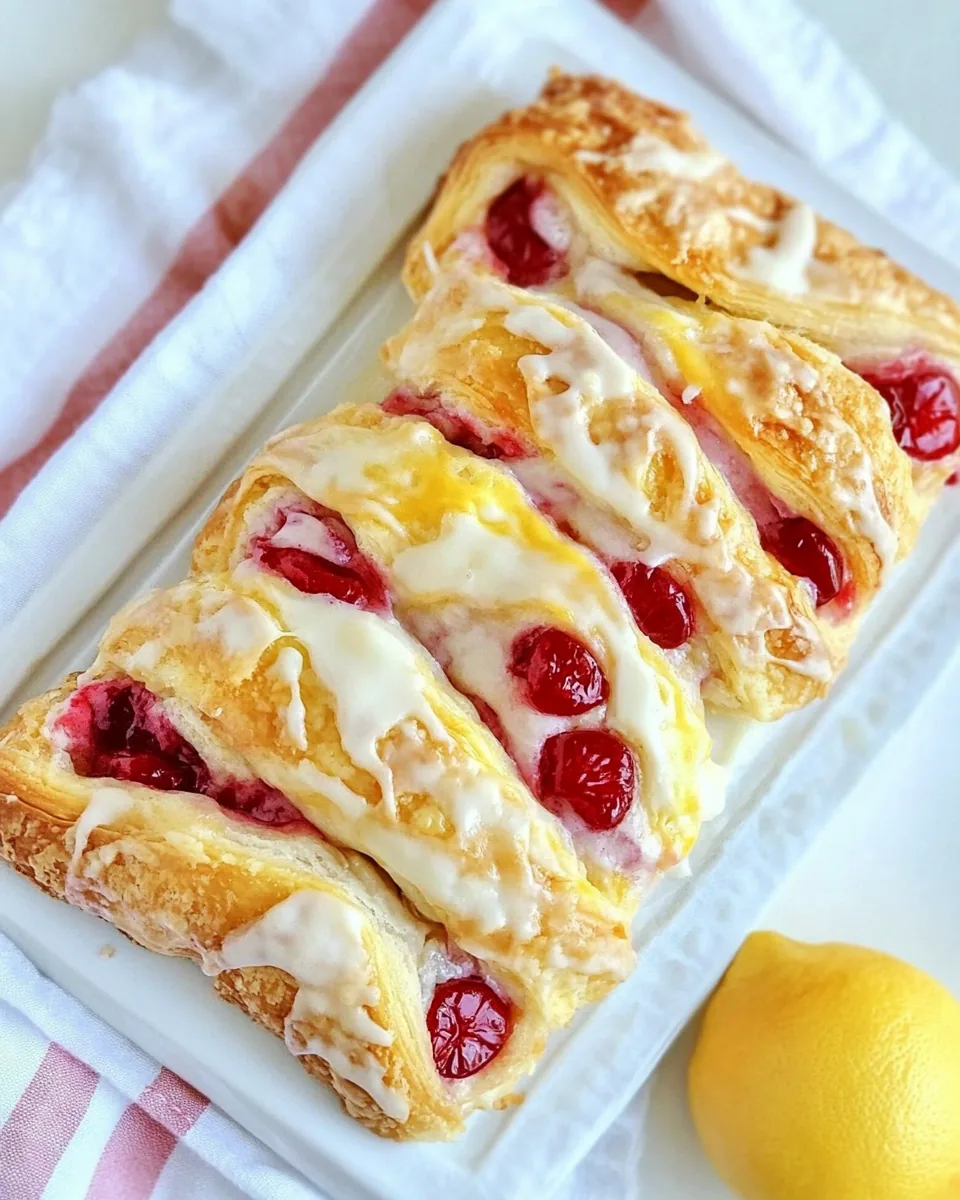
- For the lemon glaze, combine powdered sugar and fresh lemon juice in a medium bowl. Mix until there are no lumps. If the glaze is too thick, feel free to add more lemon juice for a pourable consistency.
- After cooling, drizzle the lemon icing over the danish using a fork or spoon, and then slice and serve your beautiful creation!
Things Worth Knowing
- Using room temperature ingredients: Ensure that your cream cheese is at room temperature before mixing. This will create a smoother filling and help it blend more easily with the other ingredients.
- Checking for doneness: The danish is ready when it’s golden brown. If you find it’s browning too quickly, you can cover it with aluminum foil to prevent burning.
- Cooling before icing: It’s important to let the danish cool completely before icing. This prevents the glaze from melting and ensures a beautiful finish.
- Reheating frozen danish: If you freeze leftovers, reheat them in the oven at a low temperature until warm. This will help restore that flaky texture.
Pro Tips and Tweaks
Whether you’re making the Lemon Cherry Cheese Danish for the first time or you’re a seasoned pro, these tips will help you achieve the best results:
- Storage: Store any leftovers in an airtight container at room temperature for up to two days or in the refrigerator for up to a week.
- Freezing: Feel free to freeze this danish for up to three months. Wrap it tightly in plastic wrap and then foil to avoid freezer burn.
- Variations: Experiment with different fruit fillings such as blueberry, raspberry, or even a combination of fruits for a unique twist!
- Glaze thickness: Adjust the glaze to your liking. If you prefer a thinner glaze, simply add more lemon juice. For a thicker icing, reduce the juice.
- Serving warm: For a delightful experience, serve the danish warm right after baking, paired with a cup of coffee or tea.
What to Serve Alongside Lemon Cherry Cheese Danish
If you’re wondering what to serve with your stunning Lemon Cherry Cheese Danish, look no further! Here are some ideas:
- Fresh fruit: Pair your danish with a side of mixed berries or sliced citrus fruits for a refreshing contrast.
- Yogurt: A dollop of Greek yogurt adds creaminess and balances the sweetness of the danish.
- Coffee or tea: Enjoy your danish with a warm cup of coffee or a refreshing herbal tea to complement the flavors.
- Breakfast spread: Serve alongside scrambled eggs and crispy bacon for a well-rounded brunch experience.
- Seasonal delights: In spring, serve with a light salad or asparagus; in summer, accompany with ice cream.
- Picnic treat: This danish is perfect for a picnic basket, served as a sweet treat to share with friends.
FAQ
Conclusion
The Lemon Cherry Cheese Danish is a delightful pastry that combines tangy lemon and sweet cherry flavors in a flaky crust, making it a perfect choice for any occasion. I encourage you to try this recipe—it’s a great way to impress at brunch or simply enjoy a treat at home. With its easy preparation and stunning presentation, you’ll find it quickly becomes a favorite in your baking repertoire!

Lemon Cherry Cheese Danish
Equipment
- Chef's Knife
- Mixing Bowl
- Oven
- Baking Sheet
Ingredients
- 1 tube crescent dough sheet
- 8 ounces cream cheese room temperature
- 2 tablespoons granulated sugar
- 0.5 teaspoon lemon extract
- 1 tablespoon fresh lemon zest
- 3/4 cup cherry pie filling
- 1 cup powdered sugar
- 2-3 tablespoons fresh lemon juice
Instructions
- Preheat oven to 375F degrees.
- Top a baking sheet with parchment paper and set aside.
- Add the softened cream cheese, granulated sugar, lemon zest, and lemon extract to the bowl of a stand mixer and beat until fully combined and smooth. Stop once to scrape the sides of the bowl with a spatula to make sure the mixture is fully combined.
- Unroll the seamless dough sheet onto the prepared baking sheet.
- Spread the lemon cream cheese filling down the middle of the dough sheet.
- Spread the cherry filling on top of the lemon cream cheese layer. You can use more or less cherry filling, I like using 1 cup so the danish is bursting with cherry filling.
- On each long side of the dough, left and right from the filling, make 2 inch long cuts about 1 inch apart. Check the photo at the end of the recipe.
- Starting at one end of the dough sheet, fold the strips over the filling from one side to the other, if you want on an angle.
- Bake the danish for 15-20 minutes, or until it is golden brown. Check at 15 minutes as it is probably ready.
- Remove the danish from the oven and let it completely cool before icing, around 20 - 30 minutes.
- Add the powdered sugar to a medium bowl, add two tablespoons of fresh lemon juice and mix until fully combined with no lumps. If the mixture is too thick add one more tablespoon of lemon juice. I like the glaze on the thicker side, yet pourable, so it will look white and shiny on the danish, not transparent.
- After the danish has cooled, use a fork or spoon to drizzle the lemon icing over the danish.
- Slice the danish and serve!